11/1/2020 Admin
Blazor and Azure B2C: The Big Picture

Azure Active Directory B2C is a service that allows your Blazor website users to log in using their preferred social, enterprise logins (or they can create a new local account in your Azure B2C tenant). Because this is a Azure Active Directory tenant, you have access to powerful features such as Multi Factor Authentication and Conditional Access control.
You can get more details at the following links:
- What is Azure Active Directory B2C? | Microsoft Docs
- Technical and feature overview - Azure Active Directory B2C | Microsoft Docs
The pricing is really affordable, basically you get the first 50,000 users for free.
- Also see: Creating A Blazor Server Azure B2C App
- Also see: Creating A Blazor WebAssembly Azure B2C Application
Why Use Azure B2C?
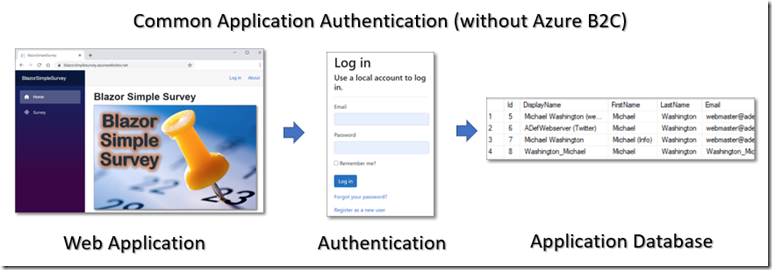
All this sounds good, but, why would you want to use Azure B2C rather than just logging users directly into your Azure tenant? Multi-Tenant Azure login has been available for years, and you can easily log in users using external providers such as Google and Facebook.

The key difference is that with Azure B2C, all your users, regardless of how they were authenticated, are contained (and controlled) in your Azure B2C tenant, allowing you (or your IT department) to apply conditional access policies. These are essential for providing the tightest security and user management. It is also easier for developers to code against because they are coding against one identity end-point rather than several.
Configuring Blazor to use Azure B2C (Using User Flows)
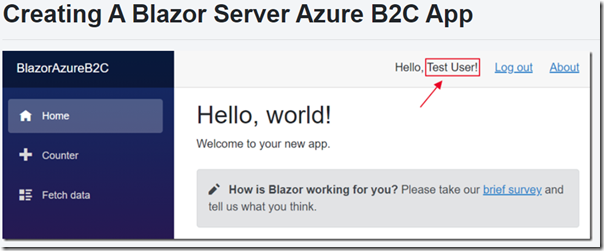
The easiest way to get started with Blazor and Azure B2C is to simply follow the directions in this article (that implements User Flows):
Creating A Blazor Server Azure B2C App
Register Azure AD B2C
See: Tutorial - Create an Azure Active Directory B2C tenant | Microsoft Docs

Configure Azure AD B2C Identity Provider & User Flow
See: Tutorial - Create user flows - Azure Active Directory B2C | Microsoft Docs

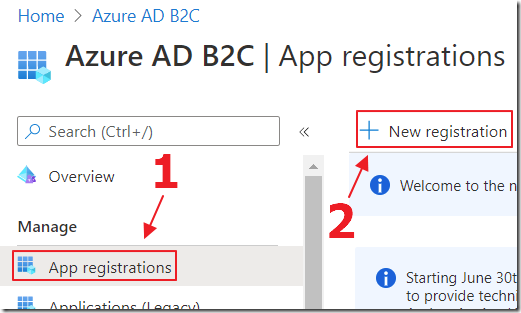
Register Apps in Azure AD B2C tenant
See: Tutorial: Register an application - Azure AD B2C | Microsoft Docs
Create a Blazor App and Enjoy!

Note: You can also use the directions here (but they are not for Server Side Blazor applications only Client Side Blazor applications):
- Secure an ASP.NET Core Blazor WebAssembly hosted app with Azure Active Directory B2C | Microsoft Docs
- How to Add Authentication to Blazor App using Azure B2C (Video)
Allow users from Any Azure AD Tenant To Log In
If the following login providers are sufficient, you are good to go at this point:
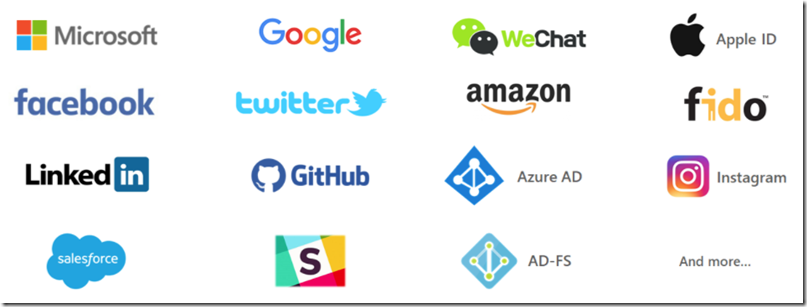
However, the provider for Microsoft Azure AD is not in the list.
You can enable it by following the directions at this link: Set up sign-in for an Azure AD organization - Azure AD B2C | Microsoft Docs. However, you have to set up each Azure tenant you want to provide access to one at a time.
If you desire to allow any Azure AD tenant to log in, you need to use Custom Policies.
The advantages of using Custom Policies vs. User Flows is described here:
Comparing user flows and custom policies
Custom Policies
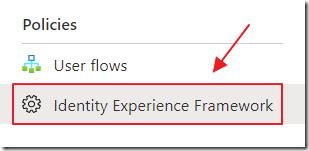
To use Custom Policies, the first step is to complete all the steps described here:
Get started with custom policies - Azure AD B2C | Microsoft Docs
This describes how to complete the following steps:

(1) Add signing and encryption keys

(2) Register Identity Experience Framework applications
- Register the IdentityExperienceFramework application
- Register the ProxyIdentityExperienceFramework application
You can now create a Custom Policies that will allow multi-tenant Azure AD login. To do that, complete the steps described here:
Set up sign-in for multi-tenant Azure AD by custom policies - Azure AD B2C | Microsoft Docs
To understand the details of the Custom Policies (basically the .xml format) see this link:
A Walkthrough For Azure AD B2C Custom Policy (Identity Experience Framework)
The official documentation is at this link:
Reference - trust frameworks in Azure Active Directory B2C | Microsoft Docs
Pass an access token through a custom policy
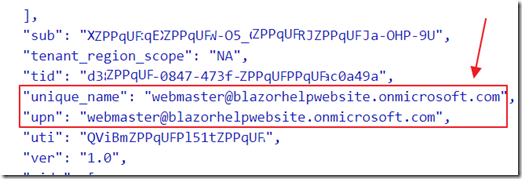
When using Azure Active Directory authentication, to get additional information on the user, the idp_access_token needs to be passed to your application code using the following directions: Pass an access token through a custom policy to your app - Azure AD B2C | Microsoft Docs.
That token allows access to additional information in the user’s Azure AD tenant.
Implementing Multi-Tenant Azure B2C in Blazor Simple Survey

Blazor Simple Survey is an open source Github project that demonstrates integrating Azure B2C in a Blazor Server Side application.
The application currently features code that logs a user in and stores their information in the SQL database for the application.
You can see a live example of the application at the following link: BlazorSimpleSurvey

You can log into the application using the Log In link.
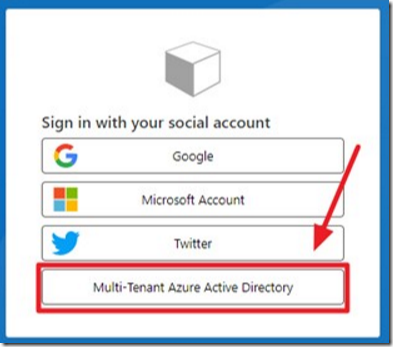
You will be presented with several login options, including the Multi-Tenant Azure Active Directory option.
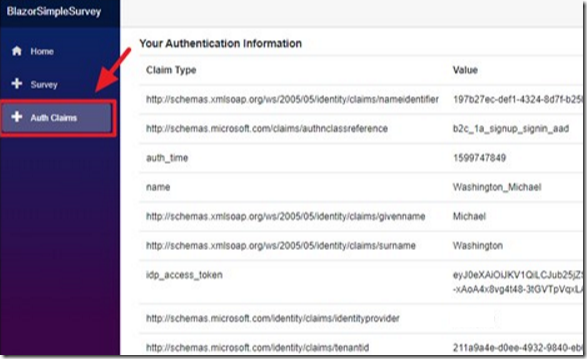
Once logged in, click Auth Claims to see the information the application is able to retrieve.
Implementing Custom Policies in Blazor Simple Survey

For Blazor Simple Survey, the desire was to allow any Azure AD tenant to log in so Custom Policies had to be implemented.
Primarily this required the configuration of the Identity Experience Framework that is described here: Get started with custom policies - Azure AD B2C | Microsoft Docs.
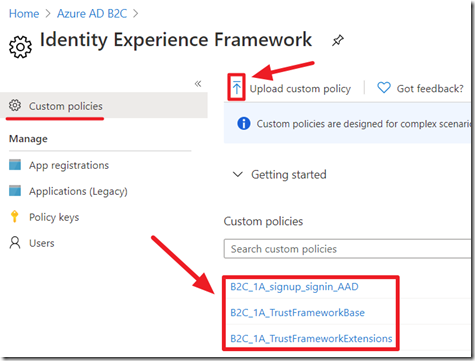
The end result is a series of custom .xml policies that allow login using the following providers:
- Azure Active Directory Multi-Tenant
- Microsoft Accounts

To create your own custom policies, you can start with the Custom policy starter pack available at this link: Get started with custom policies - Azure AD B2C | Microsoft Docs.
Or, you can access the custom policy files used for Blazor Simple Survey at the following location: BlazorSimpleSurvey/!AzureB2CConfig.
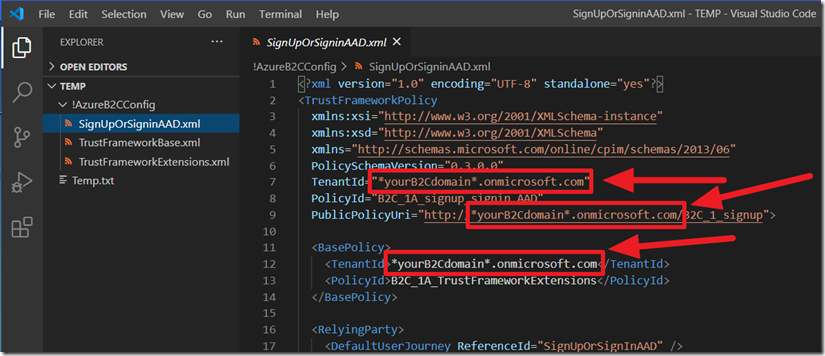
If using the custom policy files used for Blazor Simple Survey, you will have to update the files with the configuration values of your Azure B2C tenant.
Using an .xml editor like Visual Studio Code is recommended for editing the files.
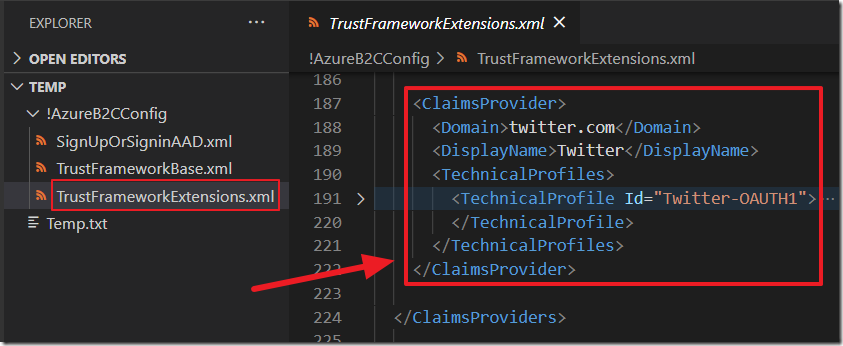
If there are providers that are not desired (or providers you want to add), the TrustFrameworkExtensions.xml file can be edited to remove (or add) the provider.
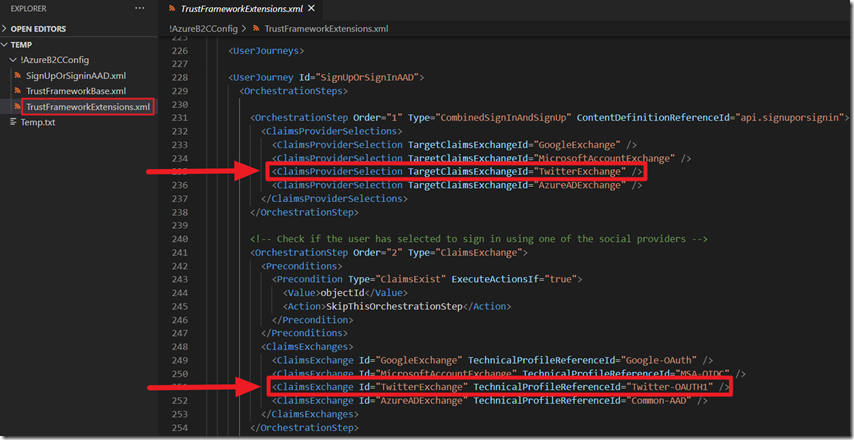
Also remove (or add) a reference to the provider in the UserJourney section.
- If using Azure Active Directory Multi-Tenant login follow these steps: B2C-Token-Includes-AzureAD-BearerToken
- If using Google login follow these steps: Set up sign-in with a Google account using custom policies in Azure Active Directory B2C
- If using Twitter login follow these steps: Set up sign-in with a Twitter account using custom policies in Azure Active Directory B2C
- If using Microsoft Accounts for login follow these steps: Set up sign-in with a Microsoft account using custom policies in Azure Active Directory B2C
See this link for additional details: Get started with custom policies - Azure AD B2C | Microsoft Docs.
Implementing Custom Policies
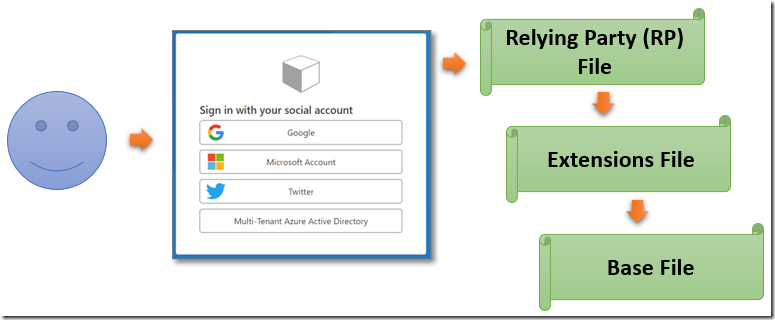
There are three types of policy files:
- Base File – This file contains most of the .xml policy definitions needed. You will make a minimum number of changes to this file.
- Extensions File – This file builds on top of the Base file and contains most of the unique configurations for your tenant. This is where you define the authentication providers such as Facebook, Twitter, and Azure multi-tenant authentication.
- Relying Party (RP) File – This is a single task-focused file that is invoked directly by the application or service (also, known as a Relying Party). Each unique task requires its own RP.
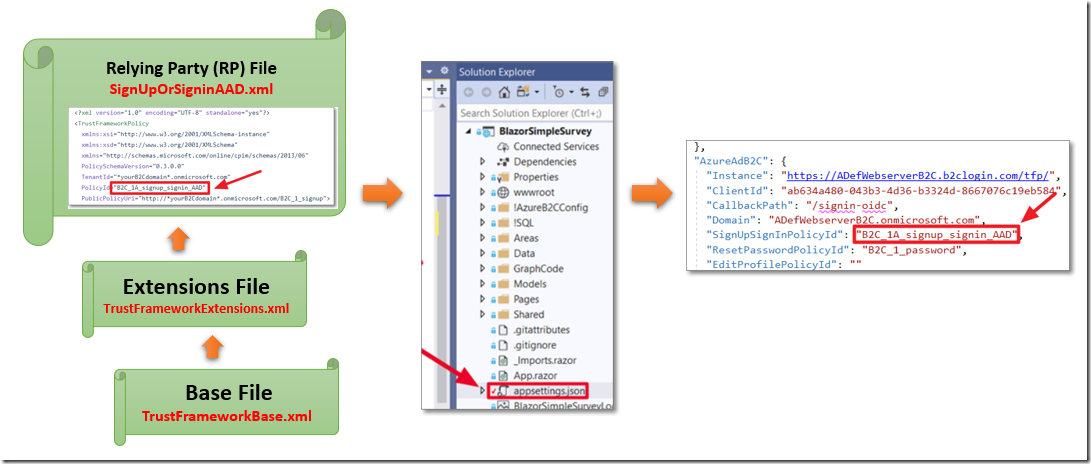
The files use the Inheritance Model which is basically:
- The application calls the Relying Party (RP) File, the Identity Experience Framework in Azure AD B2C adds all of the elements from the Base File, then the Extensions File, and finally the Relying Party (RP) File, to assemble the current policy (and features) to implement.
- Elements in the files, of the same type (and name) in the Relying Party (RP) File will override those elements in the Extensions File, and elements in the Extensions File, will override elements of the same type and name in the Base File.
- The PolicyId of the Relying Party (RP) File, is referenced in the Blazor application’s SignUpSignInPolicyId property in the appsettings.json file, to trigger the custom flow.
The login to the application is triggered by the Relying Party (RP) file. For Blazor Simple Survey, this is called: B2C_1A_signup_signin_AAD.

We then updated the SignUpSignInPolicyId property in the appsettings.json file with the name of this policy, so that policy would be triggered when a user clicked the Log In link.
Logging A User Into a Blazor Application And Storing Their Information In The Local SQL Server
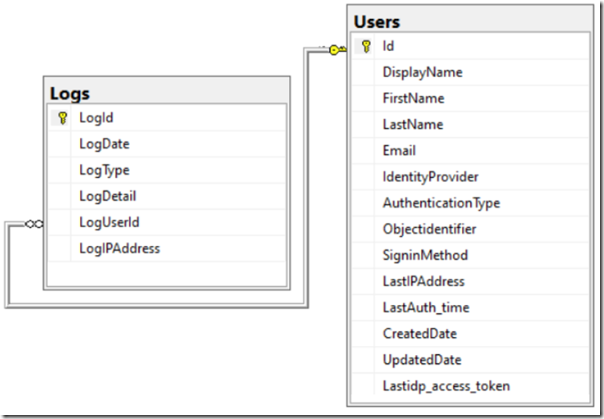
For Blazor Simple Survey, a Users and a Logs table were created in the local SQL database for the application, and an Entity Framework Core DataContext was created.
In the Startup.cs file, the following code is added to the ConfigureServices method to gather the login values and save (or update them) when the user logs in through Azure B2C:
// This is where you wire up to events to detect when a user logs inservices.AddAuthentication(OpenIdConnectDefaults.AuthenticationScheme).AddMicrosoftIdentityWebApp(options =>{Configuration.Bind("AzureAdB2C", options);options.Events = new OpenIdConnectEvents{OnRedirectToIdentityProvider = async ctxt =>{// Invoked before redirecting to the identity provider to authenticate.// This can be used to set ProtocolMessage.State// that will be persisted through the authentication process.// The ProtocolMessage can also be used to add or customize// parameters sent to the identity provider.await Task.Yield();},OnAuthenticationFailed = async ctxt =>{// They tried to log in but it failedawait Task.Yield();},OnTicketReceived = async ctxt =>{if (ctxt.Principal.Identity is ClaimsIdentity identity){// Set common valuesAuthClaims objAuthClaims = new AuthClaims();var colClaims = await ctxt.Principal.Claims.ToDynamicListAsync();objAuthClaims.IdentityProvider = colClaims.FirstOrDefault(c => c.Type =="http://schemas.microsoft.com/identity/claims/identityprovider")?.Value;objAuthClaims.Objectidentifier = colClaims.FirstOrDefault(c => c.Type =="http://schemas.xmlsoap.org/ws/2005/05/identity/claims/nameidentifier")?.Value;objAuthClaims.EmailAddress = colClaims.FirstOrDefault(c => c.Type =="http://schemas.xmlsoap.org/ws/2005/05/identity/claims/emailaddress")?.Value;objAuthClaims.FirstName = colClaims.FirstOrDefault(c => c.Type =="http://schemas.xmlsoap.org/ws/2005/05/identity/claims/givenname")?.Value;objAuthClaims.LastName = colClaims.FirstOrDefault(c => c.Type =="http://schemas.xmlsoap.org/ws/2005/05/identity/claims/surname")?.Value;objAuthClaims.AzureB2CFlow = colClaims.FirstOrDefault(c => c.Type =="http://schemas.microsoft.com/claims/authnclassreference")?.Value;objAuthClaims.auth_time = colClaims.FirstOrDefault(c => c.Type == "auth_time")?.Value;objAuthClaims.DisplayName = colClaims.FirstOrDefault(c => c.Type == "name")?.Value;objAuthClaims.idp_access_token = colClaims.FirstOrDefault(c => c.Type == "idp_access_token")?.Value;// Google loginif (objAuthClaims.IdentityProvider.ToLower().Contains("google")){objAuthClaims.AuthenticationType = "Google";}// Microsoft account loginif (objAuthClaims.IdentityProvider.ToLower().Contains("live")){objAuthClaims.AuthenticationType = "Microsoft";}// Twitter loginif (objAuthClaims.IdentityProvider.ToLower().Contains("twitter")){objAuthClaims.AuthenticationType = "Twitter";}// Azure Active Directory login// But this will only work if Azure B2C Custom Policy is configured// to pass the idp_access_token// See \!AzureB2CConfig\TrustFrameworkExtensions.xml// for an example that does thatif (objAuthClaims.idp_access_token != null){objAuthClaims.AuthenticationType = "Azure Active Directory";try{var token =new System.IdentityModel.Tokens.Jwt.JwtSecurityToken(objAuthClaims.idp_access_token);objAuthClaims.EmailAddress =token.Claims.FirstOrDefault(c => c.Type == "upn")?.Value;}catch (System.Exception){// Could not decode - do nothing}}var request = ctxt.HttpContext.Request;var host = request.Host.ToUriComponent();// Insert into Databasevar optionsBuilder = new DbContextOptionsBuilder<SimpleSurveyContext>();optionsBuilder.UseSqlServer(Configuration.GetConnectionString("DefaultConnection"));SimpleSurveyContext _context = new SimpleSurveyContext(optionsBuilder.Options);var ExistingUser = _context.Users.Where(x => x.Objectidentifier == objAuthClaims.Objectidentifier).FirstOrDefault();if (ExistingUser == null){// New User// Create User objectvar objUser = new Users();try{objUser.Objectidentifier = objAuthClaims.Objectidentifier;objUser.AuthenticationType = objAuthClaims.AuthenticationType;objUser.IdentityProvider = objAuthClaims.IdentityProvider;objUser.SigninMethod = objAuthClaims.AzureB2CFlow;objUser.DisplayName = objAuthClaims.DisplayName;objUser.Email = objAuthClaims.EmailAddress;objUser.FirstName = objAuthClaims.FirstName;objUser.LastName = objAuthClaims.LastName;objUser.LastAuthTime = Convert.ToInt32(objAuthClaims.auth_time);objUser.LastidpAccessToken = objAuthClaims.idp_access_token;objUser.LastIpaddress = host;objUser.CreatedDate = DateTime.Now;_context.Users.Add(objUser);_context.SaveChanges();// Write to Logvar objLogs = new Logs();objLogs.LogType = "Login";objLogs.LogDate = DateTime.Now;objLogs.LogDetail = "New User";objLogs.LogUserId = objUser.Id;objLogs.LogIpaddress = host;_context.Logs.Add(objLogs);_context.SaveChanges();}catch (Exception ex){// Write to Logvar objLogs = new Logs();objLogs.LogType = "Login Error - New User";objLogs.LogDate = DateTime.Now;objLogs.LogDetail =String.Format($"User: {objUser.DisplayName} " +$"Objectidentifier: {objUser.Objectidentifier} " +$"Message: {ex.GetBaseException().Message}");objLogs.LogIpaddress = host;_context.Logs.Add(objLogs);_context.SaveChanges();}}else{// Update Existing Usertry{ExistingUser.AuthenticationType = objAuthClaims.AuthenticationType;ExistingUser.IdentityProvider = objAuthClaims.IdentityProvider;ExistingUser.SigninMethod = objAuthClaims.AzureB2CFlow;ExistingUser.DisplayName = objAuthClaims.DisplayName;ExistingUser.Email = objAuthClaims.EmailAddress;ExistingUser.FirstName = objAuthClaims.FirstName;ExistingUser.LastName = objAuthClaims.LastName;ExistingUser.LastAuthTime = Convert.ToInt32(objAuthClaims.auth_time);ExistingUser.LastidpAccessToken = objAuthClaims.idp_access_token;ExistingUser.LastIpaddress = host;ExistingUser.UpdatedDate = DateTime.Now;_context.SaveChanges();// Write to Logvar objLogs = new Logs();objLogs.LogType = "Login";objLogs.LogDate = DateTime.Now;objLogs.LogDetail = "Existing User";objLogs.LogUserId = ExistingUser.Id;objLogs.LogIpaddress = host;_context.Logs.Add(objLogs);_context.SaveChanges();}catch (Exception ex){// Write to Logvar objLogs = new Logs();objLogs.LogType = "Login Error - Existing User";objLogs.LogDate = DateTime.Now;objLogs.LogUserId = ExistingUser.Id;objLogs.LogDetail = ex.GetBaseException().Message;objLogs.LogIpaddress = host;_context.Logs.Add(objLogs);_context.SaveChanges();}}}await Task.Yield();},};});services.AddControllersWithViews().AddMicrosoftIdentityUI();
Also See
Creating A Blazor Server Azure B2C App
Creating A Blazor WebAssembly Azure B2C Application
Blazor Azure B2C User And Group Management
Blazor Simple Survey: Creating Dynamic Surveys
Links
ADefWebserver/BlazorSimpleSurvey: Blazor Simple Survey (github.com)
Azure Active Directory B2C documentation | Microsoft Docs
What is Azure Active Directory B2C? | Microsoft Docs
How to Add Authentication to Blazor App using Azure B2C (Video)
Azure AD B2C Community (github.com) and azure-ad-b2c/samples: Azure AD B2C Identity Experience Framework sample User Journeys. (github.com)
Everything you wanted to know about Azure AD B2C custom policy samples but were afraid to ask!
Azure AD B2C OnTicketReceived newUser Claim | C# Tutorials Blog (wellsb.com)
