10/27/2024 Admin
Creating A Step-By-Step End-To-End Database Server-Side Blazor Application (updated to .Net 9)
The primary benefit we have when using server-side Blazor is that we do not have to make web http calls from the client code to the server code. This reduces the code we need to write and eliminates many security concerns.
In this article, we will demonstrate how a list of Weather forecasts can be added to the database by each user. A user will only have the ability to see their own forecasts.
Use SQL Server
The new project template in Visual Studio will allow you to create a database using SQL Server Express LocalDB. However, it can be problematic to install and configure. Using the free SQL Server 2022 Developer server (or the full SQL Server) is recommended.
Download and install SQL Server 2022 Developer Edition from the following link:
https://www.microsoft.com/en-us/sql-server/sql-server-downloads
Create The Blazor Application
Open Visual Studio.

Select Create a new Project.
Select Blazor App and click Next.
Name it EndToEnd and click Next.
Select .Net 9.
Select Individual Accounts under Authentication.
Click Create.
The project will be created.
Create The Database
Open the SQL Server Object Explorer.
Add a connection to your local database server if you don’t already have it in the SQL Server list.
For this tutorial, we do not want to use the SQL Express server on (localdb) that you may already see in the list.
You will specify just the server and Connect.
Expand the tree under the local SQL server, right-click on the Databases folder and select Add New Database.
Give the database a name and press Enter.
The database will be created.
Click on the tree node to expand the database
Right-Click on the Database node and select Refresh (important because this causes the Properties to properly load).
Right-Click on the Database node again and select Properties.
Open the Properties window if it is not already opened.
The Properties window for the database will display.
Copy the Connection string for the database.
Open the appsettings.json file.
Paste in the connection string for the DefaultConnection and save the file.
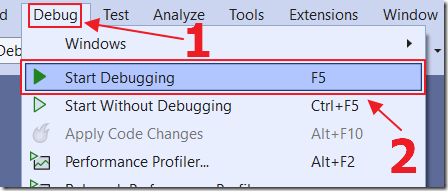
Hit F5 to run the application.
The application will open in your web browser.
Click the Register link.
Enter the information to create a new account.
Click the Register button.
Because this is the first time the database is being used, you will see a message asking you to run the migration scripts that will create the database objects needed to support the user membership code.
Click the Apply Migrations button.
After the message changes to Migrations Applied, refresh the page in the web browser.
After clicking refresh in your web browser, a popup will require you to click Continue.
Click the Click here to confirm your account link.
The Confirm email page will display the confirmation notice.
Now you can click the Log in link to log in using the account you just created.
You will now be logged into the application.
You can click around the application and see that it works.
The Weather page currently shows random data. We will alter the application to allow us to add, update, and delete this data in the database.
Close the web browser to stop the application.
Do Not Require Account Confirmation
If we do not intend to configure email account verification (using the directions at this link), we can open the Program.cs file and change the following line:
builder.Services.AddIdentityCore<ApplicationUser>(options => options.SignIn.RequireConfirmedAccount = true).AddEntityFrameworkStores<ApplicationDbContext>().AddSignInManager().AddDefaultTokenProviders();
To:
builder.Services.AddIdentityCore<ApplicationUser>(options => options.SignIn.RequireConfirmedAccount = false).AddEntityFrameworkStores<ApplicationDbContext>().AddSignInManager().AddDefaultTokenProviders();
Create The Database
In the SQL Server Object Explorer window, in Visual Studio, we see the tables that the migration scripts added.
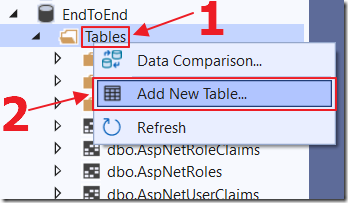
Right-click on the Tables node and select Add New Table.
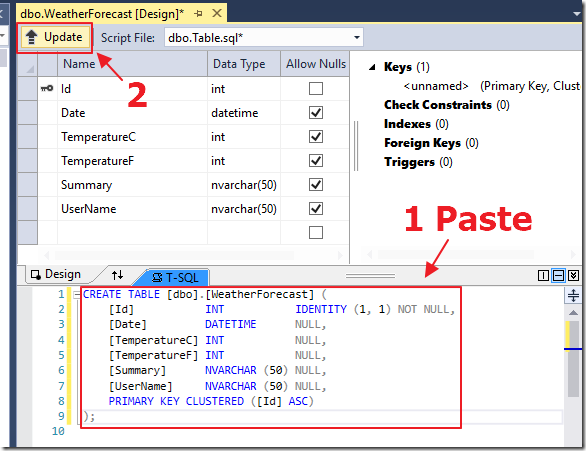
Paste the following script in the T-SQL window and then click the Update button:
CREATE TABLE [dbo].[WeatherForecast] ([Id] INT IDENTITY (1, 1) NOT NULL,[Date] DATETIME NULL,[TemperatureC] INT NULL,[TemperatureF] INT NULL,[Summary] NVARCHAR (50) NULL,[UserName] NVARCHAR (50) NULL,PRIMARY KEY CLUSTERED ([Id] ASC));
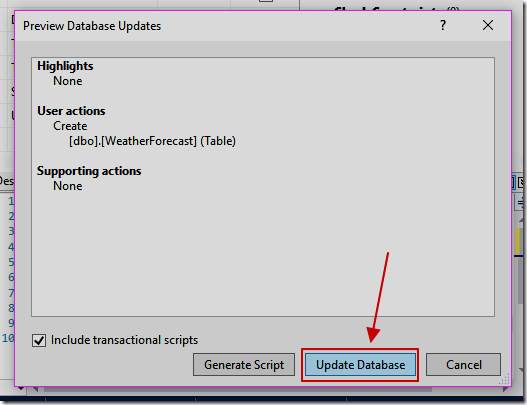
The script will prepare.
Click the Update Database button.
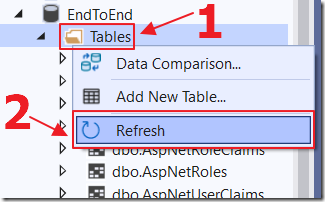
Back in the Server Explorer window, right-click on Tables and select Refresh.
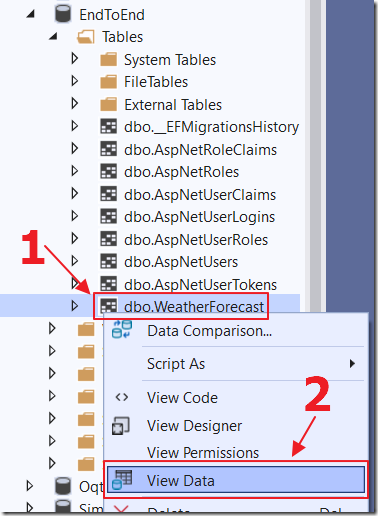
The WeatherForecast table will display.
Right-click on the table and select Show Table Data.
We will enter some sample data so that we will be able to test the data connection in the next steps.
Set the UserName field to the username of the user that we registered an account for earlier.
Create The Data Context
If you do not already have it installed, install EF Core Power Tools from:
https://marketplace.visualstudio.com/items?itemName=ErikEJ.EFCorePowerTools
(Note: Please give this project a 5 star review on marketplace.visualstudio.com!)
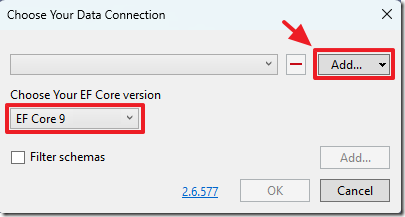
Right-click on the project node in the Solution Explorer and select EF Core Power Tools then Reverse Engineer.
Click the Add button.
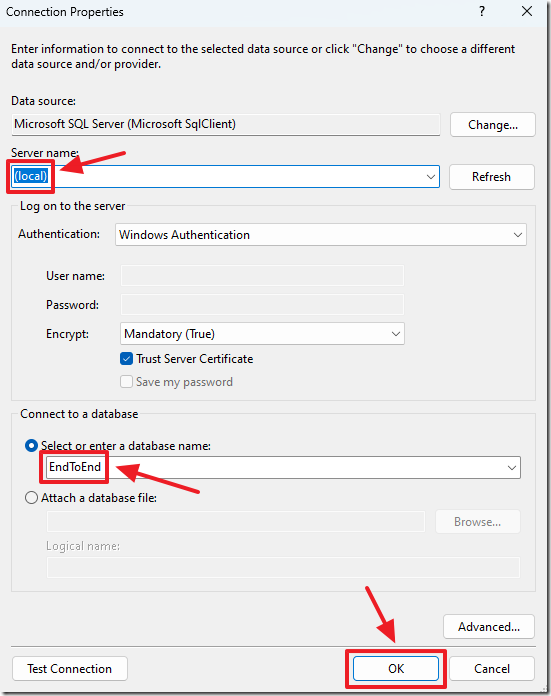
Select Add Database Connection.
Connect to the database.
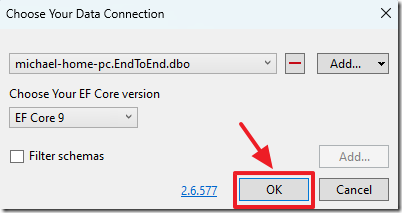
Select the database connection in the dropdown and click OK.
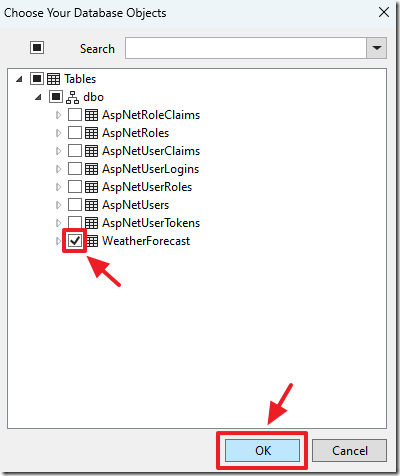
Select the WeatherForecast table and click OK.
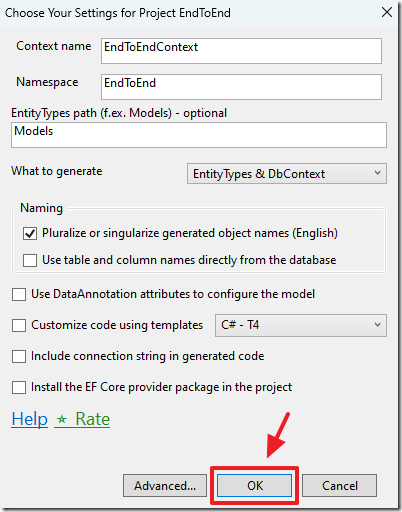
Set the values and click OK.
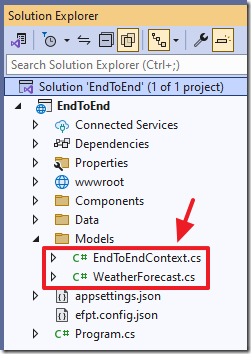
In the Solution Explorer, you will see the Data Context has been created.
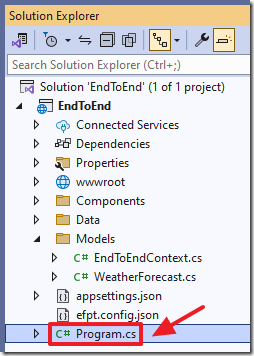
Open the Program.cs file.
Add the following code above the var app = builder.Build(); line:
#if DEBUG// Logging data with EnableSensitiveDataLogging is a security risk, as it may expose passwords// and other Personally Identifiable Information (PII) when it logs SQL statements executed// against the database. Only enable EnableSensitiveDataLogging for development and testingbuilder.Services.AddDbContextFactory<EndToEndContext>(options =>options.UseSqlServer(connectionString).EnableSensitiveDataLogging());#elsebuilder.Services.AddDbContextFactory<EndToEndContext>(options =>options.UseSqlServer(connectionString));#endif

Save the file.
Select Build, then Rebuild Solution.
Read From The Database
We want to replace the current Weather.razor page with a page that reads and writes to the database.
The first step is to add support for the QuickGrid component that will display the data.
Install the following NuGet packages:
Microsoft.AspNetCore.Components.QuickGrid
Microsoft.AspNetCore.Components.QuickGrid.EntityFrameworkAdapter
Open the Program.cs file.
Add the following code above the var app = builder.Build(); line:
builder.Services.AddQuickGridEntityFrameworkAdapter();builder.Services.AddDatabaseDeveloperPageExceptionFilter();
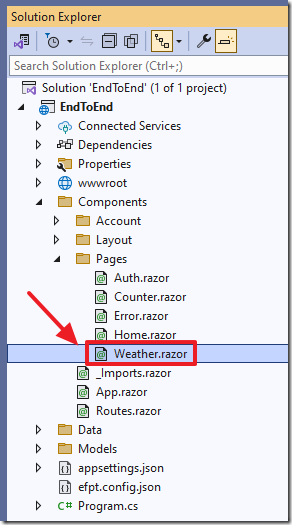
Open the Weather.razor file.
Replace all the code with the following code:
@page "/weather"@attribute [Authorize]@using EndToEnd.Components.Account@using EndToEnd.Data@using Microsoft.EntityFrameworkCore@using Microsoft.AspNetCore.Authorization@using Microsoft.AspNetCore.Components.QuickGrid@using EndToEnd.Models@using System.Security.Claims@implements IAsyncDisposable@inject IDbContextFactory<EndToEndContext> DbFactory@inject AuthenticationStateProvider AuthenticationStateProvider
Primarily this injects the EndToEndContext that connects to the database and the AuthenticationStateProvider that allows access to the currently authenticated user.
Note we add the [Authorize] tag to restrict access to this page to authenticated users.
If a user is not authenticated, they will automatically be redirected to the login page.
Also note that this page implements IAsyncDisposable.
This requires us to implement a DisposeAsync method in the @code block that will dispose of the EndToEndContext, that connects to the database, when the user navigates away from the page:
@code {#nullable disableprivate EndToEndContext context = default!;public async ValueTask DisposeAsync(){// Dispose the contextawait context.DisposeAsync();}}
Next add the following markup to display the header and the name of the current user:
<PageTitle>Weather</PageTitle><h1>Weather</h1><p>Current user: @CurrentUser</p>
Also add the markup for the QuickGrid:
<QuickGrid @ref="myGrid" Class="table table-striped" Items="WeatherForecasts"><PropertyColumn Property="weatherforecast => weatherforecast.Date" Sortable="true" /><PropertyColumn Property="weatherforecast => weatherforecast.TemperatureC" Sortable="true" /><PropertyColumn Property="weatherforecast => weatherforecast.TemperatureF" Sortable="true" /><PropertyColumn Property="weatherforecast => weatherforecast.Summary" Sortable="true" /><PropertyColumn Property="weatherforecast => weatherforecast.UserName" /></QuickGrid>
Next, add the following fields to the @code section:
private IQueryable<WeatherForecast> WeatherForecasts;private WeatherForecast selectedWeatherForecast = new();private QuickGrid<WeatherForecast> myGrid;private string CurrentUser = "";
Finally, add the following methods:
protected override void OnInitialized(){// Create a new database contextcontext = DbFactory.CreateDbContext();}protected override async Task OnInitializedAsync(){// Get the current uservar authState =await AuthenticationStateProvider.GetAuthenticationStateAsync();if (authState.User.Identity is not null && authState.User.Identity.IsAuthenticated){// Set the current userCurrentUser = authState.User.Identity.Name;// Load weather forecasts for the current userWeatherForecasts = context.WeatherForecasts.Where(w => w.UserName == CurrentUser);}}
Build and run the project.
If we are not logged in, and we go to the Weather page, we will be directed to the Login page.
Log in as the user we created data for earlier.
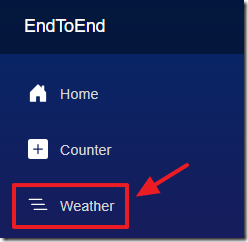
After you are logged in, switch to the Weather page and you will see the data for the user we entered earlier.
Stop the project and return to Visual Studio.
Inserting Data Into The Database
Open the Weather.razor file and add the following fields:
private bool isPopupVisible, isDeletePopupVisible = false;private string modalTitle = "Create New Weather Forecast";private string modalButtonText = "Save";private bool isEditMode = false;
Add the following HTML markup, to implement a Create New button, above the existing table element:
<p><button class="btn btn-primary" @onclick="() => CreateNew()">Create New</button></p>
Add the following code below the table code to create a popup to allow a new record to be created (and later edited):
<!-- Reusable Modal -->@if (isPopupVisible){<div class="modal fade show" style="display: block;" tabindex="-1"><div class="modal-dialog"><div class="modal-content"><div class="modal-header"><h5 class="modal-title">@modalTitle</h5><button type="button" class="btn-close" @onclick="ClosePopup"></button></div><div class="modal-body"><EditForm Model="selectedWeatherForecast" OnValidSubmit="HandleFormSubmit"class="needs-validation" novalidate><DataAnnotationsValidator /><ValidationSummary /><div class="mb-3"><label for="date" class="form-label">Date</label><InputDate @bind-Value="selectedWeatherForecast.Date"class="form-control" id="date" /></div><div class="mb-3"><label for="tempC" class="form-label">Temperature (C)</label><InputNumber @bind-Value="selectedWeatherForecast.TemperatureC"class="form-control" id="tempC" /></div><div class="mb-3"><label for="tempF" class="form-label">Temperature (F)</label><InputNumber @bind-Value="selectedWeatherForecast.TemperatureF"class="form-control" id="tempF" /></div><div class="mb-3"><label for="summary" class="form-label">Summary</label><InputText @bind-Value="selectedWeatherForecast.Summary"class="form-control" id="summary" /></div><button type="submit" class="btn btn-primary">@modalButtonText</button></EditForm></div></div></div></div><div class="modal-backdrop fade show"></div>}
This adds a form (that will be displayed as popup because the class for the DIV is modal), that allows the user to enter (and later edit) data for a forecast.
We do not need JavaScript to make this popup show. We only need to wrap this code with:
@if (isPopupVisible){...}
When the isPopupVisible value is true the popup will show. When the value is false, the popup will disappear.
Add the following code to the @code section:
private void CreateNew(){// Create a new weather forecastselectedWeatherForecast = new WeatherForecast();selectedWeatherForecast.Date = DateTime.Now;selectedWeatherForecast.UserName = CurrentUser;// Show the popupShowPopup(selectedWeatherForecast, isEdit: false);}private void ShowPopup(WeatherForecast weatherForecast, bool isEdit){// Set the selected weather forecastselectedWeatherForecast = weatherForecast;isEditMode = isEdit;modalTitle = isEdit ? "Edit Weather Forecast" : "Create New Weather Forecast";modalButtonText = isEdit ? "Save Changes" : "Save";// Show the popupisPopupVisible = true;}private void ClosePopup(){// Close the popupisPopupVisible = false;}private async Task HandleFormSubmit(){if (isEditMode){// Update the selected weather forecastcontext.WeatherForecasts.Update(selectedWeatherForecast);}else{// Add the selected weather forecastcontext.WeatherForecasts.Add(selectedWeatherForecast);}// Save changesawait context.SaveChangesAsync();await myGrid.RefreshDataAsync();// Close the popupClosePopup();}
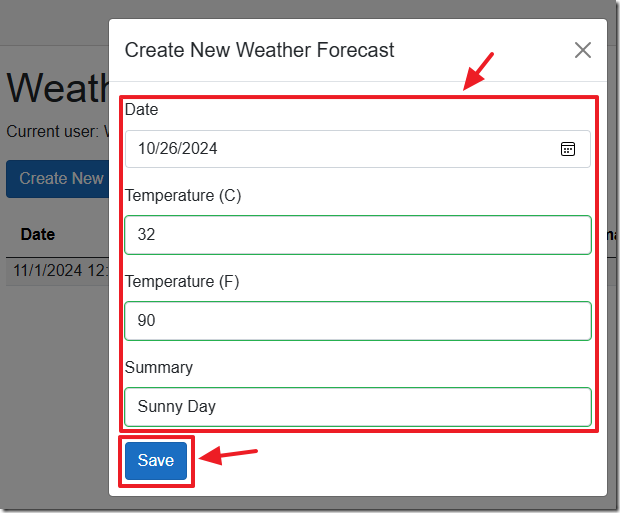
When you run the project, you can click the Create New button to add an entry.
The form only requires a Date, Fahrenheit, Celsius, and a summary, because the username, will be set by the code.
After clicking the Save button, the entry is saved to the database and displayed.
Updating The Data
Add the following code to the existing table element that adds an edit button in the last column (that calls the ShowPopup method created earlier):
<TemplateColumn Context="weatherforecast"><button @onclick="() => ShowPopup(weatherforecast, isEdit: true)"class="btn btn-link p-0 m-0 border-0 text-decoration-underline">Edit</button></TemplateColumn>
This sets the current record to the objWeatherForecast object that the popup is bound to, and opens the popup.
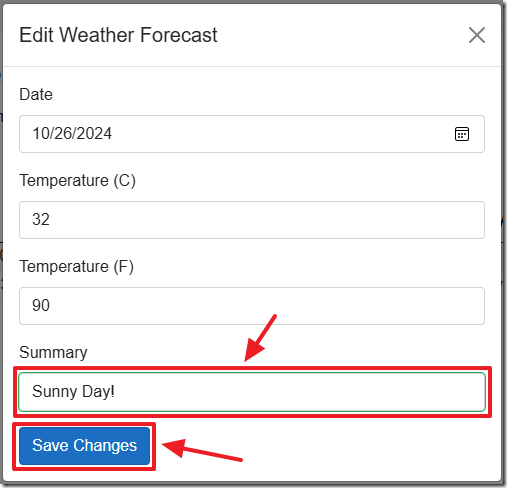
When we run the application, we now have an Edit button to edit the existing record.
The existing record will display in the popup, allowing us to edit the data and save it.
The updated record is then displayed in the table.
Deleting The Data
Add code markup for a Delete button to the TemplateColumn tag:
| <button @onclick="() => ShowDeletePopup(weatherforecast)"class="btn btn-link p-0 m-0 border-0 text-decoration-underline text-danger">Delete</button>
Add the following markup code for a delete confirmation popup:
<!-- Delete Confirmation Modal -->@if (isDeletePopupVisible){<div class="modal fade show" style="display: block;" tabindex="-1"><div class="modal-dialog"><div class="modal-content"><div class="modal-header"><h5 class="modal-title">Delete Weather Forecast</h5><button type="button" class="btn-close"@onclick="CloseDeletePopup"></button></div><div class="modal-body"><p>Are you sure you want to delete this forecast?</p><button class="btn btn-danger"@onclick="HandleDelete">Delete</button><button class="btn btn-secondary"@onclick="CloseDeletePopup">Cancel</button></div></div></div></div><div class="modal-backdrop fade show"></div>}
Add the following code to the @code section:
private void ShowDeletePopup(WeatherForecast weatherForecast){// Set the selected weather forecastselectedWeatherForecast = weatherForecast;// Show the delete popupisDeletePopupVisible = true;}private void CloseDeletePopup(){// Close the delete popupisDeletePopupVisible = false;}private async Task HandleDelete(){// Remove the selected weather forecastcontext.WeatherForecasts.Remove(selectedWeatherForecast);await context.SaveChangesAsync();await myGrid.RefreshDataAsync();// Close the delete popupCloseDeletePopup();}
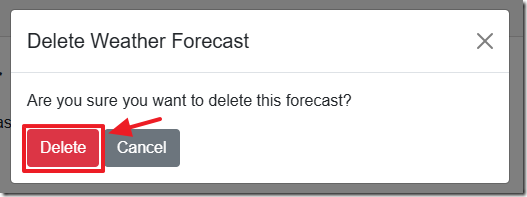
When we run the code and click the Delete button next to a record…
It opens a delete confirmation popup.
We now see a Delete button that will delete the record.
Links
ASP.NET Core Blazor authentication and authorization
Download
The project is available on the Downloads page on this site.
You must have Visual Studio 2022 (or higher) installed to run the code.


