12/24/2021 Admin
Creating A Blazor WebAssembly Azure B2C Application
You can authenticate the users in your Blazor Client (WebAssembly) .NET Core 6 application (and even manage your users) using Azure Active Directory B2C.
In this example we will create a hosted Blazor WebAssembly application, that will consist of two applications; a Blazor WebAssembly application, and a Blazor Server application that the Blazor WebAssembly application communicates with to access back-end services such as databases.
Also see: Creating A Blazor Server Azure B2C App
Azure Active Directory B2C
Azure Active Directory B2C is a service that allows your Blazor website users to log in using their preferred social or enterprise logins (or they can create a new local account in your Azure B2C tenant). Because this is an Azure Active Directory tenant, you have access to powerful features such as Multi Factor Authentication and Conditional Access control.
You can get more details at the following links:
- What is Azure Active Directory B2C? | Microsoft Docs
- Technical and feature overview - Azure Active Directory B2C | Microsoft Docs
The pricing is really affordable, basically you get the first 50,000 users for free.
Set-Up An Azure Active Directory B2C Tenant

Creating an Azure Active Directory B2C Tenant requires an Azure Account.
Sign in to the Azure Portal using an existing account at: https://portal.azure.com/ or sign-up for a new one at: https://azure.microsoft.com/en-us/free/.
Note: An Azure account that's been assigned at least the Contributor role within the Azure subscription or a resource group within the subscription is required.
Follow the directions here: Tutorial - Create an Azure Active Directory B2C tenant | Microsoft Docs

In the Azure Portal, click Create a resource and search for Azure Active Directory B2C and press enter.

Click Create.

Click Create a new Azure AD B2C Tenant.

Fill out the form and click Review + Create.
Note: After you create the Azure B2C Tenant, you will need to link it to an Azure account for billing. To do this, follow the directions here: Billing model for Azure Active Directory B2C | Microsoft Docs

After the Azure B2C Tenant is set up, search for it and select it using the All resources.

This will direct you to a screen that will display a link to allow you to navigate to the tenant.
Register A Server Web Application

We will need to create two Azure B2C App registrations. One that the Blazor Server application will use to communicate and one that the Blazor WebAssembly will use.
To allow the Blazor Server application, to interact with Azure Active Directory B2C Tenant, select App Registrations, then New registration.
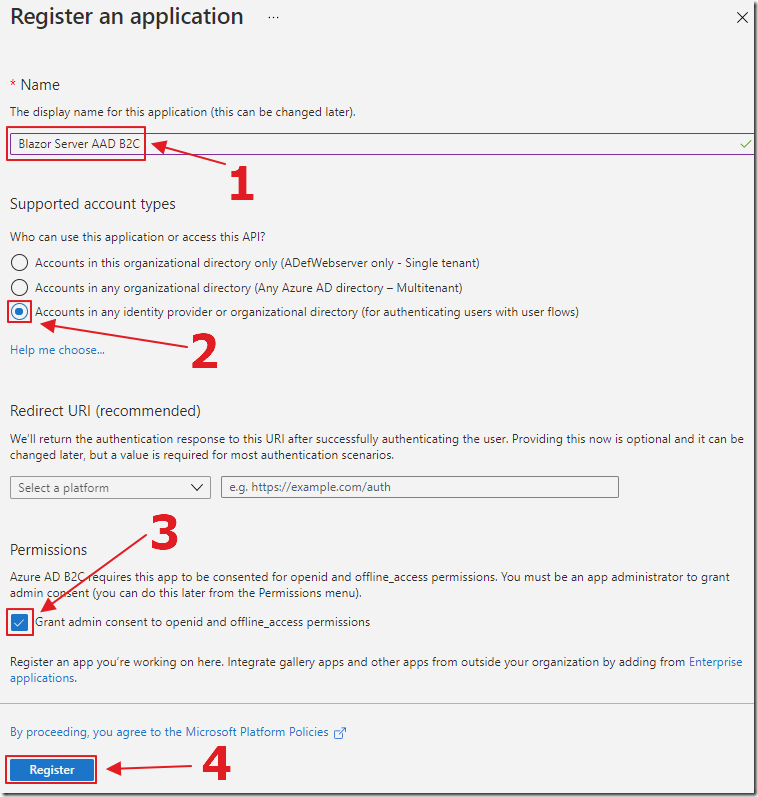
Give the application a Name, Select Accounts in any identity provider or organizational directory, also Grant admin consent to openid and offline_access permissions, and click Register.
The App Registration will be created.
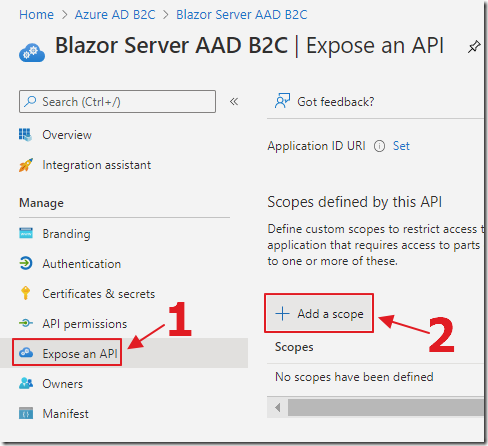
The Server registration needs to expose an API that the Client registration (to be created later) will connect to.
Select Expose an API then Add a scope.
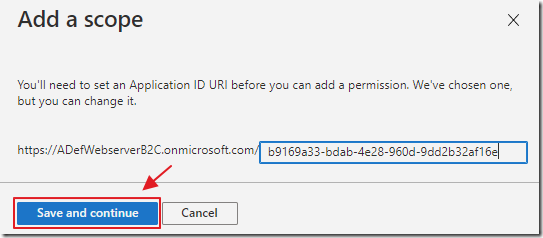
Accept the default value and click Save and continue.
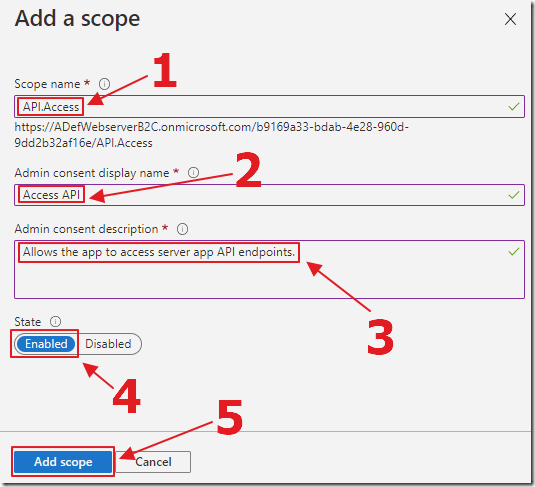
Enter values and select Add scope.
Register A Client (WebAssembly) Web Application

To allow the Blazor WebAssembly application, to interact with Azure Active Directory B2C Tenant, select App Registrations, then New registration.
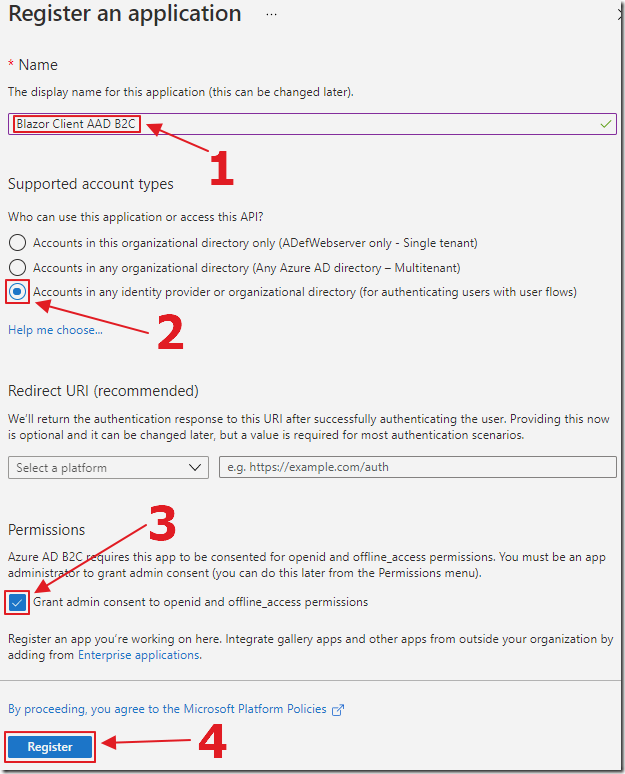
Give the application a Name, Select Accounts in any identity provider or organizational directory, also Grant admin consent to openid and offline_access permissions, and click Register.
The App Registration will be created.
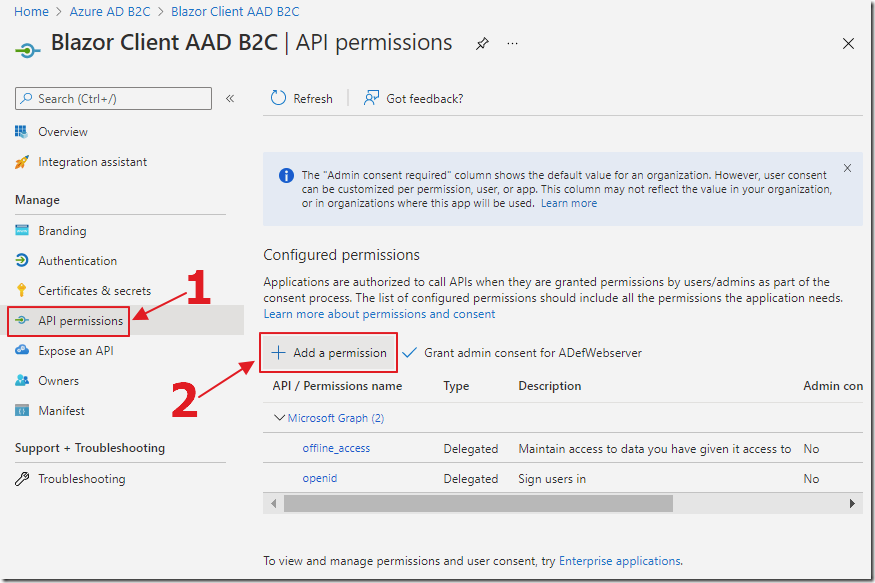
Select API permissions, then Add a permission.
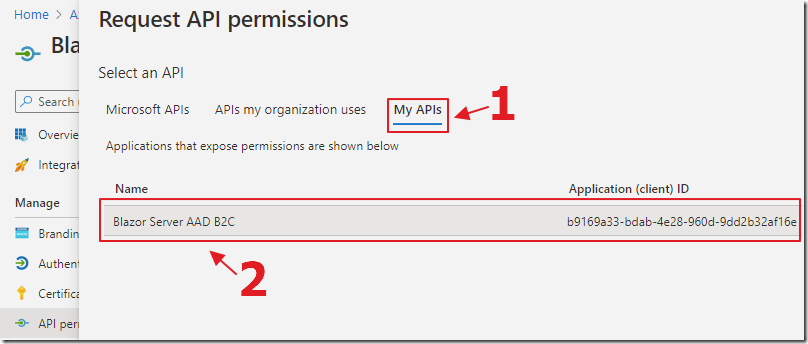
Select My APIs then the Server app registration created earlier.
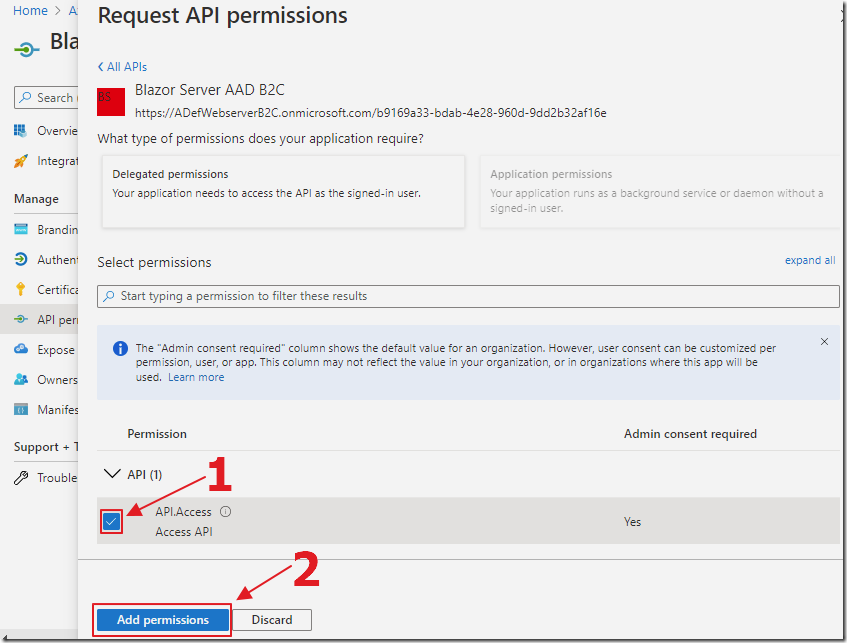
Select the API created earlier, and click Add permissions.
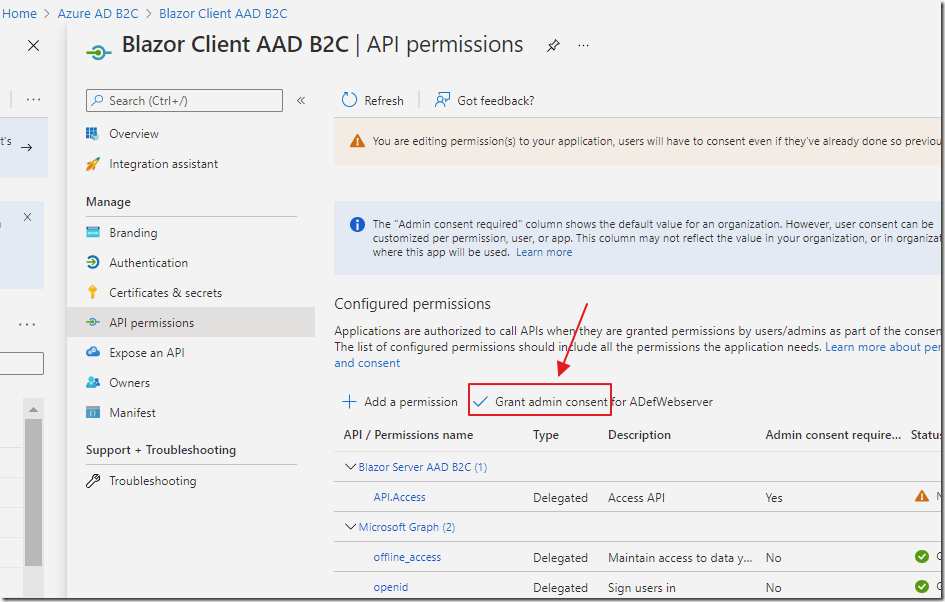
Click the Grant admin consent button and confirm when the confirmation popup displays.
Configure Azure B2C Application Identity Provider & User Flow
In this example we will create a User Flow to allow login using a Microsoft Account using the directions here: Set up sign-up and sign-in with a Microsoft Account - Azure AD B2C | Microsoft Docs.

In the Azure B2C Tenant, click User flows then select New user flow.

Select Sign up and sign In.

Select Recommended for the Version and click Create.

Give the Flow a name and select None for Local accounts and Microsoft Account for Social Identity providers.
If you don’t see the Microsoft option see: Configure Microsoft as an identity provider.

Select options for Multifactor authentication.

For User attributes and token claims, select Show more…

Select the options in the image above.
Click Ok.
![]()
Finally, click Create.

The Flow will show in the User flows section.
Clicking on it will allow further configuration if needed.
Create The Blazor Azure B2C Application

Using Visual Studio 2022 (or higher) Create a new project.

Select Blazor WebAssembly App and click Next.
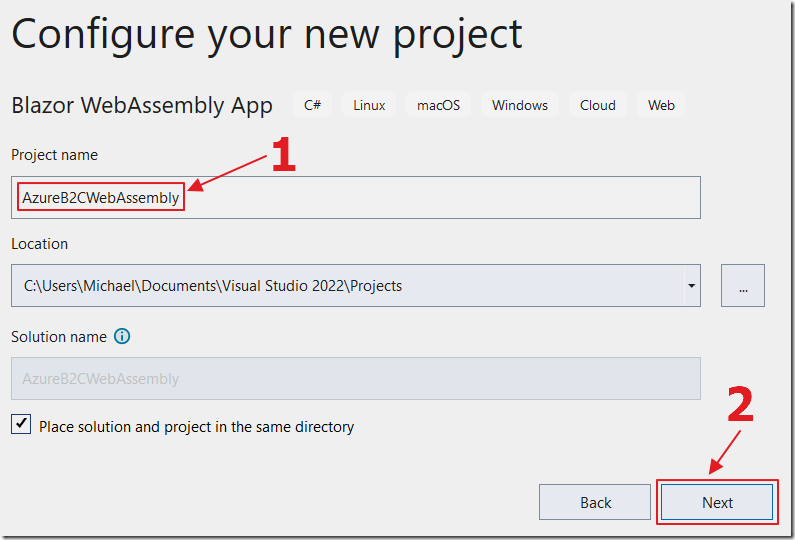
Name the project AzureB2CWebAssembly and click Next.
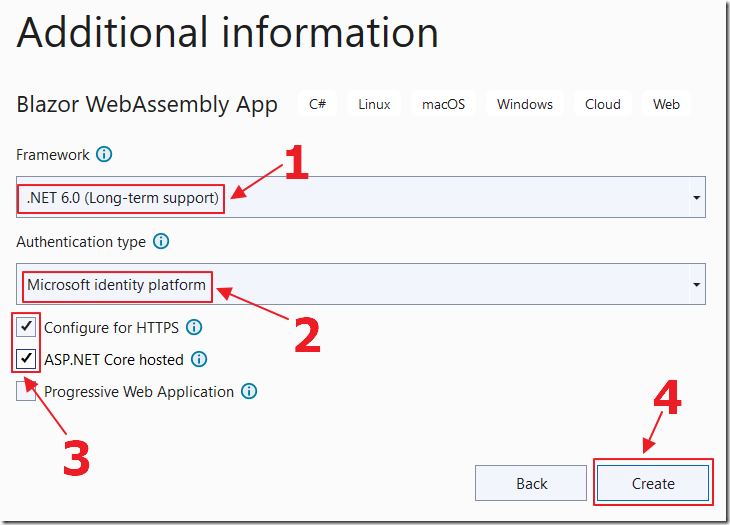
Select .Net 6.0, Microsoft identity platform, Configure for HTTPS, ASP.NET Core hosted, and click Create.
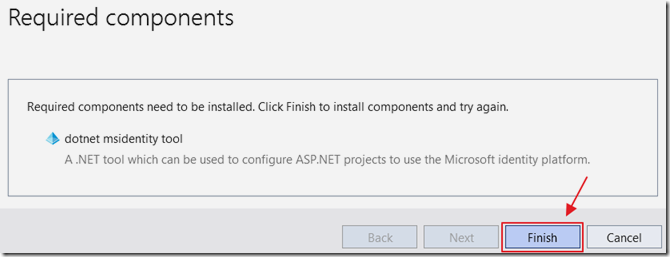
When the Required components box pop up, click the Finish button.
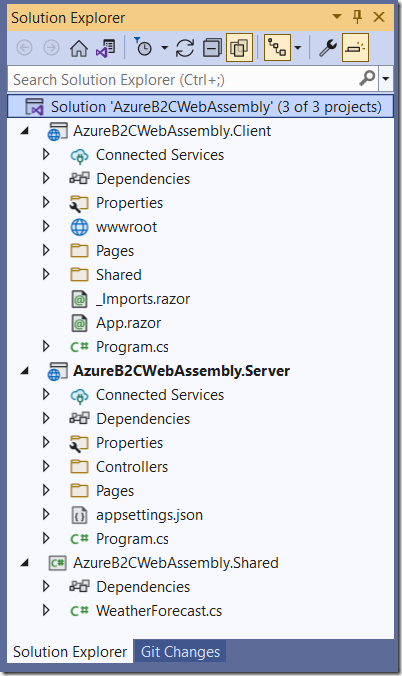
The Solution will be created.
Add the Redirect URI in the Azure Client (WebAssembly) App Registration
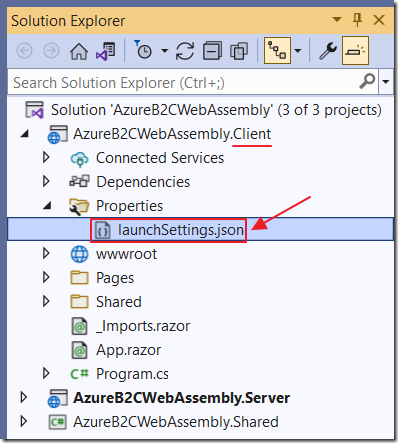
In the Solution Explorer, open the launchSettings.json file in the Properties folder (of the .Client project).
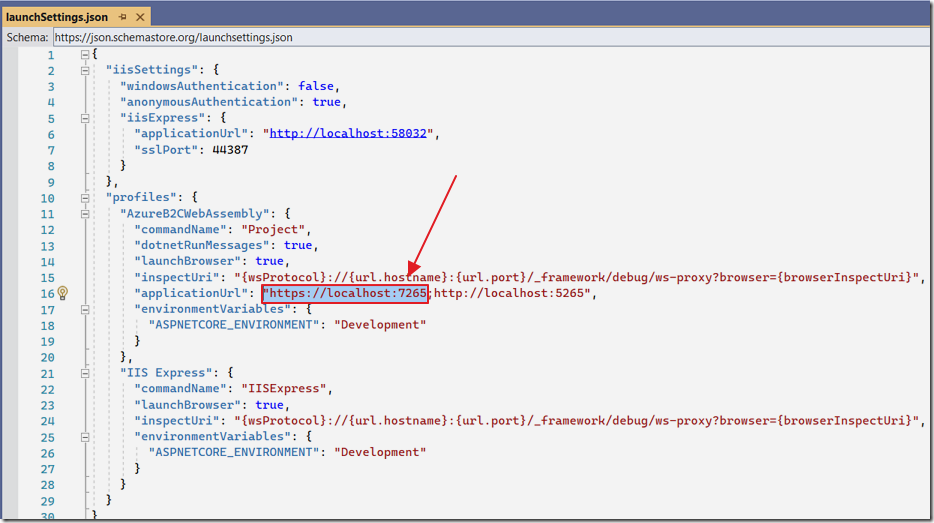
Copy the applicationUrl in the Profiles section, that begins with https.
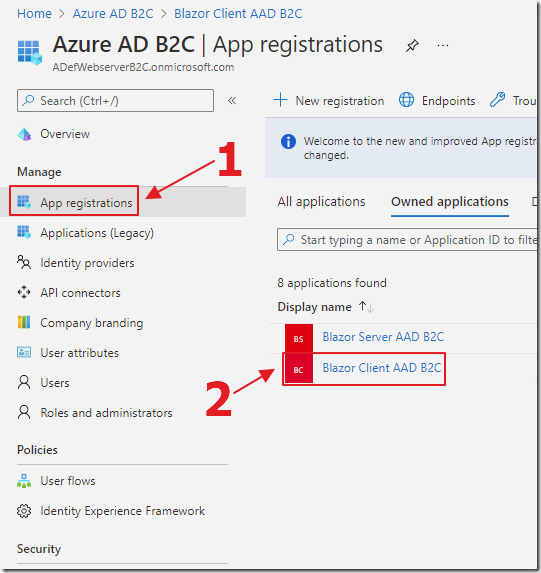
In the Azure Portal, search for the Client (WebAssembly) Web app registration created earlier and select it.
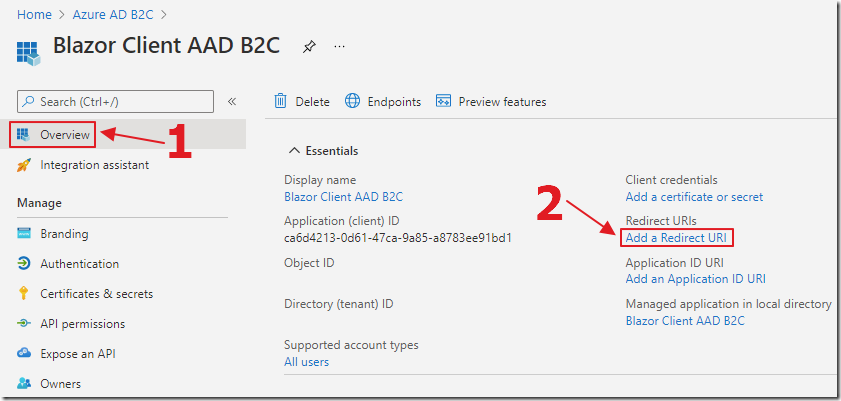
Select Add a Redirect URI.

Select Add a platform.
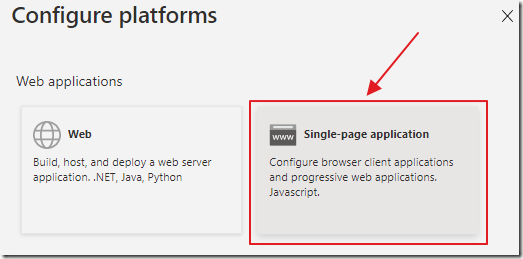
Select Single-page application.
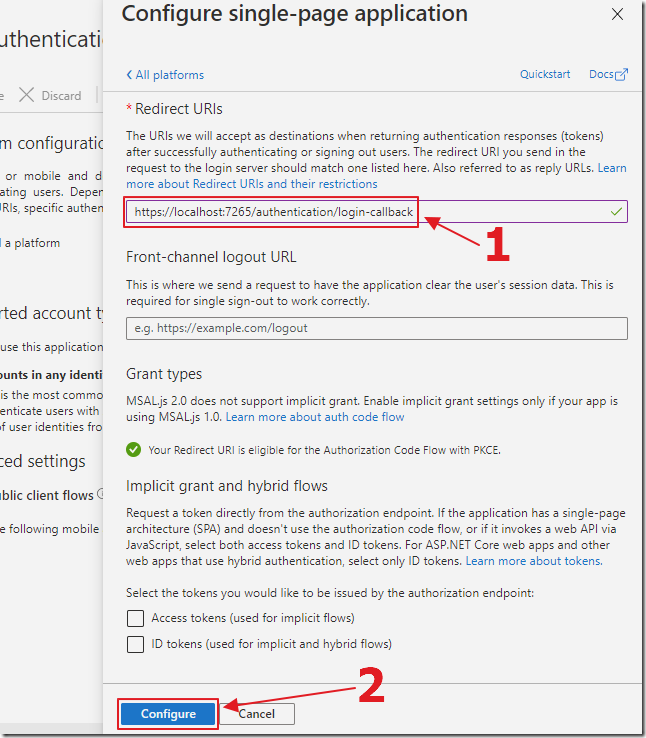
Enter the URL of the Blazor application (copied earlier), with /authentication/login-callback at the end.
Do not check the Access and ID tokens boxes, and click the Configure button.
Note: When you deploy the application to a production website, you will need to add the URI of that address to this page.
Gather Values From Azure B2C Website
To configure the Blazor application, we will need the following values from the Azure B2C website:
- {DOMAIN NAME}
- {TENANT DOMAIN}
- {CLIENT APP CLIENT ID}
- {SERVER API APP CLIENT ID}
- {SERVER API APP ID URI}
- {DEFAULT SCOPE}
- {SIGN UP OR SIGN IN POLICY}
The following explains the location of the values…


Update Settings
The following files need to be updated with settings from the Azure B2C website:
- Client\Program.cs
- Client\wwwroot\appsettings.json
- Server\appsettings.json
Client\Program.cs
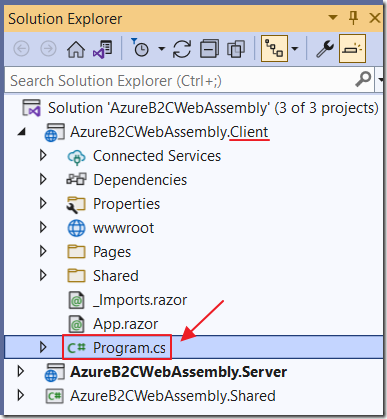
In Visual Studio, in the Solution Explorer, in the Client project, open the Program.cs file and locate the line:
options.ProviderOptions.DefaultAccessTokenScopes.Add("api://api.id.uri/access_as_user");
Change the:
"api://api.id.uri/access_as_user"
value to a format like this:
"{SERVER API APP ID URI}/{DEFAULT SCOPE}"
for example:
“https://ADefWebserverB2C.onmicrosoft.com/b9169a33-bdab-4e28-960d-9dd2b32af16e/API.Access”
Client\wwwroot\appsettings.json
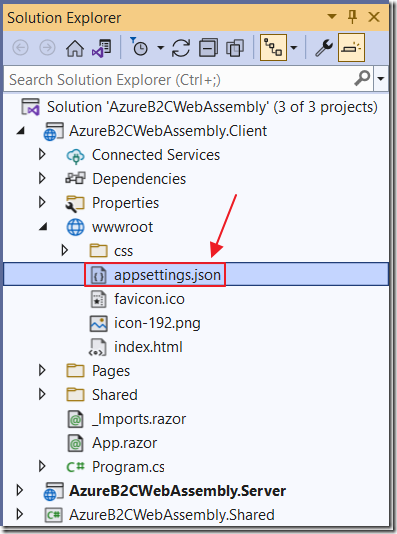
In Visual Studio, in the Solution Explorer, in the Client project, open the wwwroot/appsettings.json file and replace all the code with the following:
{"AzureAd": {"Authority": "https://{DOMAIN NAME}.b2clogin.com/{TENANT DOMAIN}/{SIGN UP OR SIGN IN POLICY}","ClientId": "{CLIENT APP CLIENT ID}","ValidateAuthority": false}}
Replace {DOMAIN NAME}, {TENANT DOMAIN}, {SIGN UP OR SIGN IN POLICY} and {CLIENT APP CLIENT ID} with the values gathered earlier from your Azure B2C website.
For example:
{"AzureAd": {"Authority": "https://ADefWebserverB2C.b2clogin.com/ADefWebserverB2C.onmicrosoft.com/B2C_1_BlazorSignInSignUp","ClientId": "ca6d4213-0d61-47ca-9a85-a8783ee91bd1","ValidateAuthority": false}}
Server\appsettings.json
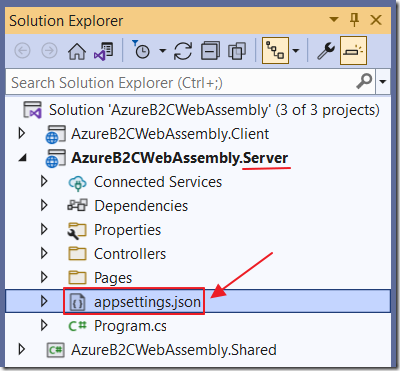
In Visual Studio, in the Solution Explorer, in the Server project, open the Appsettings.json file.
Replace all the contents with the following:
{"AzureAd": {"Instance": "https://{DOMAIN NAME}.b2clogin.com/","ClientId": "{SERVER API APP CLIENT ID}","Domain": "{TENANT DOMAIN}","Scopes": "{DEFAULT SCOPE}","SignUpSignInPolicyId": "{SIGN UP OR SIGN IN POLICY}"},"Logging": {"LogLevel": {"Default": "Information","Microsoft.AspNetCore": "Warning"}},"AllowedHosts": "*"}
Replace {DOMAIN NAME}, {TENANT DOMAIN}, {SIGN UP OR SIGN IN POLICY} and {SERVER API APP CLIENT ID} with the values gathered earlier from your Azure B2C website.
For example:
{"AzureAd": {"Instance": "https://ADefWebserverB2C.b2clogin.com/","ClientId": "b9169a33-bdab-4e28-960d-9dd2b32af16e","Domain": "ADefWebserverB2C.onmicrosoft.com","Scopes": "API.Access","SignUpSignInPolicyId": "B2C_1_BlazorSignInSignUp"},"Logging": {"LogLevel": {"Default": "Information","Microsoft.AspNetCore": "Warning"}},"AllowedHosts": "*"}
Sign-In To Azure B2C

In Visual Studio, Hit F5 to run the application.
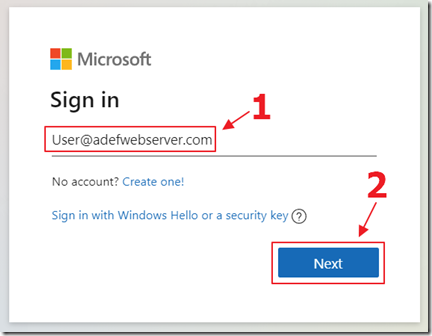
Your web browser will open and the login will display.
Log in with your Microsoft account.
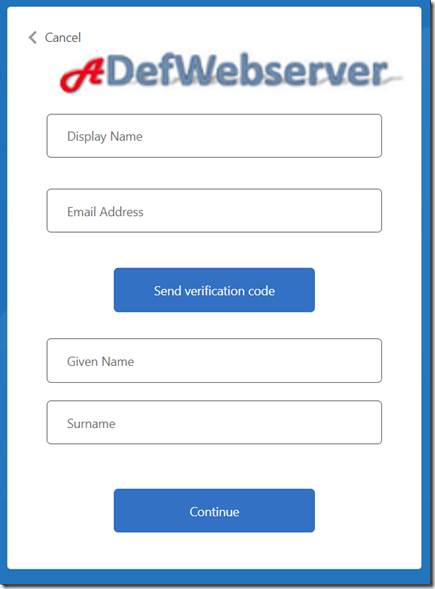
If this is your first time logging in, a new user screen will display.
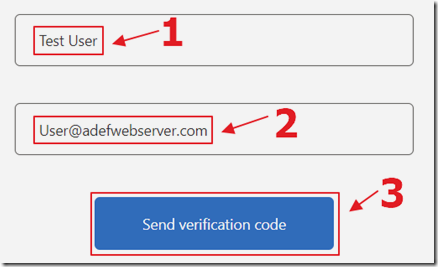
Enter a Display Name and an Email address, and click the Send verification code button.
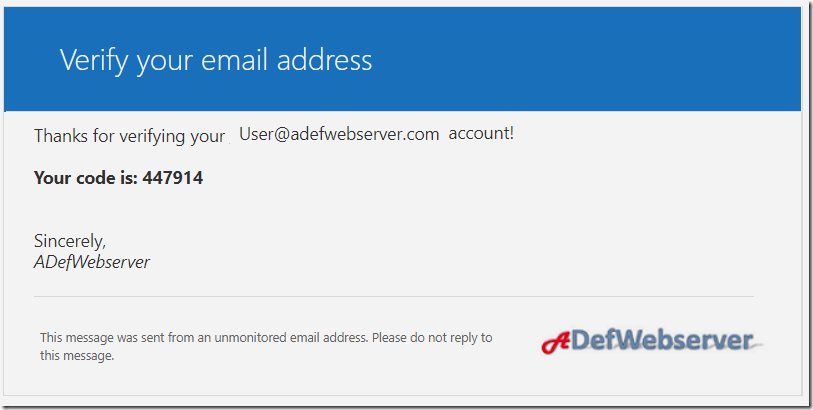
An email will be sent to the email address with a code.
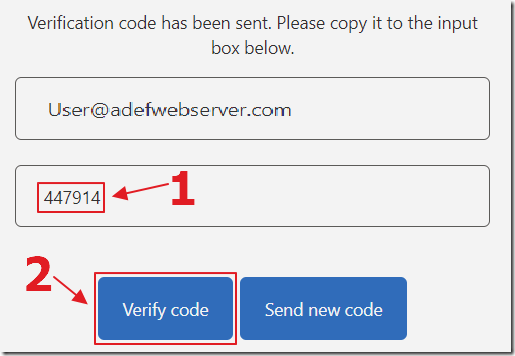
Enter the code and click the Verify code button.

Finally, enter a First Name and Last Name in the last two boxes and click the Continue button.

You will be logged in.

If you return to the Azure Portal and select Users…

You will be able to search for and select the user.

You will be able to fully manage the user, including implementing Conditional Access policies.
Download
The project is available on the Downloads page on this site.
You must have Visual Studio 2022 (or higher) installed to run the code.
Links
Creating A Blazor Server Azure B2C App
Blazor and Azure B2C: The Big Picture
Blazor Azure B2C User And Group Management
ADefWebserver/BlazorSimpleSurvey: Blazor Simple Survey (github.com)
Secure an ASP.NET Core Blazor WebAssembly hosted app with Azure Active Directory B2C
Cloud authentication with Azure Active Directory B2C in ASP.NET Core
Azure Active Directory B2C documentation | Microsoft Docs
What is Azure Active Directory B2C? | Microsoft Docs
Azure AD B2C and MSAL.NET - Microsoft identity platform | Microsoft Docs
Migrate applications and APIs to b2clogin.com - Azure AD B2C | Microsoft Docs
Cars Island Blazor Web App secured by the Azure AD B2C - part 10
Azure Active Directory B2C with Blazor WebAssembly Hosted Apps
