7/22/2023 Admin
Recursive Azure OpenAI Function Calling
The Azure OpenAI API is a powerful tool that allows developers to leverage the natural language understanding and generation capabilities of GPT models. However, sometimes developers may want to use the model’s output to interact with other services or applications, such as sending an email, booking a flight, or creating a chart. How can they do that without having to parse the model’s output manually or write complex logic to handle different scenarios? The answer is function calling.
Function calling is a feature of the Azure OpenAI API that enables developers to describe functions to the model and have it intelligently return a JSON object containing arguments to call those functions. This way, developers can easily connect GPT’s output with external tools and APIs, and get more reliable and structured data back from the model.
In this blog post, we will explain how function calling works and show some examples of how it can be used to enhance your applications.
This is the overview of the process:
- Step 1: Use the Azure OpenAI API to define the functions and to allow it to invoke a function and pass parameters to the function
- Step 2: Use the model’s output to make a request to your third party API
- Step 3: Use the Azure OpenAI API to send your third party API response back to the model and generate a response
Sample Application
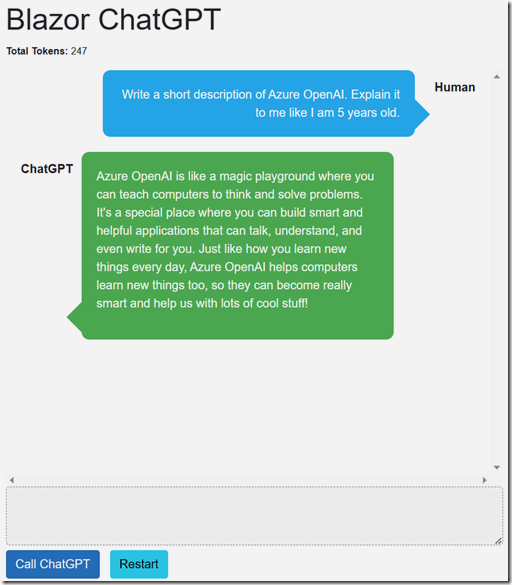
The sample application behaves like the standard ChatGPT application in that it can provide responses in a conversation format and track what is discussed so you don’t have to repeat information previously covered in the conversation.
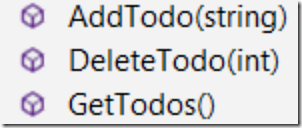
However, this application has three functions defined:
- AddTodo – Allows an item to be added to the list
- DeleteTodo – Allows an item to be deleted from the list
- GetTodos – Retrieves the items in the list
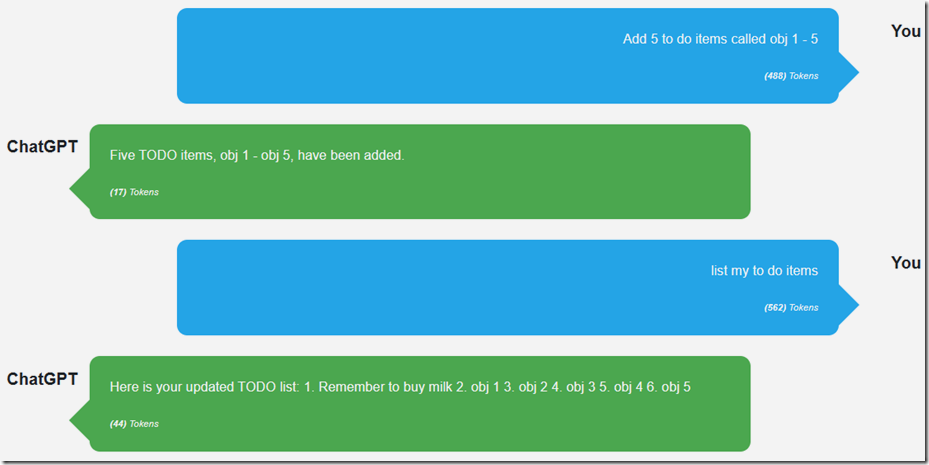
The end user is able to instruct ChatGPT to maintain the list in normal conversational language. ChatGPT makes the decision when to call the functions.
Yes ChatGPT can manage a list without using functions, but since ChatGPT has a limited memory capacity, it would start to forget items. This method will effectively provide ChatGPT with unlimited memory.
Requirements
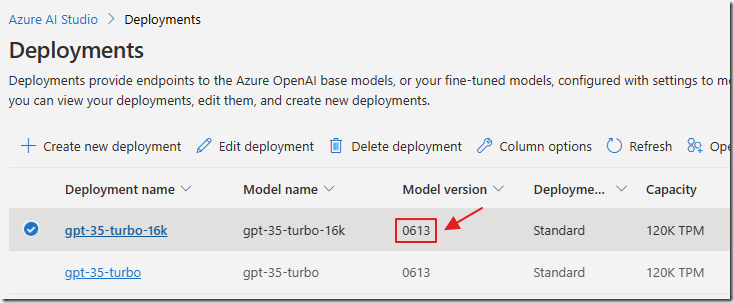
Follow the directions in the article: What Is Azure OpenAI And Why Would You Want To Use It? to create a model deployment.
Create a gpt- model deployment that is Model version 0613 (or higher).
Note: At the time of this writing, this is only possible if your Azure OpenAI service is created in the EAST Azure region.
Note: If you get this error: "Unrecognized request argument supplied: functions" you don't have a high enough version of the gpt- model deployed.
Start With OpenAI Chat
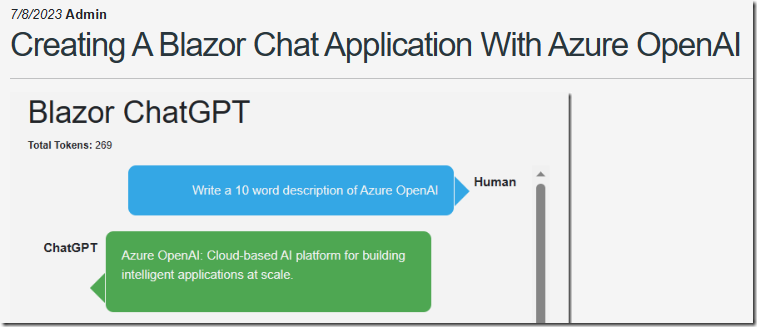
Follow the directions in the Blog post: Creating A Blazor Chat Application With Azure OpenAI to download, open the project in Visual Studio, and configure the Blazor OpenAI Chat sample code.
Note: Ensure the gpt- model deployment that it is pointing to is Model version 0613 (or higher).
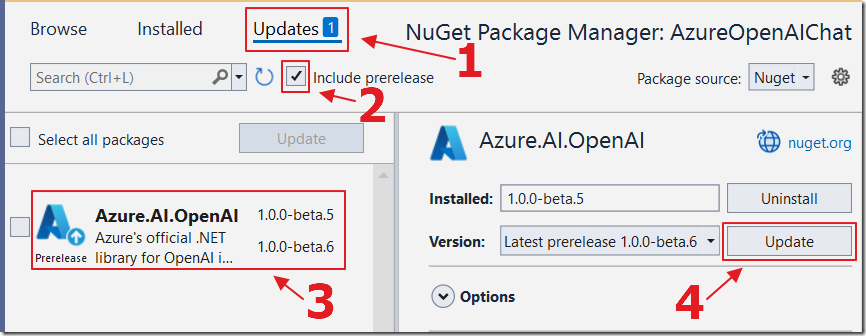
In Visual Studio, update the Azure.AI.OpenAI package to version 1.0.0-beta.6 (or higher).
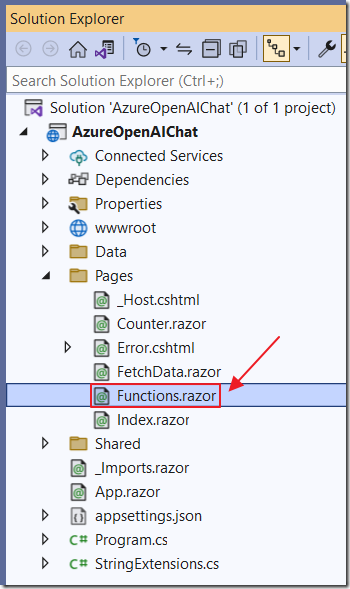
Create a new control called Functions.razor.
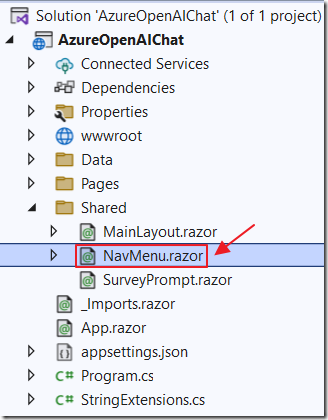
Open the NavMenu.razor control and add a link to the Functions.razor control using the following code:
<div class="nav-item px-3"><NavLink class="nav-link" href="functions"><span class="oi oi-list-rich" aria-hidden="true"></span> Functions</NavLink></div>
The UI Code
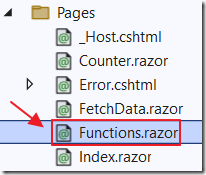
Return to the Functions.razor control and replace all the code with the following code:
@page "/functions"@using Azure.AI.OpenAI;@using Azure;@using Markdig;@using System.Text.Json.Serialization;@using System.Text.Json;@using System.Text.Json.Nodes;@inject IConfiguration _configuration@inject IJSRuntime _jsRuntime<PageTitle>Index</PageTitle>
This adds the required using statements and the page title.
Add the following Styles to the page:
<PageTitle>Index</PageTitle><style>textarea {border: 1px dashed #888;border-radius: 5px;width: 80%;overflow: auto;background: #f7f7f7}/* improved CSS for speech bubbles */.assistant, .user {position: relative;font-family: arial;font-size: 1.1em;border-radius: 10px;padding: 20px;margin-bottom: 20px;}.assistant:after, .user:after {content: '';border: 20px solid transparent;position: absolute;margin-top: -30px;}.user {background: #03a9f4;color: #fff;margin-left: 20%;margin-right: 100px;top: 30%;text-align: right;}.assistant {background: #4CAF50;color: #fff;margin-left: 100px;margin-right: 20%;}.user:after {border-left-color: #03a9f4;border-right: 0;right: -20px;}.assistant:after {border-right-color: #4CAF50;border-left: 0;left: -20px;}.msg {font-size: medium;}</style>
Add the following HTML markup that will display the chat UI:
<h1>Blazor ChatGPT</h1><p style="font-size:small"><b>Total Tokens:</b> @TotalTokens</p><div id="chatcontainer" style="height:550px; width:80%; overflow: scroll;">@foreach (var item in ChatMessages){<div>@if (item.Role == ChatRole.User){<div style="float: right; margin-right: 20px; margin-top: 10px"><b>Human</b></div><div class="@item.Role"><div class="msg">@item.Content</div></div>}@if (item.Role == ChatRole.Assistant && item.FunctionCall == null){<div style="float: left; margin-left: 20px; margin-top: 10px"><b>ChatGPT </b></div><div class="@item.Role"><div class="msg">@if (item.Content != null){@((MarkupString)item.Content.ToHtml())}</div></div>}</div>}</div>@if (!Processing){<textarea rows="3" cols="60" @bind="prompt" /><br /><button class="btn btn-primary"@onclick="CallChatGPT">Call ChatGPT</button><span> </span><button class="btn btn-info"@onclick="RestartChatGPT">Restart</button>}else{<br><h4>Processing...</h4>}<br /><p style="color:red">@ErrorMessage</p>
The Code
Add the following code block to add the following fields:
@code {#nullable disablestring Endpoint = "";string DeploymentOrModelName = "";string Key = "";List<ChatMessage> ChatMessages = new List<ChatMessage>();string prompt = "Write a 10 word description of Azure OpenAI";string ErrorMessage = "";bool Processing = false;int TotalTokens = 0;}
Inside the code block, add the following classes to allow the TODO items to be maintained:
public class ToDoAddRequest{public Todorequest TodoRequest { get; set; }}public class Todorequest{public string todo { get; set; }}public class ToDoRemoveRequest{public Todoindexrequest TodoIndexRequest { get; set; }}public class Todoindexrequest{public int todoIdx { get; set; }}
Next, add the following code that will provide the operations to add, list and remove the TODO items (stored in the _TODOS collection):
private static readonly List<string> _TODOS = new List<string>();public string AddTodo(string NewToDO){_TODOS.Add(NewToDO);return $"{NewToDO} added";}public string GetTodos(){return JsonSerializer.Serialize<List<string>>(_TODOS);}public string DeleteTodo(int TodoIdxInt){if (TodoIdxInt >= 0 && TodoIdxInt < _TODOS.Count){_TODOS.RemoveAt(TodoIdxInt);return $"TODO {TodoIdxInt} deleted";}else{return "TODO not found";}}
Add the OnInitialized method that will run when the page first loads.
This will retrieve the Azure OpenAI settings from the appsettings.json file and initialize the chat message collection:
protected override void OnInitialized(){// Get the Azure OpenAI Service configuration valuesEndpoint =_configuration["AzureOpenAIServiceOptions:Endpoint"] ?? "";DeploymentOrModelName =_configuration["AzureOpenAIServiceOptions:DeploymentOrModelName"] ?? "";Key =_configuration["AzureOpenAIServiceOptions:Key"] ?? "";// Create a new list of ChatPrompt objects and initialize it with the// system's introductory messagestring SystemMessage = "You are helpful Assistant.";SystemMessage += "You will always reply with a Markdown formatted response.";ChatMessages.Add(new ChatMessage(ChatRole.System,SystemMessage));}
Next add the OnAfterRenderAsync method that will call the ScrollToBottom JavaScript method that was added previously to the _Host.cshtml page:
protected override async TaskOnAfterRenderAsync(bool firstRender){try{await _jsRuntime.InvokeAsync<string>("ScrollToBottom", "chatcontainer");}catch{// do nothing if this fails}}
Add the following method that will be raised when the Restart button is clicked:
void RestartChatGPT(){prompt = "Write a 10 word description of Azure OpenAI";ChatMessages = new List<ChatMessage>();TotalTokens = 0;ErrorMessage = "";ChatMessages.Add(new ChatMessage(ChatRole.System, "You are helpful Assistant"));StateHasChanged();}
Call ChatGPT
Add the following method to call the Azure OpenAI API when the Call ChatGPT button is clicked:
async Task CallChatGPT(){try{// Set Processing to true to indicate that the method is processingProcessing = true;// Call StateHasChanged to refresh the UIStateHasChanged();// Clear any previous error messagesErrorMessage = "";// Create a new OpenAIClient object// with the provided API key and EndpointOpenAIClient client = new OpenAIClient(new Uri(Endpoint),new AzureKeyCredential(Key));// Add the new message to chatMessagesChatMessages.Add(new ChatMessage(ChatRole.User, prompt));
Add the following code to the method to define the functions:
// *** Define the Functions ***string fnTodosPOSTDescription = "Creates a new TODO item. ";fnTodosPOSTDescription += "Use this function to add ";fnTodosPOSTDescription += "a new TODO item to the list";string fnTodosGETDescription = "Retrieves the TODO list. ";fnTodosGETDescription += "Use this function to view the TODO list.";string fnTodosDELETEDescription = "Deletes a specific TODO item ";fnTodosDELETEDescription += "from the list. Use this function to ";fnTodosDELETEDescription += "remove a TODO item from the list.";var fnTodosPOST = new FunctionDefinition();fnTodosPOST.Name = "Todos_POST";fnTodosPOST.Description = fnTodosPOSTDescription;fnTodosPOST.Parameters = BinaryData.FromObjectAsJson(new JsonObject{["type"] = "object",["properties"] = new JsonObject{["TodoRequest"] = new JsonObject{["type"] = "object",["properties"] = new JsonObject{["todo"] = new JsonObject{["type"] = "string",["description"] = @"The TODO item to be added."}},["required"] = new JsonArray { "todo" }}},["required"] = new JsonArray { "TodoRequest" }});var fnTodosGET = new FunctionDefinition();fnTodosGET.Name = "Todos_GET";fnTodosGET.Description = fnTodosGETDescription;fnTodosGET.Parameters = BinaryData.FromObjectAsJson(new JsonObject{["type"] = "object",["properties"] = new JsonObject { }});var fnTodosDELETE = new FunctionDefinition();fnTodosDELETE.Name = "Todos_DELETE";fnTodosDELETE.Description = fnTodosDELETEDescription;fnTodosDELETE.Parameters = BinaryData.FromObjectAsJson(new JsonObject{["type"] = "object",["properties"] = new JsonObject{["TodoIndexRequest"] = new JsonObject{["type"] = "object",["properties"] = new JsonObject{["todoIdx"] = new JsonObject{["type"] = "integer",["description"] = @"The index of the TODO item to be deleted."}},["required"] = new JsonArray { "todoIdx" }}},["required"] = new JsonArray { "TodoIndexRequest" }});// Create a new list of FunctionDefinition objectsList<FunctionDefinition> DefinedFunctions = new List<FunctionDefinition>();// Add the FunctionDefinition objects to the listDefinedFunctions.Add(fnTodosPOST);DefinedFunctions.Add(fnTodosGET);DefinedFunctions.Add(fnTodosDELETE);
Next add the following code to call the Azure OpenAI API:
// *** Call Azure OpenAI Service ***// Create a new ChatCompletionsOptions objectvar chatCompletionsOptions = new ChatCompletionsOptions(){Temperature = (float)0.7,MaxTokens = 2000,NucleusSamplingFactor = (float)0.95,FrequencyPenalty = 0,PresencePenalty = 0,};chatCompletionsOptions.Functions = DefinedFunctions;chatCompletionsOptions.FunctionCall = FunctionDefinition.Auto;// Add the prompt to the chatCompletionsOptions objectforeach (var message in ChatMessages){chatCompletionsOptions.Messages.Add(message);}// Call the GetChatCompletionsAsync methodResponse<ChatCompletions> responseWithoutStream =await client.GetChatCompletionsAsync(DeploymentOrModelName,chatCompletionsOptions);// Get the ChatCompletions object from the responseChatCompletions result = responseWithoutStream.Value;// Create a new Message object with the response and other details// and add it to the messages listvar choice = result.Choices.FirstOrDefault();if (choice != null){if (choice.Message != null){ChatMessages.Add(choice.Message);}}// Update the total number of tokens used by the APITotalTokens = TotalTokens + result.Usage.TotalTokens;
Finally, add the following code to complete the method. The following block of code processes the result from ChatGPT.
If ChatGPT wants to call a function, we call the ExecuteFunction method (we will add this later).
We do this in a While loop because ChatGPT may want to call multiple functions based on the prompt. For example, to add multiple items, it will call the Todos_POST function multiple times.
// *** FUNCTIONS ***// See if as a response ChatGPT wants to call a functionif (result.Choices.FirstOrDefault().FinishReason == "function_call"){// Chat GPT wants to call a function// To allow ChatGPT to call multiple functions// We need to start a While loopbool FunctionCallingComplete = false;while (!FunctionCallingComplete){// Call the functionChatMessages = ExecuteFunction(result, ChatMessages);// *** Call Azure OpenAI Service ***// Get a response from ChatGPT// (now that is has the results of the function)// Create a new ChatCompletionsOptions objectchatCompletionsOptions = new ChatCompletionsOptions(){Temperature = (float)0.7,MaxTokens = 2000,NucleusSamplingFactor = (float)0.95,FrequencyPenalty = 0,PresencePenalty = 0,};chatCompletionsOptions.Functions = DefinedFunctions;chatCompletionsOptions.FunctionCall = FunctionDefinition.Auto;// Add the prompt to the chatCompletionsOptions objectforeach (var message in ChatMessages){chatCompletionsOptions.Messages.Add(message);}// Call the GetChatCompletionsAsync methodResponse<ChatCompletions> responseWithoutStreamFn =await client.GetChatCompletionsAsync(DeploymentOrModelName,chatCompletionsOptions);// Get the ChatCompletions object from the responseresult = responseWithoutStreamFn.Value;var FunctionResult = result.Choices.FirstOrDefault();// Create a new Message object with the response and other details// and add it to the messages listif (FunctionResult.Message != null){ChatMessages.Add(FunctionResult.Message);}if (FunctionResult.FinishReason == "function_call"){// Keep loopingFunctionCallingComplete = false;}else{// Break out of the loopFunctionCallingComplete = true;}}}}catch (Exception ex){// Set ErrorMessage to the exception message if an error occursErrorMessage = ex.Message;}finally{// Clear the prompt variableprompt = "";// Set Processing to false to indicate// that the method is done processingProcessing = false;// Call StateHasChanged to refresh the UIStateHasChanged();}}
Note that it passes the functions, defined earlier, to the functions property. The FunctionCall property is currently set to FunctionDefinition.Auto which means ChatGPT can decide if it wants to call a function in response to this prompt. This can also be set to instruct ChatGPT to call a specific defined function, or not to call any functions at all.
This is the ExecuteFunction method:
private List<ChatMessage> ExecuteFunction(ChatCompletions ChatCompletionResult, List<ChatMessage> ParamChatPrompts){// Get the argumentsvar functionArgs =ChatCompletionResult.Choices.FirstOrDefault().Message.FunctionCall.Arguments.ToString();// Get the function namevar functionName =ChatCompletionResult.Choices.FirstOrDefault().Message.FunctionCall.Name;// Variable to hold the function resultstring functionResult = "";// Use select case to call the functionswitch (functionName){case "Todos_POST":var NewTODO =JsonSerializer.Deserialize<ToDoAddRequest>(functionArgs);if (NewTODO != null){functionResult = AddTodo(NewTODO.TodoRequest.todo);}break;case "Todos_GET":functionResult = GetTodos();break;case "Todos_DELETE":var DeleteTODO =JsonSerializer.Deserialize<ToDoRemoveRequest>(functionArgs);if (DeleteTODO != null){functionResult =DeleteTodo(DeleteTODO.TodoIndexRequest.todoIdx);}break;default:break;}// Return with the results of the functionvar ChatFunctionMessage = new ChatMessage();ChatFunctionMessage.Role = ChatRole.Function;ChatFunctionMessage.Content = functionResult;ChatFunctionMessage.Name = functionName;ParamChatPrompts.Add(ChatFunctionMessage);return ParamChatPrompts;}
Links
Function calling and other API updates
What Is Azure OpenAI And Why Would You Want To Use It?
Bring Your Own Data to Azure OpenAI
Creating A Blazor Chat Application With Azure OpenAI
Azure OpenAI RAG Pattern using a SQL Vector Database
Download
The project is available on the Downloads page on this site.
You must have Visual Studio 2022 (or higher) installed to run the code.
