7/8/2023 Admin
Creating A Blazor Chat Application With Azure OpenAI
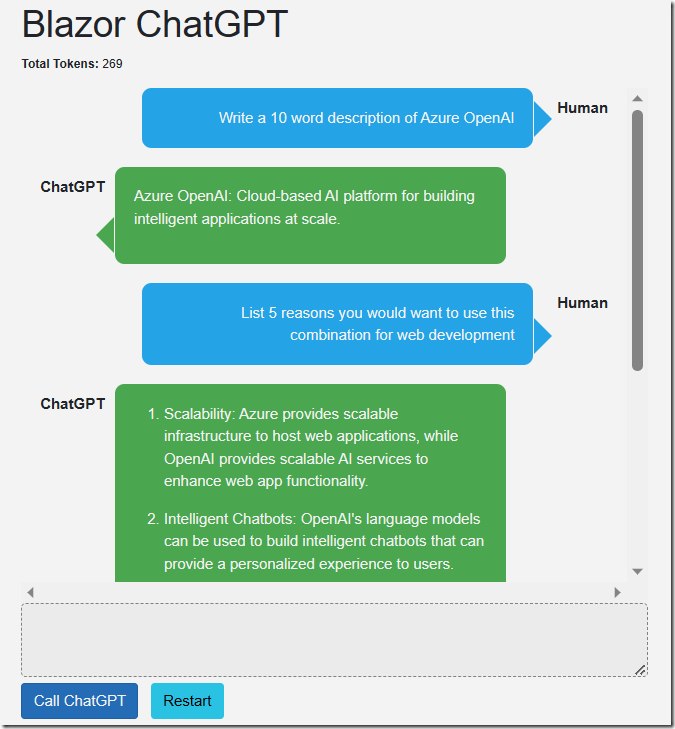
The Azure OpenAI API is a powerful tool that allows developers to create cutting-edge applications that can understand, analyze, and generate human-like text. With Microsoft Blazor, we can harness the power of this API to create a seamless client experience. In this blog post, we will explore how we can use Microsoft Blazor to build a client that calls the Azure OpenAI API, and demonstrate some of the exciting possibilities that this combination brings.
When using the GPT- chat models we can create applications that allows the end user to have interactions that have context. Meaning, the response in each interaction is based on the interactions that preceded it.

For example, when we call the API with a request to “Write a 10 word description of Azure OpenAI” and click the Call ChatGPT button…
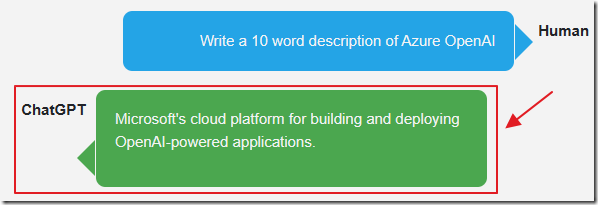
It processes the request and produces a response.
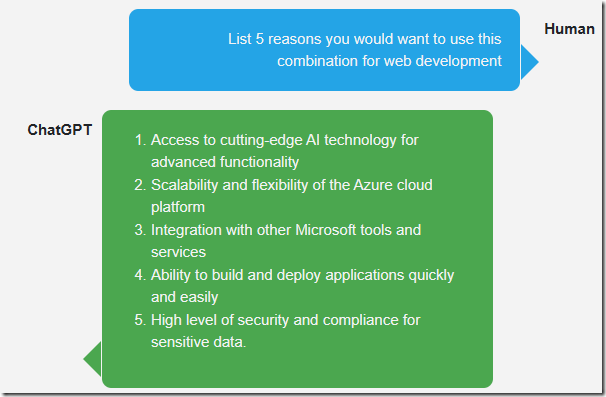
When we ask the API to “List 5 reasons you would want to use this combination for web development” and click the Call ChatGPT button, the response is based on the previous conversation interaction. It already knows we were talking about Blazor and Azure OpenAI.
Set-up Azure OpenAI
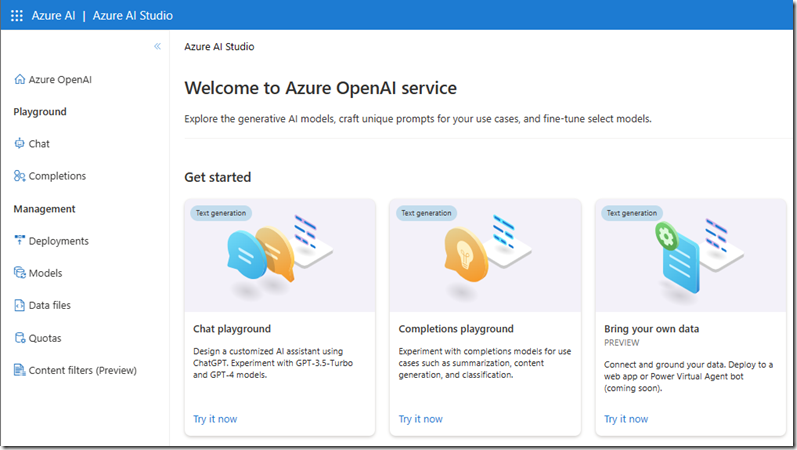
See the article: What Is Azure OpenAI And Why Would You Want To Use It? for instructions on gaining access and setting up Azure OpenAI.
Creating The Application
Use Visual Studio 2022 or higher.

Select Blazor Server App.
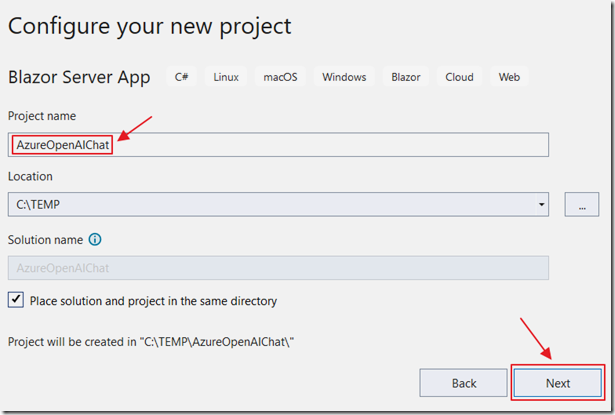
Create a project named AzureOpenAIChat.
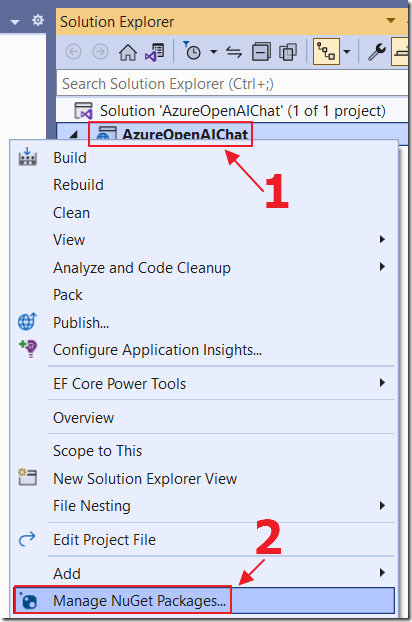
Right-click on the Project node and select Manage NuGet Packages…
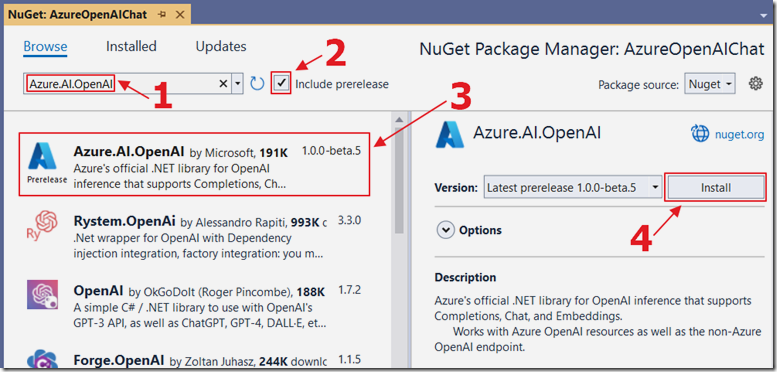
Add the Azure.AI.OpenAI NuGet package.
This is added to provide support for calling the Azure OpenAI API.

Also add the Markdig NuGet package.
This is added to provide support to display Markdown formatted responses from Azure OpenAI.
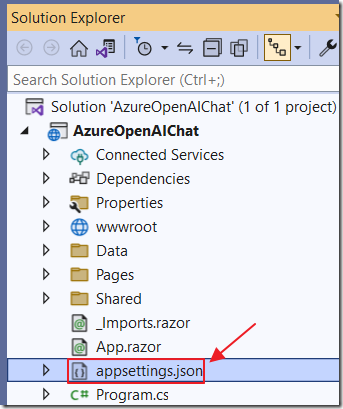
Add the following section to the appsettings.json file, replacing the Endpoint, DeploymentOrModelName, and Key values with your own Azure OpenAI values:
"AzureOpenAIServiceOptions": {"Endpoint": "** Your Azure OpenAI Endpoint **","DeploymentOrModelName": "** Your Azure OpenAI deployment model name **","Key": "** Your Azure OpenAI Key **"}
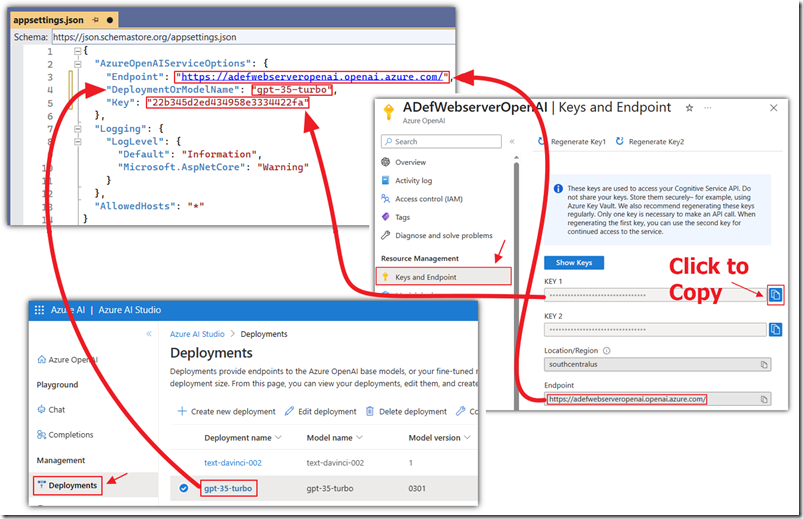
The diagram above shows where to locate the required values.
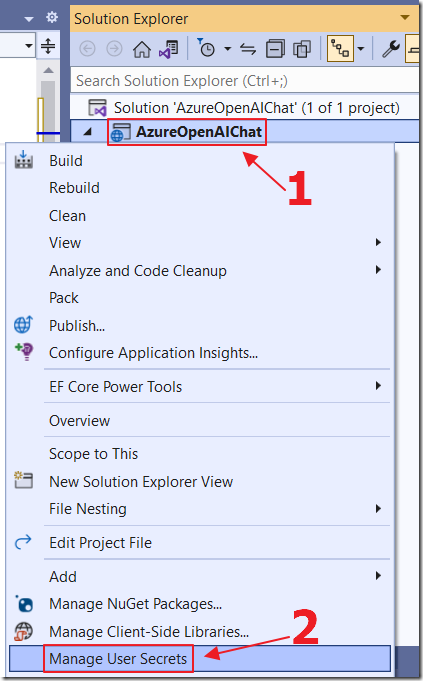
However, the safer way, to prevent your keys from accidently being leaked when checking your code into source control, is to right-click on the Project node and select Manage User Secrets…

Enter your keys in this file instead of the appsettings.json file.
Add UI Support
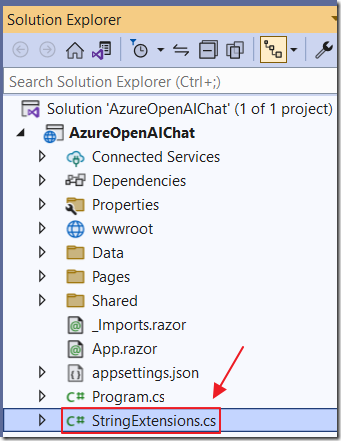
We installed the Markdig NuGet package to provide support to display Markdown formatted responses from Azure OpenAI.
To call the component and configure its options we will add an extension class. Add a new class file called StringExtensions.cs using the following code:
using Markdig;namespace AzureOpenAIChat{public static class StringExtensions{// Copyright (c) David Pine. All rights reserved.private static readonly MarkdownPipeline s_pipeline =new MarkdownPipelineBuilder().ConfigureNewLine("\n").UseAdvancedExtensions().UseEmojiAndSmiley().UseSoftlineBreakAsHardlineBreak().Build();public static string ToHtml(this string markdown) =>string.IsNullOrWhiteSpace(markdown) is false? Markdown.ToHtml(markdown, s_pipeline): "";}}
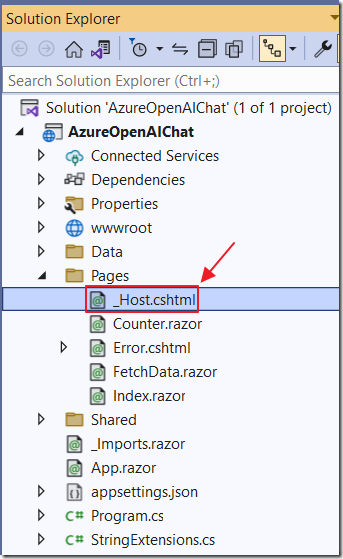
We also need to implement a JavaScript method that will automatically scroll the chat window to the most recent message.
Open the _Host.cshtml file and add the following code:
<script>window.ScrollToBottom = (elementName) => {element = document.getElementById(elementName);element.scrollTop = element.scrollHeight - element.clientHeight;}</script>
The Index Page
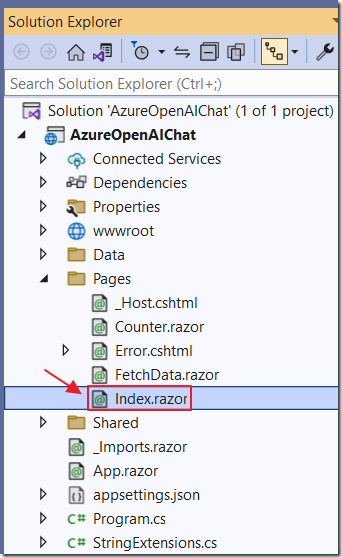
Open the Index.razor page and replace all the code with the following code:
@page "/"@using Azure.AI.OpenAI;@using Azure;@using Markdig;@inject IConfiguration _configuration@inject IJSRuntime _jsRuntime<PageTitle>Index</PageTitle>
This adds the required using statements and the page title.
Add the following Styles to the page:
<style>textarea {border: 1px dashed #888;border-radius: 5px;width: 80%;overflow: auto;background: #f7f7f7}/* improved CSS for speech bubbles */.assistant, .user {position: relative;font-family: arial;font-size: 1.1em;border-radius: 10px;padding: 20px;margin-bottom: 20px;}.assistant:after, .user:after {content: '';border: 20px solid transparent;position: absolute;margin-top: -30px;}.user {background: #03a9f4;color: #fff;margin-left: 20%;margin-right: 100px;top: 30%;text-align: right;}.assistant {background: #4CAF50;color: #fff;margin-left: 100px;margin-right: 20%;}.user:after {border-left-color: #03a9f4;border-right: 0;right: -20px;}.assistant:after {border-right-color: #4CAF50;border-left: 0;left: -20px;}.msg {font-size: medium;}</style>
Add the following HTML markup that will display the chat:
<h1>Blazor ChatGPT</h1><p style="font-size:small"><b>Total Tokens:</b> @TotalTokens</p><div id="chatcontainer" style="height:550px; width:80%; overflow: scroll;">@foreach (var item in ChatMessages){<div>@if (item.Role == ChatRole.User){<div style="float: right; margin-right: 20px; margin-top: 10px"><b>Human</b></div><div class="@item.Role"><div class="msg">@item.Content</div></div>}@if (item.Role == ChatRole.Assistant){<div style="float: left; margin-left: 20px; margin-top: 10px"><b>ChatGPT </b></div><div class="@item.Role"><div class="msg">@if (item.Content != null){@((MarkupString)item.Content.ToHtml())}</div></div>}</div>}</div>
Finally, to complete the UI, add the following code that will display the input box and the buttons to call Azure OpenAI:
@if (!Processing){<textarea rows="3" cols="60" @bind="prompt" /><br /><button class="btn btn-primary"@onclick="CallChatGPT">Call ChatGPT</button><span> </span><button class="btn btn-info"@onclick="RestartChatGPT">Restart</button>}else{<br><h4>Processing...</h4>}<br /><p style="color:red">@ErrorMessage</p>
The Code
Add the following code for the code section to add the following fields:
@code {string Endpoint = "";string DeploymentOrModelName = "";string Key = "";List<ChatMessage> ChatMessages = new List<ChatMessage>();string prompt = "Write a 10 word description of Azure OpenAI";string ErrorMessage = "";bool Processing = false;int TotalTokens = 0;
Add the OnInitialized method that will run when the page first loads.
This will retrieve the Azure OpenAI settings from the appsettings.json file and initialize the chat message collection:
protected override void OnInitialized(){// Get the Azure OpenAI Service configuration valuesEndpoint =_configuration["AzureOpenAIServiceOptions:Endpoint"] ?? "";DeploymentOrModelName =_configuration["AzureOpenAIServiceOptions:DeploymentOrModelName"] ?? "";Key =_configuration["AzureOpenAIServiceOptions:Key"] ?? "";// Create a new list of ChatPrompt objects and initialize it with the// system's introductory messagestring SystemMessage = "You are helpful Assistant.";SystemMessage += "You will always reply with a Markdown formatted response.";ChatMessages.Add(new ChatMessage(ChatRole.System,SystemMessage));}
Next add the OnAfterRenderAsync method that will call the ScrollToBottom JavaScript method we added earlier to the _Host.cshtml page:
protected override async TaskOnAfterRenderAsync(bool firstRender){try{await _jsRuntime.InvokeAsync<string>("ScrollToBottom", "chatcontainer");}catch{// do nothing if this fails}}
Add the following method that will be raised when the Restart button is clicked:
void RestartChatGPT(){prompt = "Write a 10 word description of Azure OpenAI";ChatMessages = new List<ChatMessage>();TotalTokens = 0;ErrorMessage = "";ChatMessages.Add(new ChatMessage(ChatRole.System, "You are helpful Assistant"));StateHasChanged();}
Finally add the following method to call the Azure OpenAI API when the Call ChatGPT button is clicked:
async Task CallChatGPT(){try{// Set Processing to true to indicate that the method is processingProcessing = true;// Call StateHasChanged to refresh the UIStateHasChanged();// Clear any previous error messagesErrorMessage = "";// Create a new OpenAIClient object// with the provided API key and EndpointOpenAIClient client = new OpenAIClient(new Uri(Endpoint),new AzureKeyCredential(Key));// Add the new message to chatMessagesChatMessages.Add(new ChatMessage(ChatRole.User, prompt));// Create a new ChatCompletionsOptions objectvar chatCompletionsOptions = new ChatCompletionsOptions(){Temperature = (float)0.7,MaxTokens = 2000,NucleusSamplingFactor = (float)0.95,FrequencyPenalty = 0,PresencePenalty = 0,};// Add the prompt to the chatCompletionsOptions objectforeach (var message in ChatMessages){chatCompletionsOptions.Messages.Add(message);}// Call the GetChatCompletionsAsync methodResponse<ChatCompletions> responseWithoutStream =await client.GetChatCompletionsAsync(DeploymentOrModelName,chatCompletionsOptions);// Get the ChatCompletions object from the responseChatCompletions result = responseWithoutStream.Value;// Create a new Message object with the response and other details// and add it to the messages listvar choice = result.Choices.FirstOrDefault();if (choice != null){if (choice.Message != null){ChatMessages.Add(choice.Message);}}// Update the total number of tokens used by the APITotalTokens = TotalTokens + result.Usage.TotalTokens;}catch (Exception ex){// Set ErrorMessage to the exception// message if an error occursErrorMessage = ex.Message;}finally{// Clear the prompt variableprompt = "";// Set Processing to false to indicate// that the method is done processingProcessing = false;// Call StateHasChanged to refresh the UIStateHasChanged();}}
When we run the application, we can interact with it using normal conversational language.

Links
What Is Azure OpenAI And Why Would You Want To Use It?
Bring Your Own Data to Azure OpenAI
Download
The project is available on the Downloads page on this site.
You must have Visual Studio 2022 (or higher) installed to run the code.
