7/4/2022 Admin
Creating A Step-By-Step End-To-End Database Client-Side (WebAssembly) Blazor Application (Updated to .Net 6)
In this article, using client (WebAssembly) Blazor, we will demonstrate how a list of Weather forecasts can be added to the database by each user. A user will only have the ability to see their own forecasts.
Walk-Thru
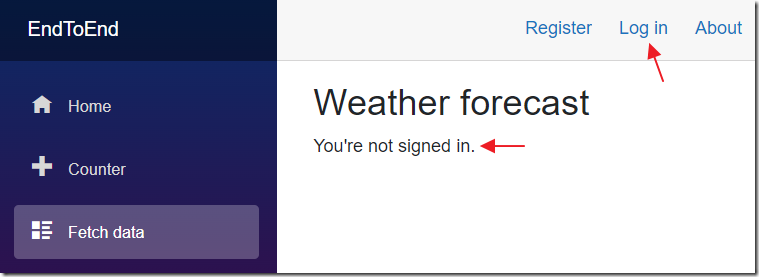
When we navigate to the Fetch data page, without being logged in, it will indicate that you Must be logged in.
To log in, click the Log In link.
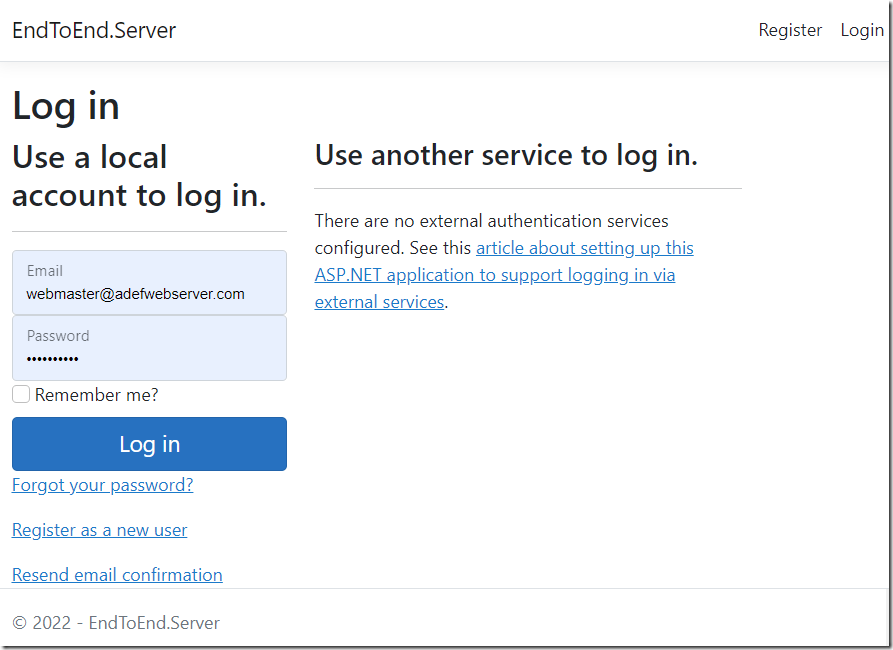
You can log in.
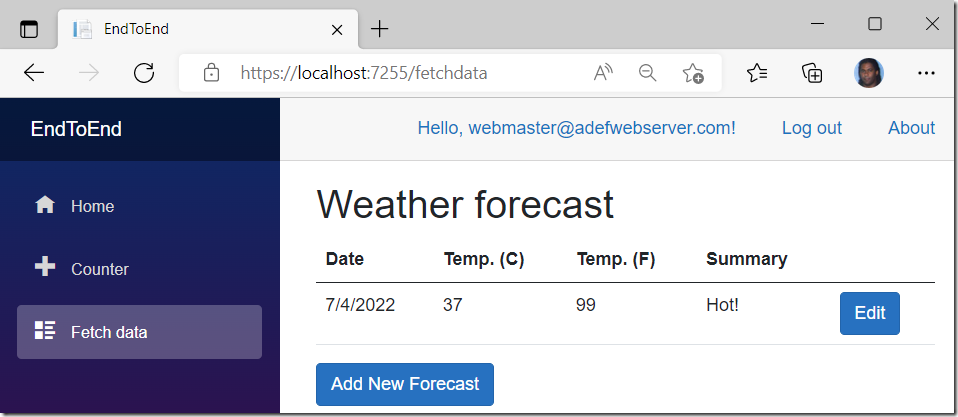
Once a user is logged in, navigating to the Fetch data page displays their data.
The logged in user’s name is also displayed at the top of the application.
The user can add or edit Weather Forecasts that will be saved to the database.
Use SQL Server
You can create a database using SQL Server Express LocalDB. However, it can be problematic to install and configure. Using the free SQL Server 2019 Developer server (or the full SQL Server) is recommended.
Download and install SQL Server 2019 Developer Edition from the following link:
https://www.microsoft.com/en-us/sql-server/sql-server-downloads
Create The Blazor Application

Open Visual Studio.

Select Create a new Project.
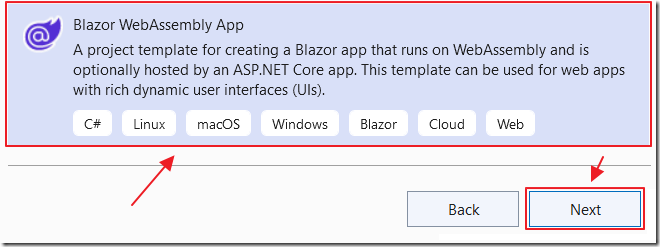
Select Blazor WebAssembly App and click Next.
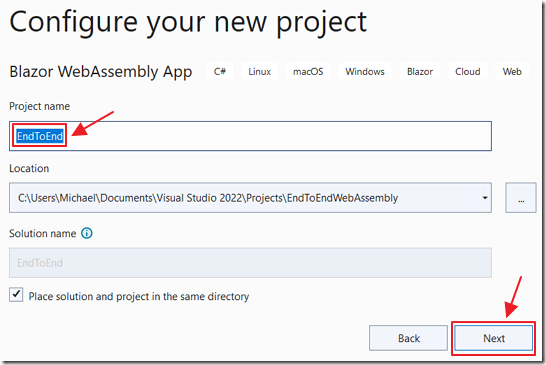
Name it EndToEnd and click Next.
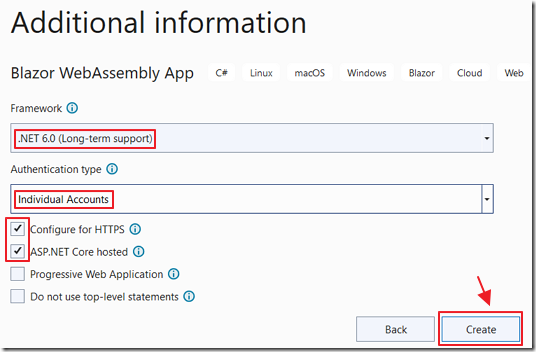
Select .Net 6.
Select Individual Accounts under Authentication.
Select Configure for HTTPS and ASP.NET Core hosted.
Click Create.
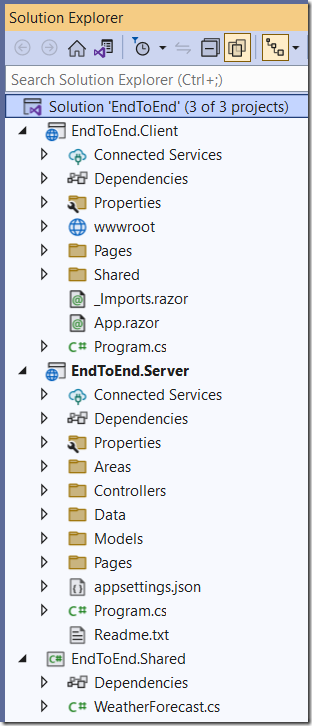
The project will be created.
Create The Database
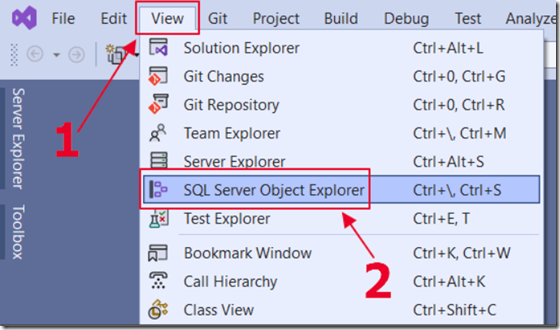
Open the SQL Server Object Explorer.
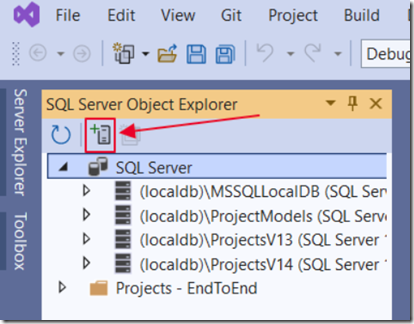
Add a connection to your local database server if you don’t already have it in the SQL Server list.
For this tutorial, we do not want to use the SQL Express server on (localdb) that you may already see in the list.
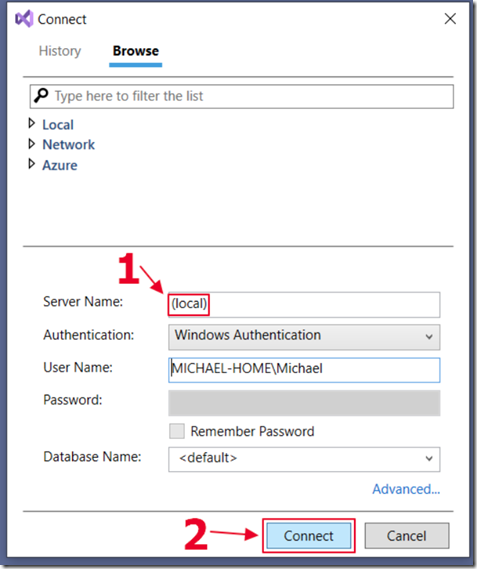
You will specify just the server and Connect.
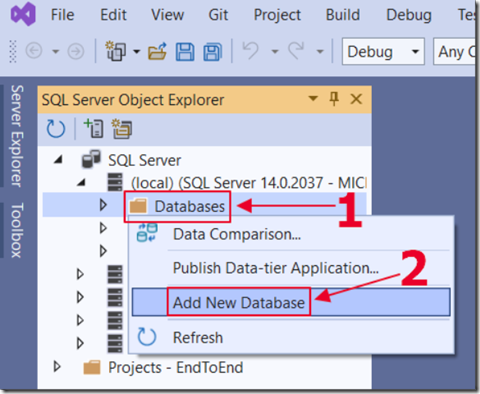
Expand the tree under the local SQL server, right-click on the Databases folder and select Add New Database.
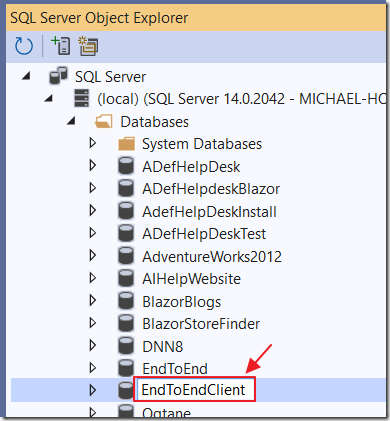
Give the database a name and press Enter.
The database will be created.
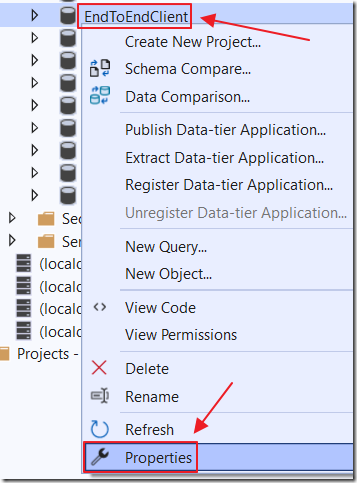
Click on the tree node to expand the database (important because this causes the Properties to properly load)
Right-Click on the Database node and select Properties.
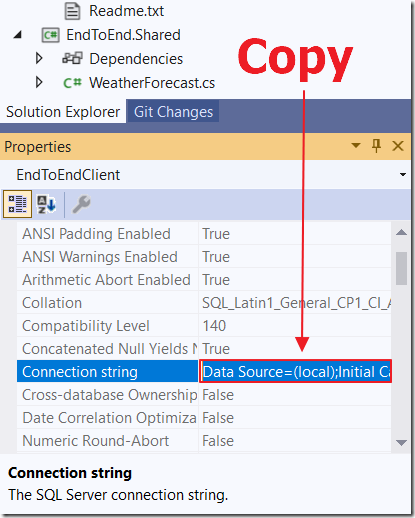
Open the Properties window if it is not already opened.
The Properties window for the database will display.
Copy the Connection string for the database.
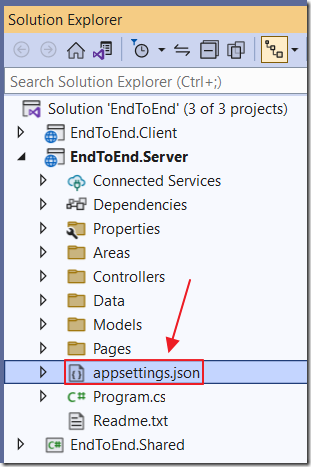
Open the appsettings.json file in the Server project.
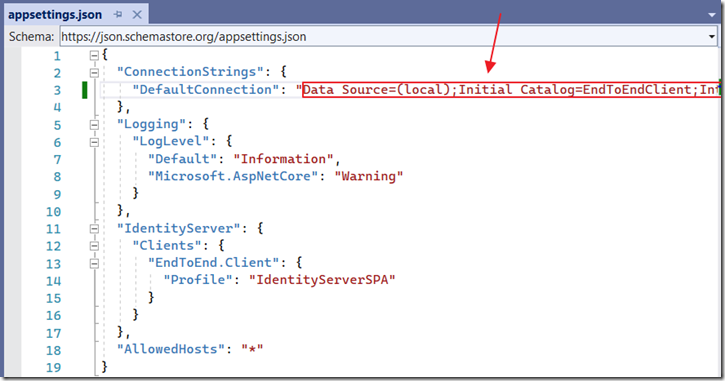
Paste in the connection string for the DefaultConnection and save the file.

Hit F5 to run the application.
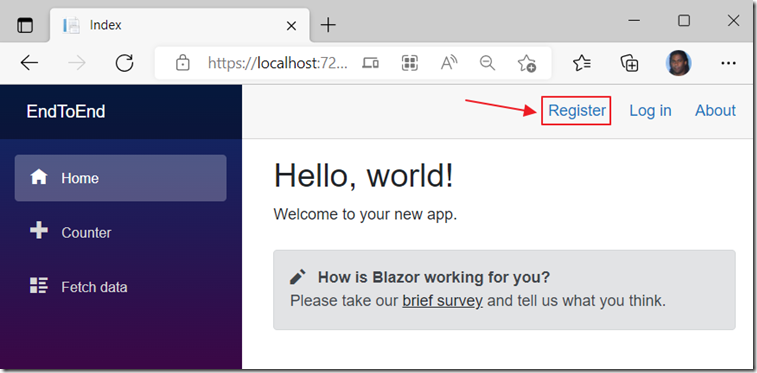
The application will open in your web browser.
Click the Register link.
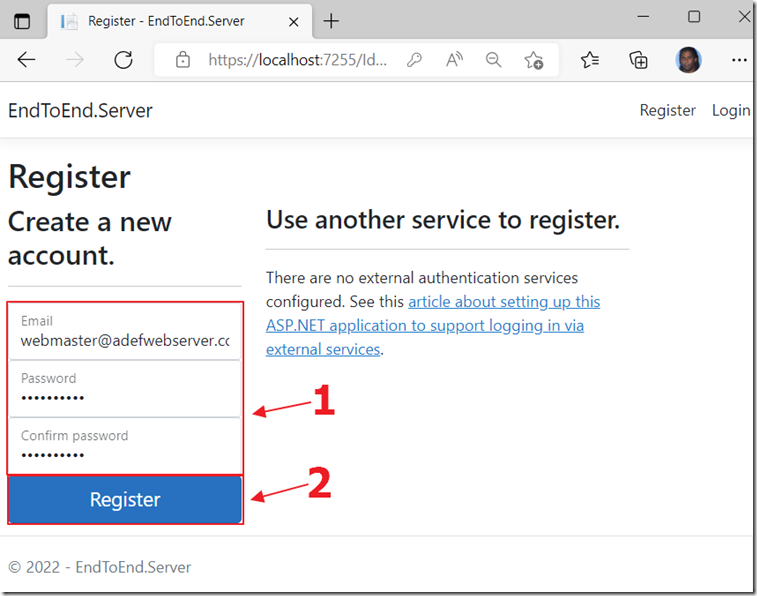
Enter the information to create a new account.
Click the Register button.
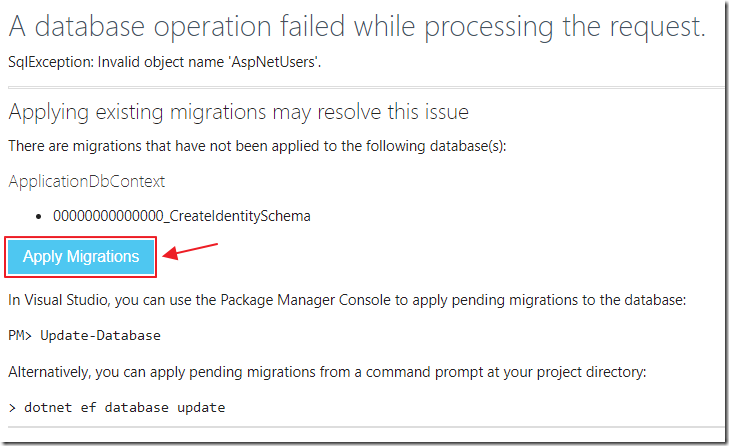
Because this is the first time the database is being used, you will see a message asking you to run the migration scripts that will create the database objects needed to support the user membership code.
Click the Apply Migrations button.
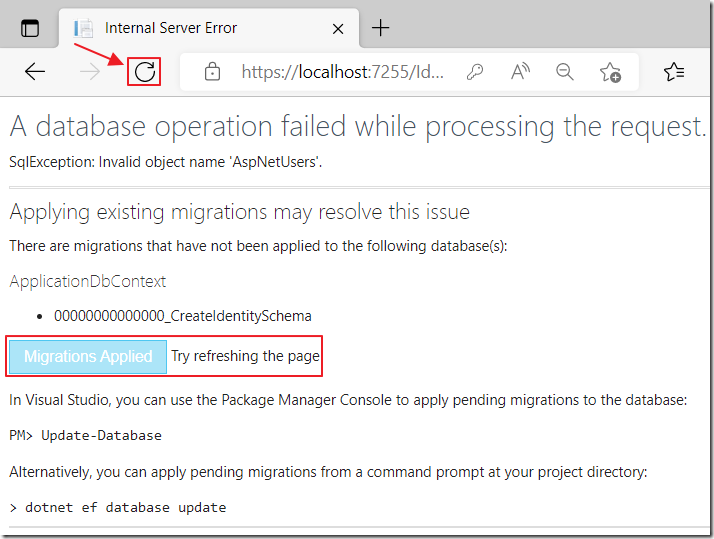
After the message changes to Migrations Applied, refresh the page in the web browser.
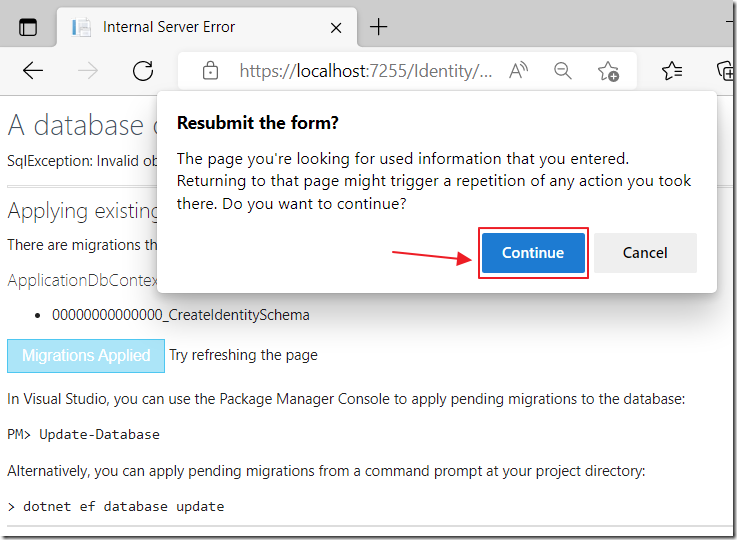
After clicking refresh in your web browser, a popup will require you to click Continue.
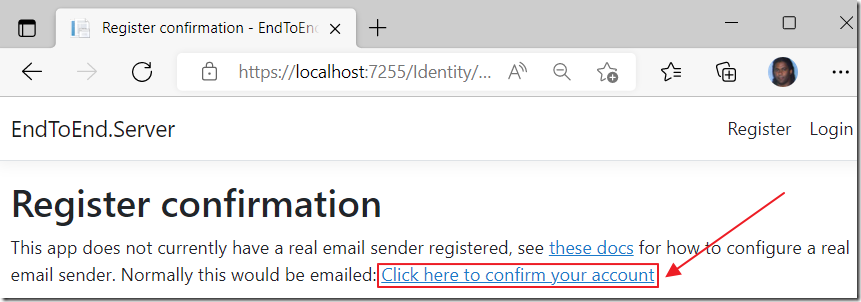
Click the Click here to confirm your account link.
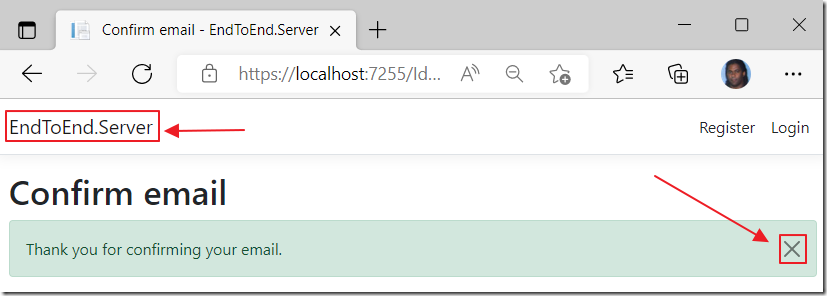
On the Confirm email page, click the X to close the confirmation notice.
Click the name of the application to navigate to the home page.
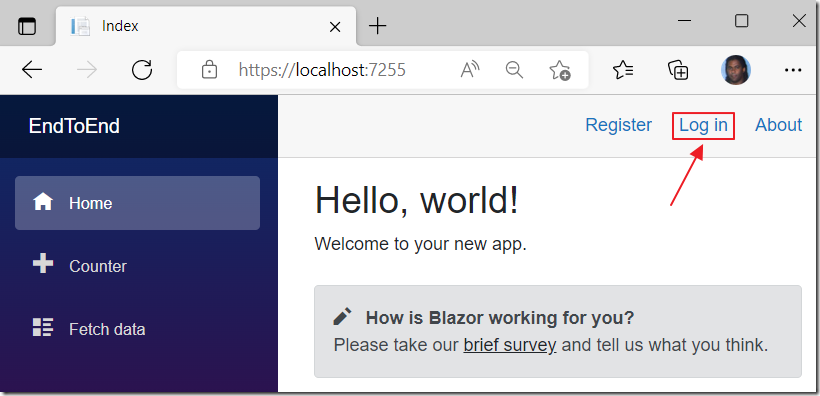
Now you can click the Log in link to log in using the account you just created.
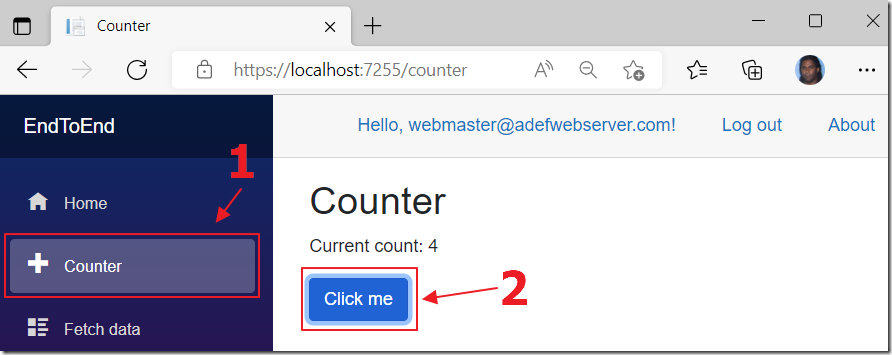
You will now be logged into the application.
You can click around the application and see that it works.
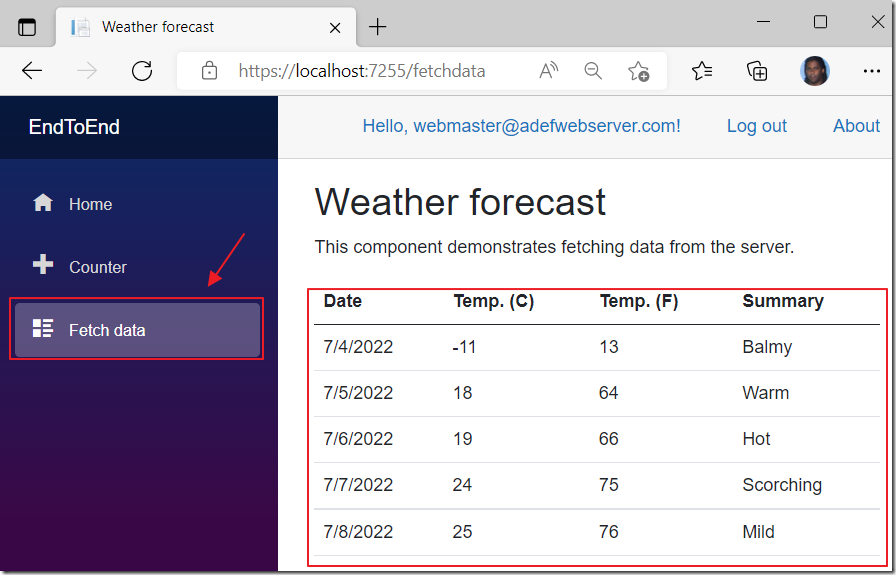
The Fetch data page currently shows random data. We will alter the application to allow us to add, update, and delete this data in the database.
Close the web browser to stop the application.
Create The WeatherForcast Table
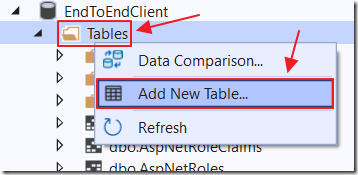
Open the SQL Server Object Explorer.
Select the database.
Right-click on the Tables node and select Add New Table.
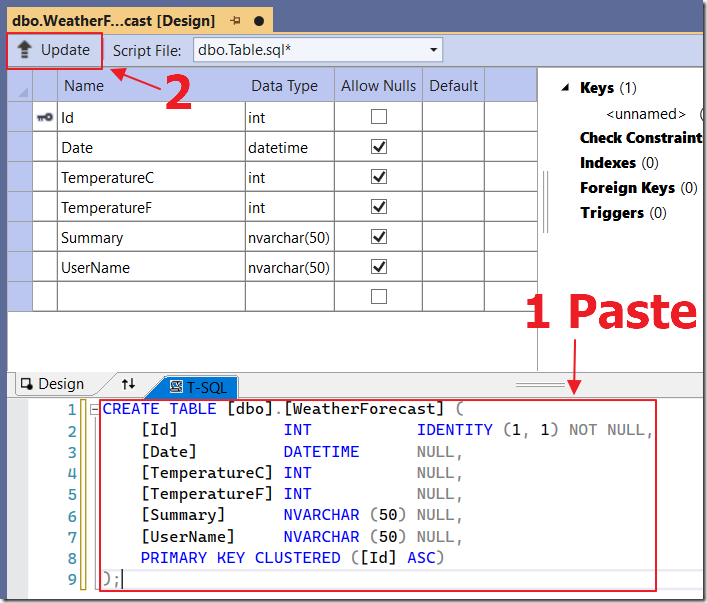
Paste the following script in the T-SQL window and then click the Update button:
CREATE TABLE [dbo].[WeatherForecast] ([Id] INT IDENTITY (1, 1) NOT NULL,[Date] DATETIME NULL,[TemperatureC] INT NULL,[TemperatureF] INT NULL,[Summary] NVARCHAR (50) NULL,[UserName] NVARCHAR (50) NULL,PRIMARY KEY CLUSTERED ([Id] ASC));
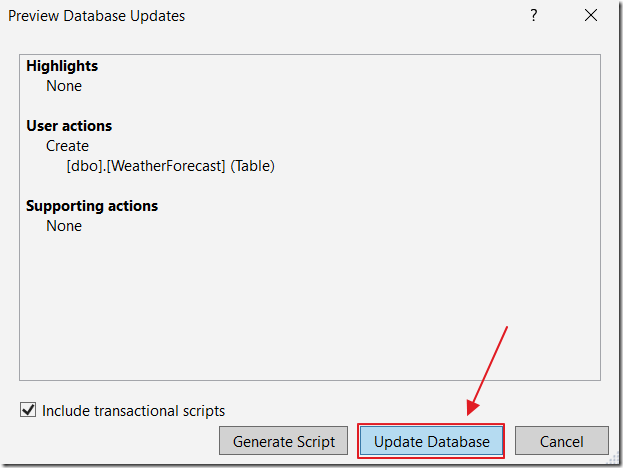
The script will prepare.
Click the Update Database button.
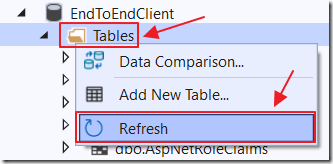
Back in the Server Explorer window, right-click on Tables and select Refresh.
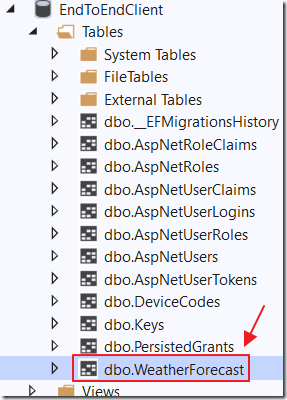
The WeatherForecast table will display.

Right-click on the table and select Show Table Data.

We will enter some sample data so that we will be able to test the data connection in the next steps.
Set the UserName field to the email of the user that we previously Registered with.
Create The Data Context
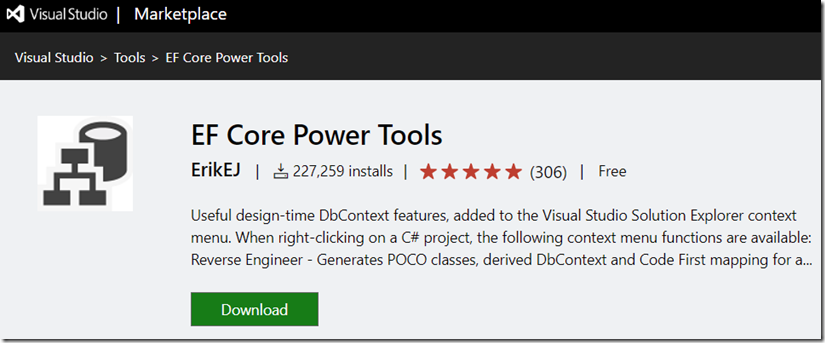
If you do not already have it installed, install EF Core Power Tools from:
https://marketplace.visualstudio.com/items?itemName=ErikEJ.EFCorePowerTools
(Note: Before installing, close Visual Studio)
(Note: Please give this project a 5 star review on marketplace.visualstudio.com!)
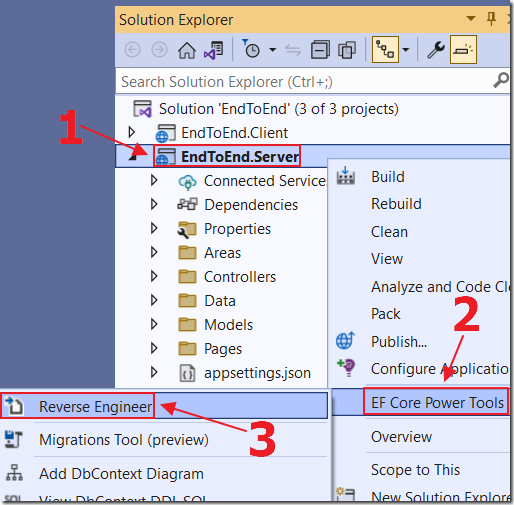
Right-click on the project node in the Solution Explorer and select EF Core Power Tools then Reverse Engineer.
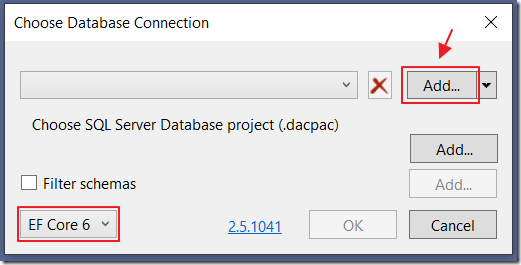
Select EF Core 6.
Click the Add button.
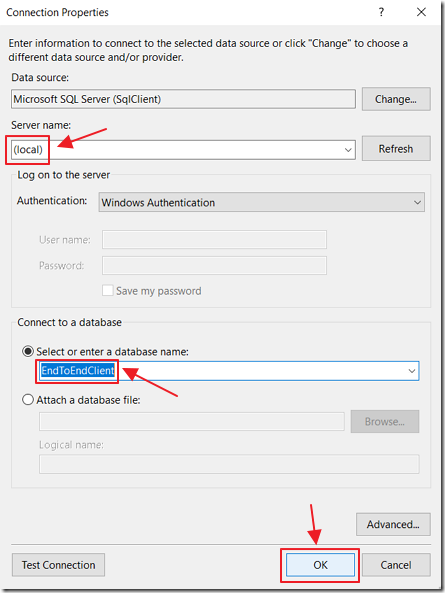
Connect to the database.
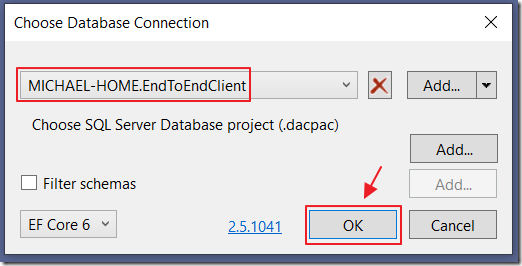
Select the database connection in the dropdown and click OK.
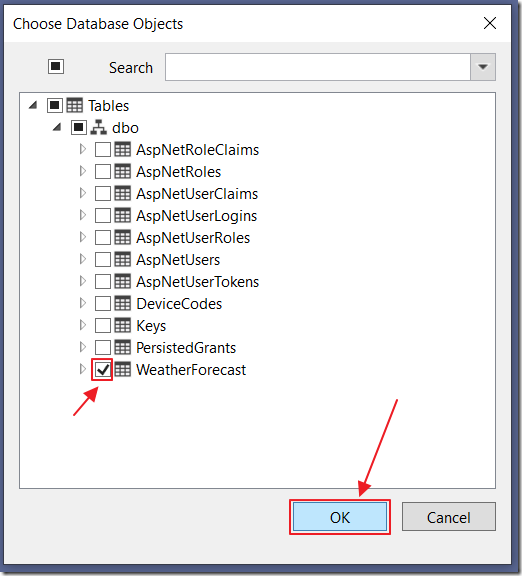
Select the WeatherForecast table and click OK.
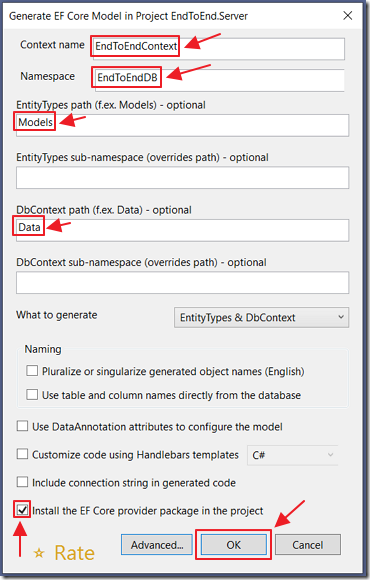
Set the values and click OK.
The Data Context will be created.
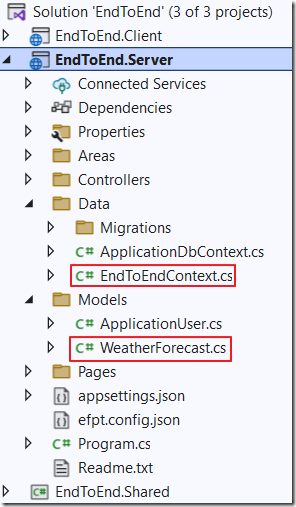
In the Solution Explorer, you will see the files for the Data Context.
Update the Program.cs File
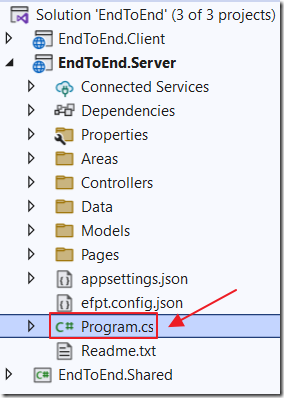
Open the Program.cs file in the Server project.
Add the following code below the var builder = WebApplication.CreateBuilder(args); line:
// Read the connection string from the appsettings.json file// Set the database connection for the EndtoEndContextbuilder.Services.AddDbContext<EndToEndDB.Data.EndToEndContext>(options =>options.UseSqlServer(builder.Configuration.GetConnectionString("DefaultConnection")));
To allow the user name to be readable in the Controller methods (to be created later), change the folliwng line:
builder.Services.AddIdentityServer().AddApiAuthorization<ApplicationUser, ApplicationDbContext>();
To:
// This allows the username (email address) of the currrently// logged in user to be read in the server side controllerbuilder.Services.AddIdentityServer().AddApiAuthorization<ApplicationUser, ApplicationDbContext>(options => {options.IdentityResources["openid"].UserClaims.Add("name");options.ApiResources.Single().UserClaims.Add("name");});
Create The Weather Forecast DTO
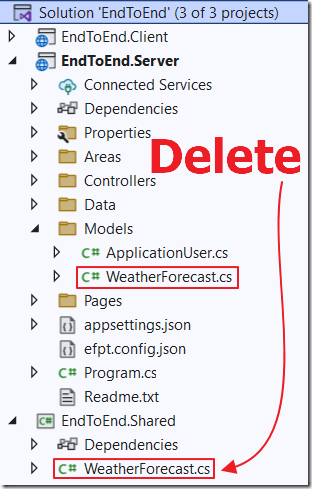
Because the EF Core Power Tools created a WeatherForecast.cs class for the Data Context, we now have two files of the same class.
Delete the WeatherForecast.cs class that is in the Shared project.
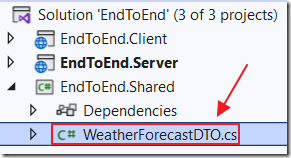
Replace it with a file name WeatherForecastDTO.cs using the following code:
#nullable disableusing System;using System.Collections.Generic;using System.Text;namespace EndToEnd.Shared{public class WeatherForecastDTO{public int Id { get; set; }public DateTime? Date { get; set; }public int? TemperatureC { get; set; }public int? TemperatureF { get; set; }public string Summary { get; set; }public string UserName { get; set; }}}
The Controller
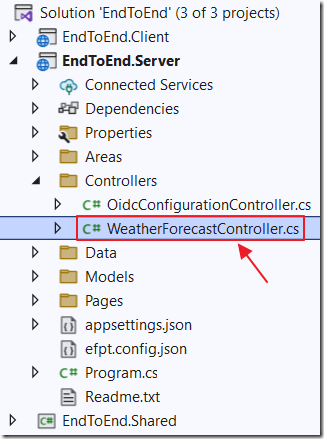
The Blazor client side code communicates with the server side code through the controller.
Open the WeatherForecastController.cs file in the server project and replace all the code with the following:
#nullable disableusing System;using System.Collections.Generic;using System.Linq;using System.Threading.Tasks;using Microsoft.AspNetCore.Mvc;using Microsoft.AspNetCore.Authorization;using EndToEndDB.Data;using Microsoft.EntityFrameworkCore;using EndToEnd.Shared;using EndToEndDB.Models;namespace BlazorClientAD.Server.Controllers{// [Authorize] means this can only be called by logged in users[Authorize][ApiController]public class WeatherForecastController : ControllerBase{// This holds the Data Context object to communicate// with the databaseprivate readonly EndToEndContext _context;// Inject the EndtoEndContext using dependency injectionpublic WeatherForecastController(EndToEndContext context){_context = context;}[HttpGet][Route("api/WeatherForecast/GetAsync")]public async Task<List<WeatherForecastDTO>>GetAsync(){// Get the current userstring strCurrentUser = this.User.Claims.Where(x => x.Type =="http://schemas.xmlsoap.org/ws/2005/05/identity/claims/name").FirstOrDefault().Value;// Get Weather Forecastsvar result = await _context.WeatherForecast// Only get entries for the current logged in user.Where(x => x.UserName == strCurrentUser)// Use AsNoTracking to disable EF change tracking// Use ToListAsync to avoid blocking a thread.AsNoTracking().ToListAsync();// Collection to returnList<WeatherForecastDTO> ColWeatherForecast =new List<WeatherForecastDTO>();// Loop through the resultsforeach (var item in result){// Create a new WeatherForecast instanceWeatherForecastDTO objWeatherForecastDTO =new WeatherForecastDTO();// Set the values for the WeatherForecast instanceobjWeatherForecastDTO.Id =item.Id;objWeatherForecastDTO.Date =item.Date;objWeatherForecastDTO.UserName =item.UserName;objWeatherForecastDTO.TemperatureF =item.TemperatureF;objWeatherForecastDTO.TemperatureC =item.TemperatureC;objWeatherForecastDTO.Summary =item.Summary;// Add the WeatherForecast instance to the collectionColWeatherForecast.Add(objWeatherForecastDTO);}// Return the final collectionreturn ColWeatherForecast;}[HttpPost][Route("api/WeatherForecast/Post")]public voidPost([FromBody] WeatherForecastDTO paramWeatherForecast){// Create a new WeatherForecast instanceWeatherForecast objWeatherForecast =new WeatherForecast();// Get the current userstring strCurrentUser = this.User.Claims.Where(x => x.Type =="http://schemas.xmlsoap.org/ws/2005/05/identity/claims/name").FirstOrDefault().Value;// Set the values for the WeatherForecast instanceobjWeatherForecast.Id =paramWeatherForecast.Id;objWeatherForecast.Date =paramWeatherForecast.Date;objWeatherForecast.UserName =strCurrentUser;objWeatherForecast.TemperatureF =paramWeatherForecast.TemperatureF;objWeatherForecast.TemperatureC =paramWeatherForecast.TemperatureC;objWeatherForecast.Summary =paramWeatherForecast.Summary;// Save to the database_context.WeatherForecast.Add(objWeatherForecast);_context.SaveChanges();}[HttpPut][Route("api/WeatherForecast/Put")]public voidPut([FromBody] WeatherForecastDTO objWeatherForecast){// Get the current userstring strCurrentUser = this.User.Claims.Where(x => x.Type =="http://schemas.xmlsoap.org/ws/2005/05/identity/claims/name").FirstOrDefault().Value;// Find the existing Weather Forecast record// using the idvar ExistingWeatherForecast =_context.WeatherForecast.Where(x => x.Id == objWeatherForecast.Id).Where(x => x.UserName == strCurrentUser).FirstOrDefault();if (ExistingWeatherForecast != null){// Update the valuesExistingWeatherForecast.Date =objWeatherForecast.Date;ExistingWeatherForecast.Summary =objWeatherForecast.Summary;ExistingWeatherForecast.TemperatureC =objWeatherForecast.TemperatureC;ExistingWeatherForecast.TemperatureF =objWeatherForecast.TemperatureF;// Save to the database_context.SaveChanges();}}[HttpDelete][Route("api/WeatherForecast/Delete/{id}")]public voidDelete(int id){// Get the current userstring strCurrentUser = this.User.Claims.Where(x => x.Type =="http://schemas.xmlsoap.org/ws/2005/05/identity/claims/name").FirstOrDefault().Value;// Find the existing Weather Forecast record// using the idvar ExistingWeatherForecast =_context.WeatherForecast.Where(x => x.Id == id).Where(x => x.UserName == strCurrentUser).FirstOrDefault();if (ExistingWeatherForecast != null){// Remove from the database_context.WeatherForecast.Remove(ExistingWeatherForecast);_context.SaveChanges();}}}}
Client Code
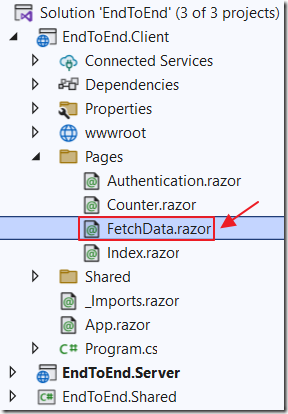
In the Client project, open the FetchData.razor page and replace all the code with the following code:
@page "/fetchdata"@using EndToEnd.Shared@inject HttpClient Http@inject AuthenticationStateProvider AuthenticationStateProvider<h1>Weather forecast</h1><!-- AuthorizeView allows us to only show sections of the page --><!-- based on the security on the current user --><AuthorizeView><!-- Show this section if the user is logged in --><Authorized>@if (forecasts == null){<!-- Show this if the current user has no data... yet... --><p><em>Loading...</em></p>}else{<!-- Show the forecasts for the current user --><table class="table"><thead><tr><th>Date</th><th>Temp. (C)</th><th>Temp. (F)</th><th>Summary</th><th></th></tr></thead><tbody>@foreach (var forecast in forecasts){<tr><td>@((forecast.Date != null)? forecast.Date.Value.ToShortDateString(): "")</td><td>@forecast.TemperatureC</td><td>@forecast.TemperatureF</td><td>@forecast.Summary</td><td><!-- Edit the current forecast --><button class="btn btn-primary"@onclick="(() =>EditForecast(forecast))">Edit</button></td></tr>}</tbody></table><p><!-- Add a new forecast --><button class="btn btn-primary"@onclick="AddNewForecast">Add New Forecast</button></p>@if (ShowPopup){<!-- This is the popup to create or edit a forecast --><div class="modal" tabindex="-1" style="display:block"role="dialog"><div class="modal-dialog"><div class="modal-content"><div class="modal-header"><h3 class="modal-title">Edit Forecast</h3><!-- Button to close the popup --><button type="button" class="close"@onclick="ClosePopup"><span aria-hidden="true">X</span></button></div><!-- Edit form for the current forecast --><div class="modal-body"><input class="form-control" type="text"placeholder="Celsius forecast"@bind="objWeatherForecastDTO.TemperatureC" /><input class="form-control" type="text"placeholder="Fahrenheit forecast"@bind="objWeatherForecastDTO.TemperatureF" /><input class="form-control" type="text"placeholder="Summary"@bind="objWeatherForecastDTO.Summary" /><br /><!-- Button to save the forecast --><button class="btn btn-primary"@onclick="SaveForecast">Save</button><!-- Only show button if not a new record -->@if (objWeatherForecastDTO.Id > 0){<!-- Button to delete the forecast --><button class="btn btn-primary"@onclick="DeleteForecast">Delete</button>}</div></div></div></div>}}</Authorized><!-- Show this section if the user is not logged in --><NotAuthorized><p>You're not signed in.</p></NotAuthorized></AuthorizeView>
Add the following C# code to support the page markup:
@code {#nullable disable// This passes authentication to the control// to allow us to determine the current user// This can be 'altered' by a user so we do// not trust this value in server side code[CascadingParameter]private Task<AuthenticationState>authenticationStateTask { get; set; }// Stores the forecasts displayed in a listprivate List<WeatherForecastDTO> forecasts;// Stores a single forecastWeatherForecastDTO objWeatherForecastDTO =new WeatherForecastDTO();// Controls if the popup is displayedbool ShowPopup = false;// First method to run when user navicates to this controlprotected override async Task OnInitializedAsync(){// Get the current uservar authState = await authenticationStateTask;var user = authState.User;if (user.Identity != null){if (user.Identity.IsAuthenticated){// Make a call to get the forecasts// we don't pass the user because the server// side code will determine who the user is// from the authentication cookieforecasts =await Http.GetFromJsonAsync<List<WeatherForecastDTO>>("/api/WeatherForecast/GetAsync");}}}void ClosePopup(){// Close the PopupShowPopup = false;}void AddNewForecast(){// Make new forecastobjWeatherForecastDTO = new WeatherForecastDTO();// Set Id to 0 so we know it is a new recordobjWeatherForecastDTO.Id = 0;// Open the PopupShowPopup = true;}async Task SaveForecast(){// Close the PopupShowPopup = false;// Get the current uservar user = (await authenticationStateTask).User;// A new forecast will have the Id set to 0if (objWeatherForecastDTO.Id == 0){// Create new forecastWeatherForecastDTO objNewWeatherForecastDTO =new WeatherForecastDTO();objNewWeatherForecastDTO.Date =System.DateTime.Now;objNewWeatherForecastDTO.Summary =objWeatherForecastDTO.Summary;objNewWeatherForecastDTO.TemperatureC =Convert.ToInt32(objWeatherForecastDTO.TemperatureC);objNewWeatherForecastDTO.TemperatureF =Convert.ToInt32(objWeatherForecastDTO.TemperatureF);// Username will be set server sideobjNewWeatherForecastDTO.UserName = "";// Save the resultawait Http.PostAsJsonAsync("/api/WeatherForecast/Post",objNewWeatherForecastDTO);}else{// This is an updateawait Http.PutAsJsonAsync("/api/WeatherForecast/Put",objWeatherForecastDTO);}// Get the forecasts for the current userforecasts =await Http.GetFromJsonAsync<List<WeatherForecastDTO>>("/api/WeatherForecast/GetAsync");}void EditForecast(WeatherForecastDTO WeatherForecastDTO){// Set the selected forecast// as the current forecastobjWeatherForecastDTO = WeatherForecastDTO;// Open the PopupShowPopup = true;}async Task DeleteForecast(){// Close the PopupShowPopup = false;// Delete the forecastawait Http.DeleteAsync("/api/WeatherForecast/Delete/" +Convert.ToInt32(objWeatherForecastDTO.Id));// Get the forecasts for the current userforecasts =await Http.GetFromJsonAsync<List<WeatherForecastDTO>>("/api/WeatherForecast/GetAsync");}}
Links
Implementing Roles In Blazor WebAssembly
Creating A Step-By-Step End-To-End Database Server-Side Blazor Application (updated to .Net 6)
Download
The project is available on the Downloads page on this site.
You must have Visual Studio 2022 (or higher) installed to run the code.
