10/23/2021 Admin
Blazor Power BI Paginated Reports
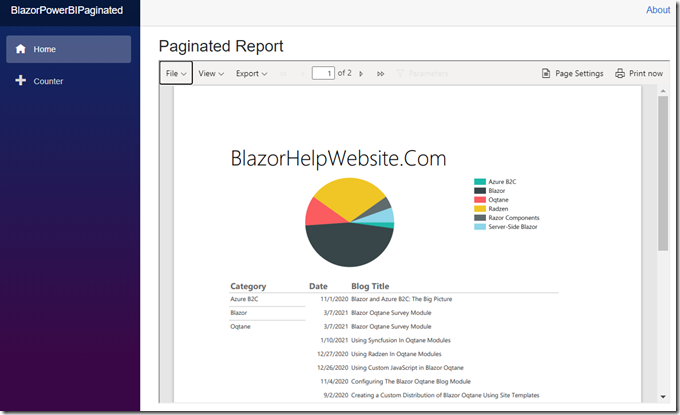
You can easily embed Power BI Paginated reports into a Microsoft Server Side Blazor Application.
Microsoft Blazor is a technology that lets you build interactive web applications using C#.
Power BI allows you to create enterprise business intelligence (BI) dashboards and reports, however, unlike a Power BI dashboard, Power BI Paginated reports are designed to be printed and shared (for example, exported as a PDF and emailed).
The method described in this article allows you to display a Power BI Paginated report in a Blazor application, without requiring the user to have a Power BI license. This is called “App owns data” or “Embed Power BI paginated reports for your customers”, therefore it has these limitations (from: Tutorial: Embed Power BI paginated reports into an application for your customers):
- You must use a service principal for API authentication, Master user is not supported.
- Premium Per User (PPU) is not supported. You can use PPU to experiment with the solution, but you will have to follow these directions to: move to production.
- Datasources that require single sign-on (SSO), are not supported. For a list of supported datasets and their authentication methods, see Supported data sources for Power BI paginated reports. Basically, a Power BI dataset is not supported as a datasource (you can use other data sources such as SQL server).
Note: On 10/22/2021 this tutorial was updated to use the Microsoft Authentication Library (MSAL) rather than the deprecated Authentication Library (ADAL) See: Update your applications to use Microsoft Authentication Library and Microsoft Graph API - Microsoft Tech Community
Set-Up For The Application
To set up to run the sample application, we follow the directions in this article: Embed Power BI content with service principal and an application secret.
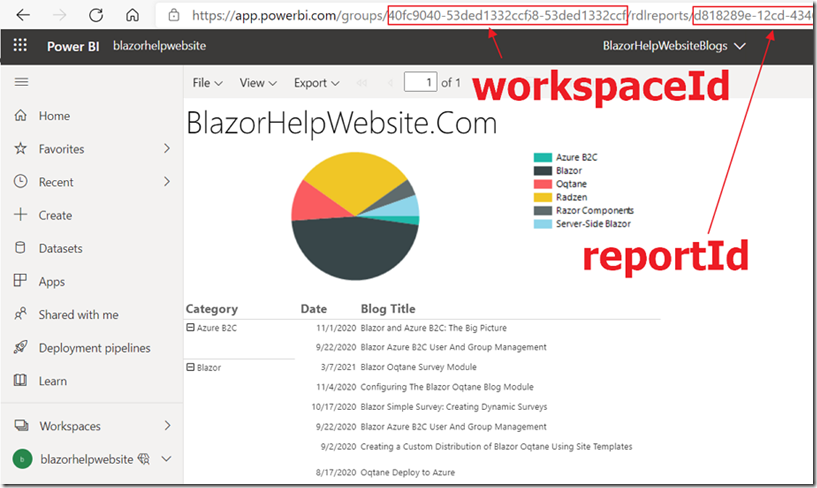
The first step is to start with a Power BI Paginated Report in https://app.powerbi.com/.
- The report must work on app.powerbi.com
- The report must not use a Power BI dataset as a data source
When viewing the report, you can look at the URL in the web browser to gather (and save for use in following steps):
- workspaceId
- reportId
(note: If you have issues completing the following directions, you may not have sufficient permissions)
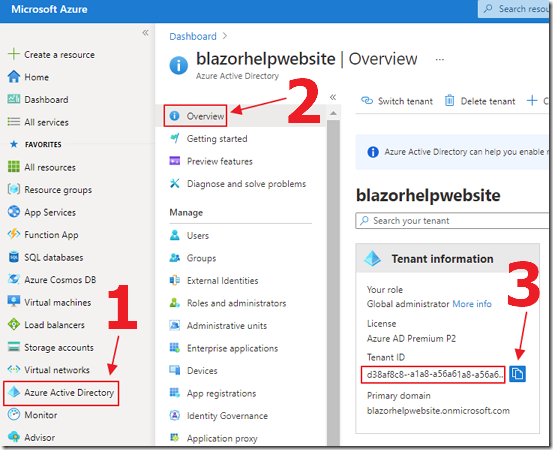
Next, log into: https://portal.azure.com/ and copy the Tenant ID.
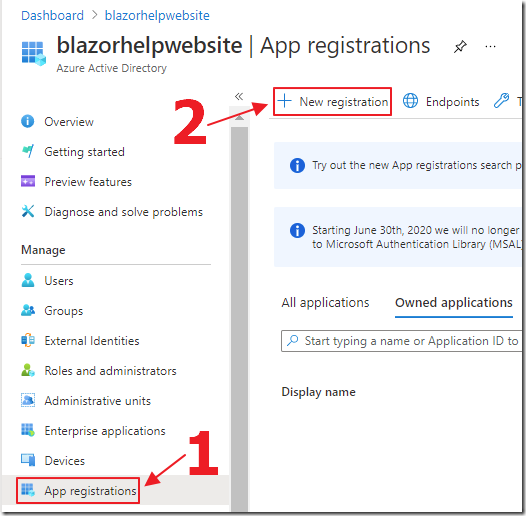
Now we need to create a Service Principal that will allow us to programmatically call the Power BI Embedded API.
We select App Registrations and click the link to create a New registration.
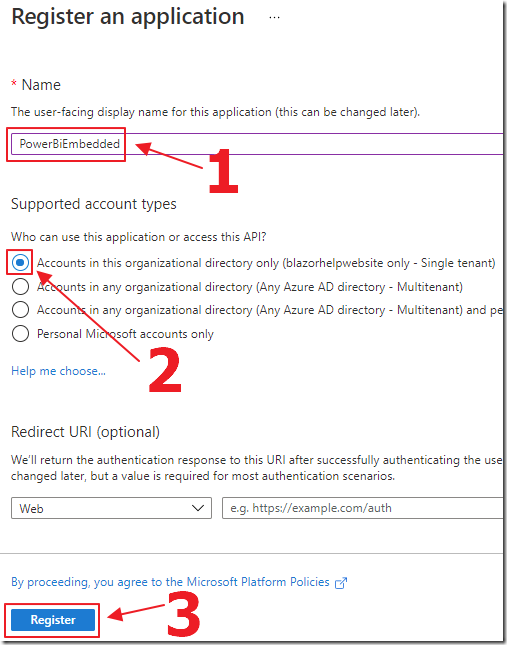
We create a new application.
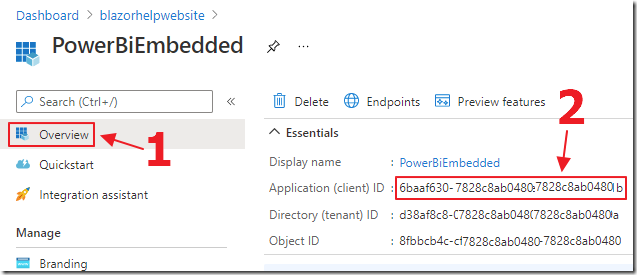
Once the application (the Service Principal), is created, we select it, then click on the Overview tab and copy and save the ClientID.
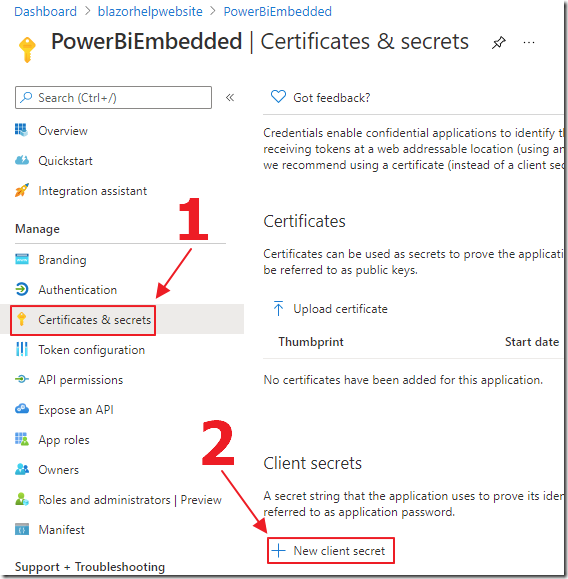
Next, we click the Certificates & secrets tab and click the link to create a New client secret.
Note: To create a client secret longer than 2 years see this link.
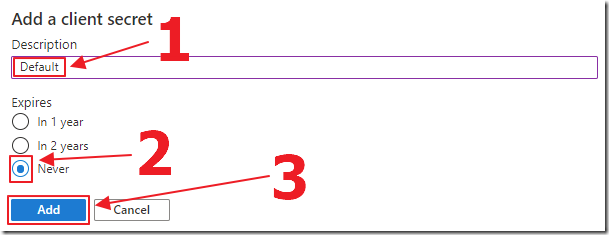
We create a client secret.

After it is created, we click the copy button to copy and save the ClientSecret.
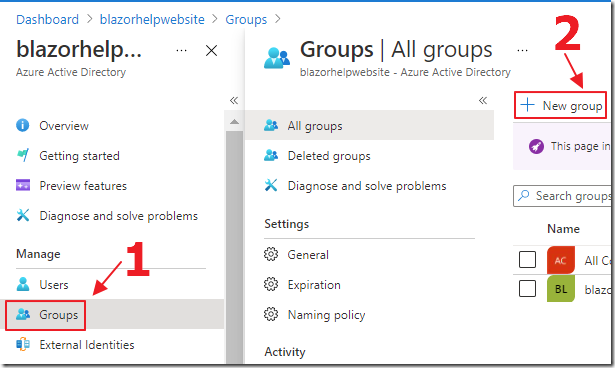
Next, select Groups, then New Group.
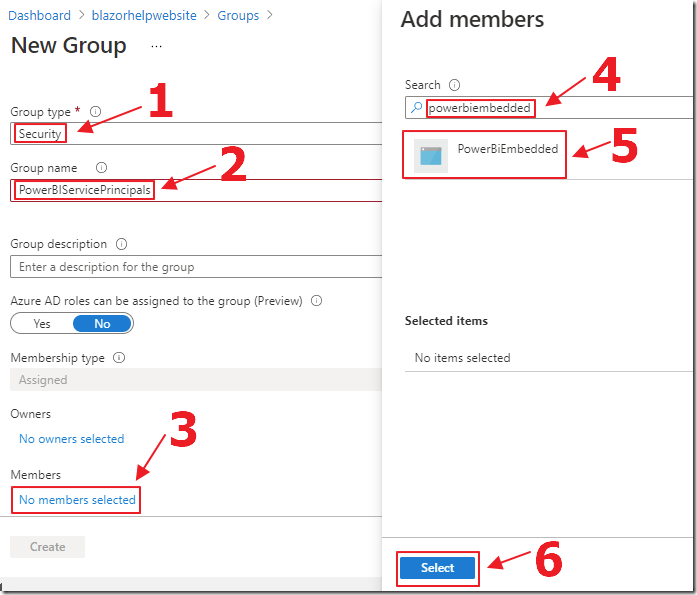
Create a new Security Group.
Add the Service Principal you just created.
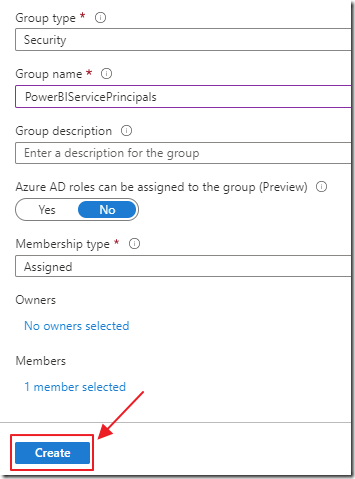
Click the Create button to save the group.
Next, to allow this Service Principal to access the Power BI Paginated Reports, we follow the directions here: Service principal API access….
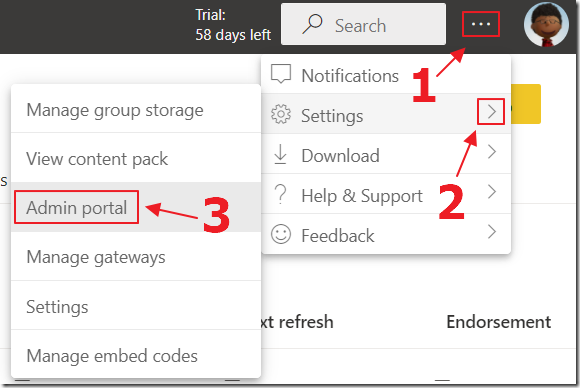
On https://app.powerbi.com/ log into the Admin portal.
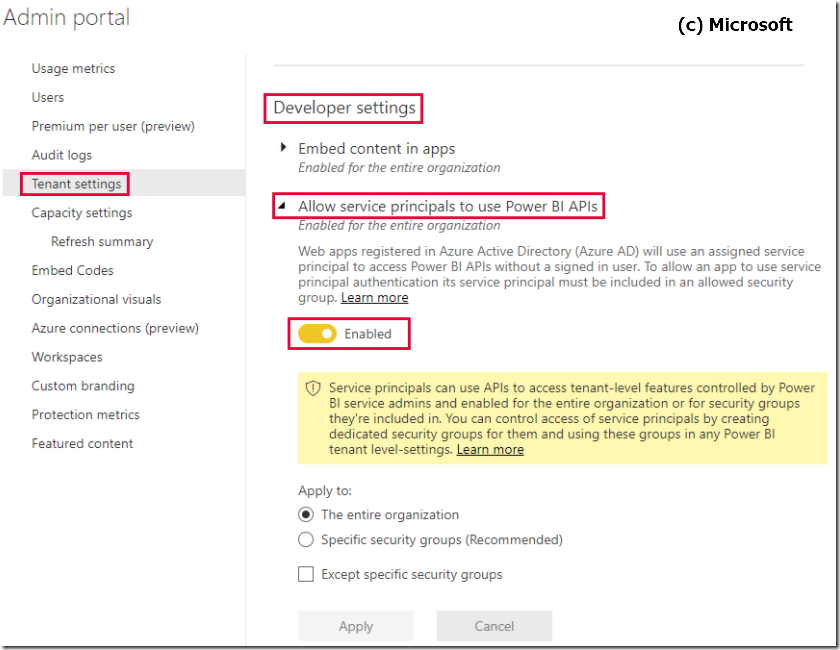
In Tenant settings, enable the option to Allow Service Principals to use Power BI APIs.
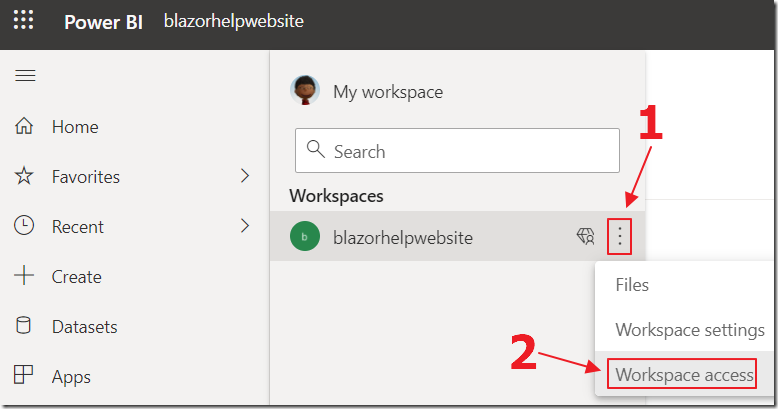
Select the Workspace that has your Power BI Paginated Report, and select Workspace access.
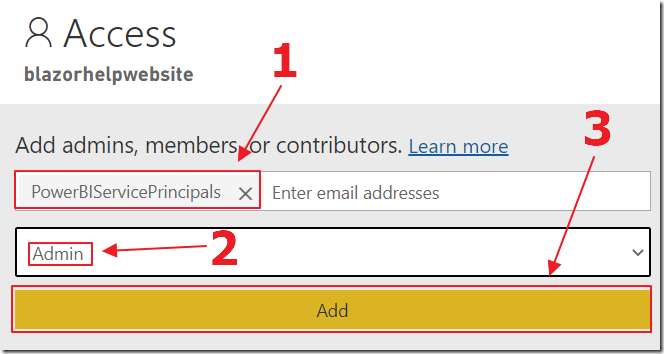
Add the Security Group (created earlier) to the Workspace.
Run The Application
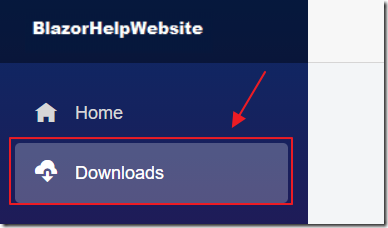
Next, navigate to the Downloads page on this site.

Download “Blazor Power BI Paginated Reports”.
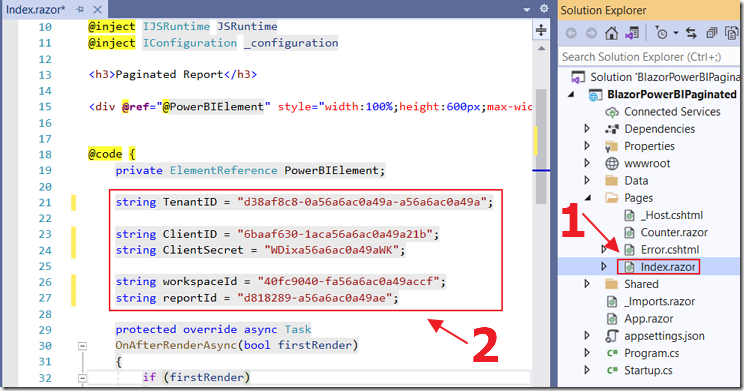
We unzip the code and open it in Visual Studio 2019 (or higher).
We replace the configuration values with the values we saved from the earlier steps.
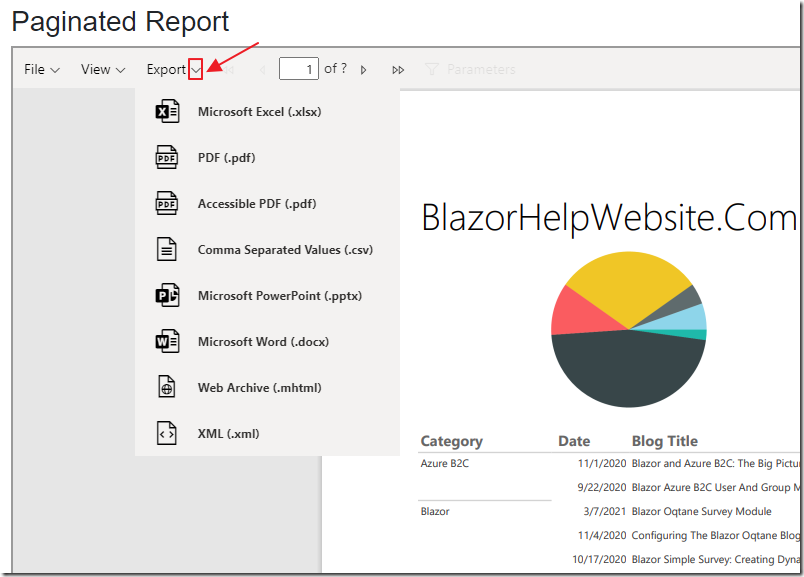
When we run the application, the report displays.
How The Blazor Application Was Created
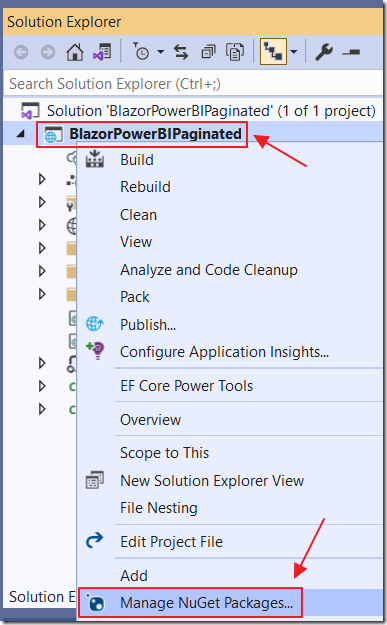
The first step is to create a Server Side Blazor project and select Manage NuGet Packages.

Install the Microsoft.PowerBI.Api and Microsoft.Identity.Client packages.
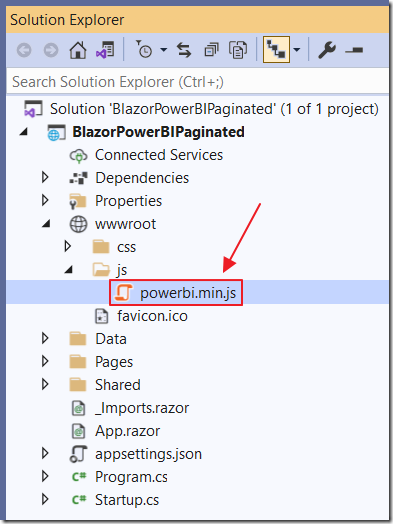
The next step is to add the powerbi.min.js file to the wwwroot/js directory (you can get that file from here: https://github.com/microsoft/PowerBI-JavaScript/releases)
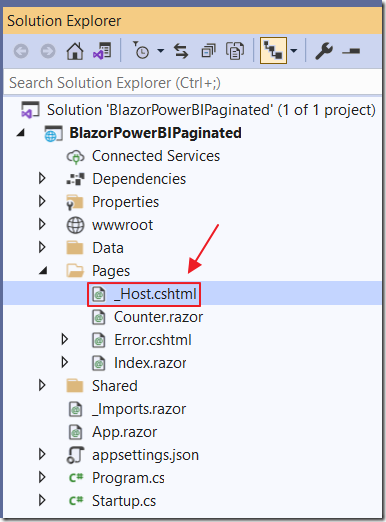
Next open the _Host.cshtml file.
Add the following code to reference the powerbi.min.js file:
<script src="js/powerbi.min.js"></script>
Add the following code to display the Power BI Paginated Report using the code in the powerbi.min.js file:
window.BlazorPowerBI = {showPaginatedReport: function (reportContainer, accessToken, embedUrl, embedReportId) {// Get models. models contains enums that can be used.var models = window['powerbi-client'].models;var config = {type: 'report',tokenType: models.TokenType.Embed,accessToken: accessToken,embedUrl: embedUrl,id: embedReportId,permissions: models.Permissions.All,settings: {filterPaneEnabled: true,navContentPaneEnabled: true}};// Embed the report and display it within the div container.powerbi.embed(reportContainer, config);}};
So that our C# code can communicate with the JavaScript, create a interop.cs file using the following code:
public static class Interop{internal static ValueTask<object> CreateReportPaginated(IJSRuntime jsRuntime,ElementReference reportContainer,string accessToken,string embedUrl,string embedReportId){return jsRuntime.InvokeAsync<object>("BlazorPowerBI.showPaginatedReport",reportContainer, accessToken, embedUrl, embedReportId);}}
Also, add a PowerBIEmbedConfig.cs Configuration class:
public class PowerBIEmbedConfig{public string Id { get; set; }public string EmbedUrl { get; set; }public EmbedToken EmbedToken { get; set; }public int MinutesToExpiration{get{var minutesToExpiration = EmbedToken.Expiration - DateTime.UtcNow;return minutesToExpiration.Minutes;}}public bool? IsEffectiveIdentityRolesRequired { get; set; }public bool? IsEffectiveIdentityRequired { get; set; }public bool EnableRLS { get; set; }public string Username { get; set; }public string Roles { get; set; }public string ErrorMessage { get; internal set; }}
Finally, create a .razor page using the following code:
@page "/"@using System.Net.Http@using System.Threading.Tasks@using Microsoft.Identity.Client@using Microsoft.PowerBI.Api@using Microsoft.PowerBI.Api.Models@using Microsoft.Rest@using Newtonsoft.Json.Linq@using Microsoft.Extensions.Configuration@inject IJSRuntime JSRuntime@inject IConfiguration _configuration<h3>Paginated Report</h3><div @ref="@PowerBIElement" style="width:100%;height:600px;max-width: 2000px" />@code {private ElementReference PowerBIElement;string TenantID = "";string ClientID = "";string ClientSecret = "";string workspaceId = "";string reportId = "";protected override async TaskOnAfterRenderAsync(bool firstRender){if (firstRender){var result = new PowerBIEmbedConfig();// Authenticate using created credentialsAuthenticationResult authenticationResult = null;authenticationResult = await DoAuthentication();var tokenCredentials =new TokenCredentials(authenticationResult.AccessToken, "Bearer");using (var client = new PowerBIClient(new Uri("https://api.powerbi.com/"), tokenCredentials)){var report = await client.Reports.GetReportInGroupAsync(new Guid(workspaceId), new Guid(reportId));var generateTokenRequestParameters = new GenerateTokenRequest(accessLevel: "view");var tokenResponse = await client.Reports.GenerateTokenAsync(new Guid(workspaceId),new Guid(reportId),generateTokenRequestParameters);result.EmbedToken = tokenResponse;result.EmbedUrl = report.EmbedUrl;result.Id = report.Id.ToString();await Interop.CreateReportPaginated(JSRuntime,PowerBIElement,tokenResponse.Token,report.EmbedUrl,report.Id.ToString());}}}private const string AuthorityFormat = "https://login.microsoftonline.com/{0}/v2.0";private const string MSGraphScope = "https://analysis.windows.net/powerbi/api/.default";private async Task<AuthenticationResult> DoAuthentication(){IConfidentialClientApplication daemonClient;daemonClient = ConfidentialClientApplicationBuilder.Create(ClientID).WithAuthority(string.Format(AuthorityFormat, TenantID)).WithClientSecret(ClientSecret).Build();AuthenticationResult authResult =await daemonClient.AcquireTokenForClient(new[] { MSGraphScope }).ExecuteAsync();return authResult;}}
If You Have Problems
If you have problems, see this Microsoft article for more details: Embed Power BI content in an embedded analytics application with service principal and an application secret enabling better embedded BI insights - Power BI | Microsoft Docs and try using their sample application.
Links
Create View and Edit Power BI Reports In Blazor
Supported data sources for Power BI paginated reports
Embed Power BI content with service principal and an application secret
Download
The project is available on the Downloads page on this site.
You must have Visual Studio 2019 Version 16.3 (or higher) installed to run the code.
