5/6/2023 Admin
Blazor OpenAI Configurator
Video: https://www.youtube.com/watch?v=cN-ZDgaaqyM
Using natural human language to generate text and images with OpenAI models is very exciting.
In this blog post, we will discuss the process of building a Microsoft Blazor application that accepts text input through a microphone or a textbox and converts it into a JSON representation. This JSON data will then be used to generate a folder Tree.
Additionally, the application will enable users to modify the Tree using natural human language, making it more user-friendly and accessible. We explore the steps involved in creating a practical and efficient Blazor application that effectively combines text input, JSON data, and natural language processing.
Walk-thru
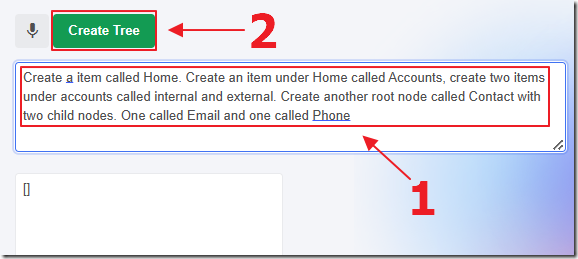
You can describe the Tree you want, including the names of the Tree nodes and their placement.

Your text will be sent to the OpenAI service, requesting that a JSON representation be returned.
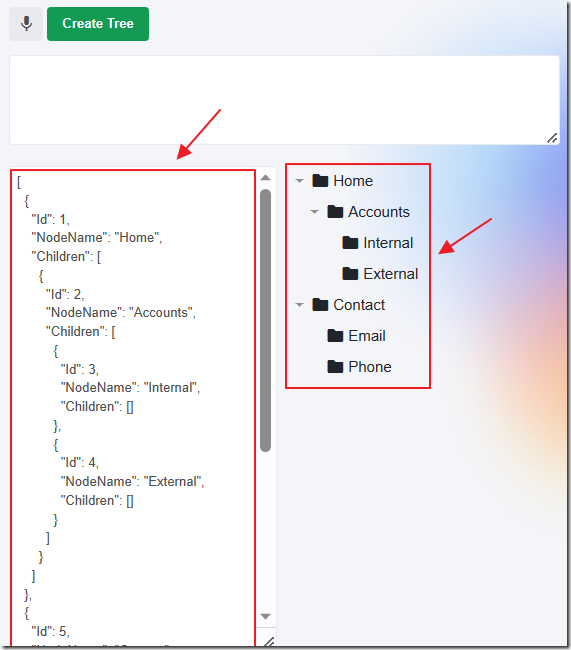
The OpenAI service will return a JSON representation of the Tree that will be displayed in the left panel.
The actual Tree, described by the JSON will be displayed in the right panel.
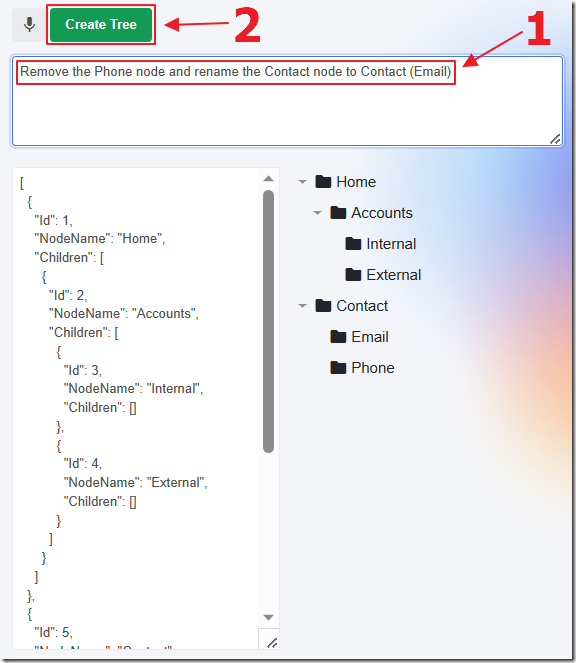
In addition, you can request changes to the existing Tree.
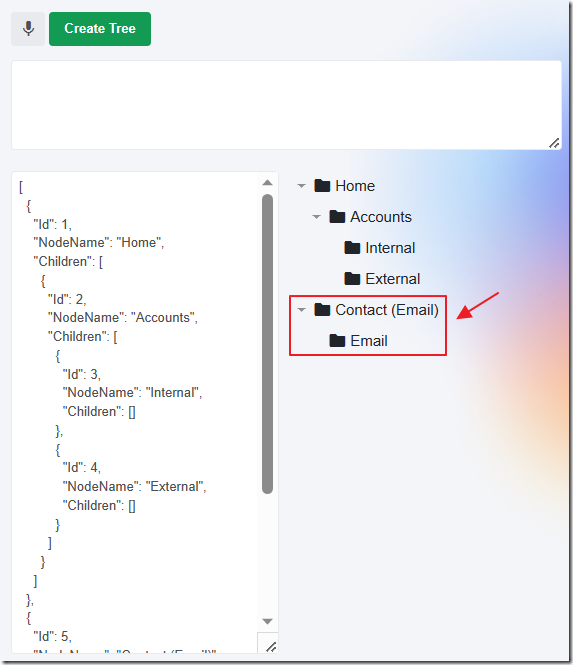
The JSON is updated and the Tree is updated.

You can also enter text not related to creating or editing a Tree…

An error message will return.
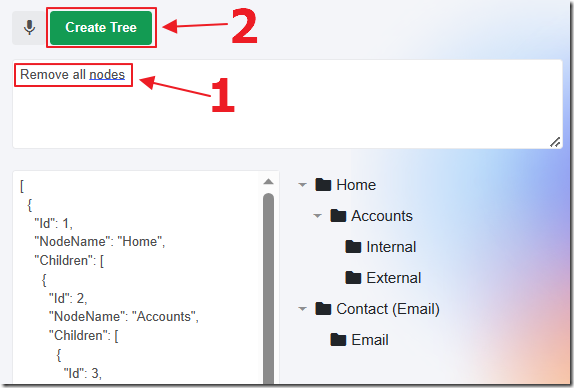
Finally, you can request that the Tree be cleared by removing all nodes.
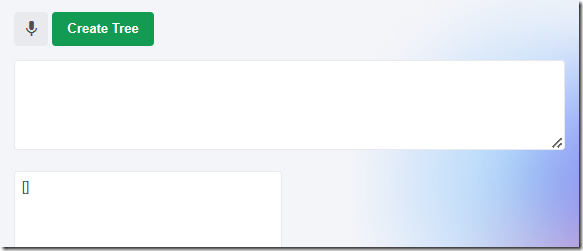
You should end up with a blank Tree.
What Large Language Models (LLMs) Can Do
(…and what this example demonstrates)

Large Language Models (LLMs) like OpenAI Chat GPT 3.5 Turbo have been designed to enable humans to interact with computers using natural language, making it easier for them to accomplish their desired tasks.
Currently, services that use LLMs like ChatGPT and Bing Chat, are capable of generating text and images when prompted by natural language.
However, the real challenge lies in getting them to do something in a safe and controlled manner.

In this example, we could have used the LLM to create the C# code to create the Tree directly, but we choose to use JSON for several reasons:
- First, this pattern can be applied universally across various applications and languages.
- Second, LLMs have proven to be quite adept at generating JSON.
- Lastly, JSON is the most succinct format, which is important because we are charged by the number of tokens when using these models.
By leveraging the capabilities of LLMs in generating JSON representations, we can build applications that are more user-friendly and efficient, bridging the gap between human language and computer functionality.
Set-Up
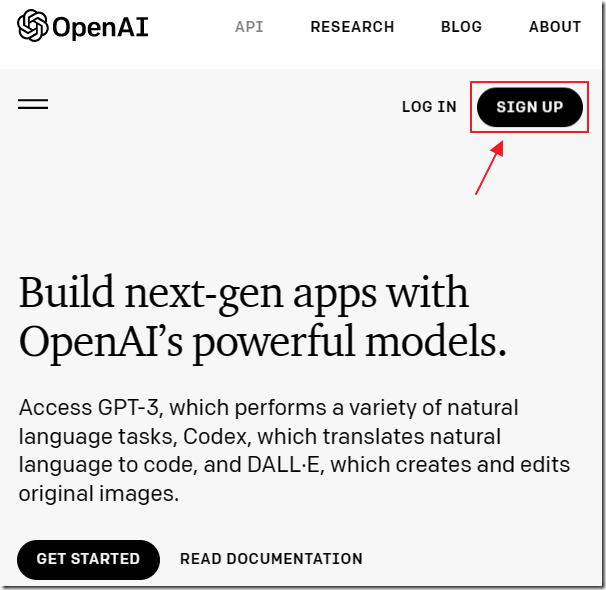
The first step is to get a Key. Go to: https://openai.com/api/ and click Sign Up.
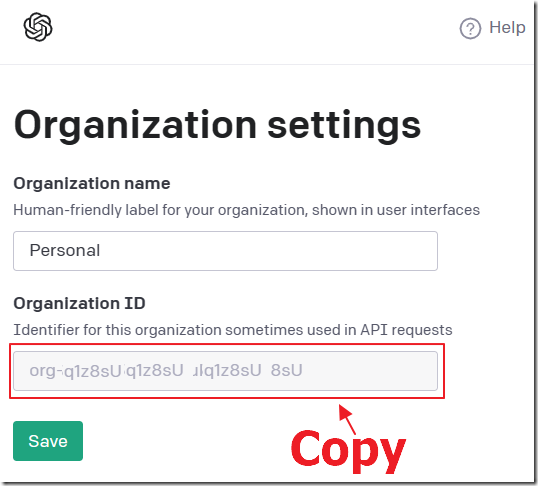
Navigate to: https://beta.openai.com/account/org-settings and copy your Organization ID.
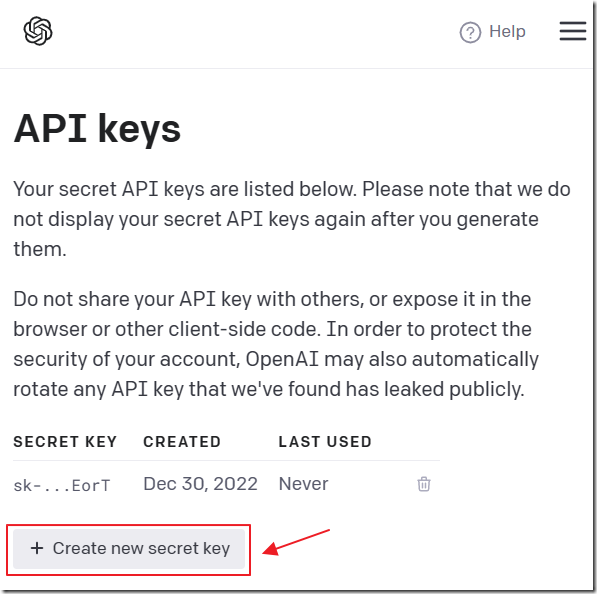
If you did not receive an API key as part of the sign-up process, navigate to: https://beta.openai.com/account/api-keys and create a new one (and save it, you will need it later).
The Application

We use Visual Studio to create the application.

We create a Blazor Server app.
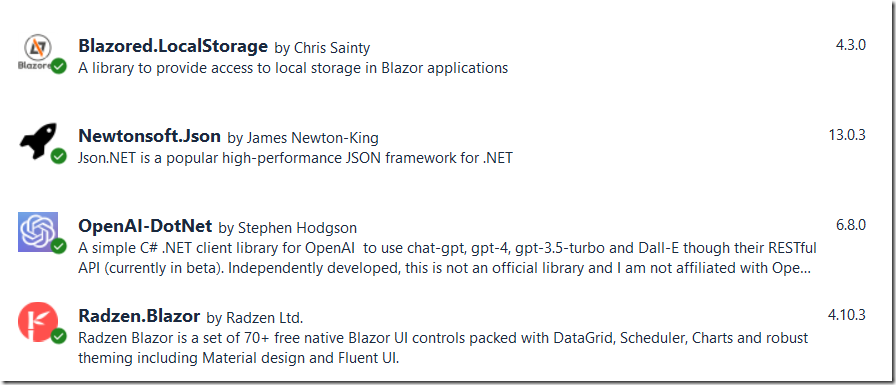
We install the following NuGet packages:
- Blazored.LocalStorage - Allows us to store the latest JSON in application storage
- Radzen.Blazor - Provides a nice looking UI and the SpeechToTextButton to capture audio and turn it into text
- OpenAI-DotNet - Connects to OpenAI to make API calls
- Newtonsoft.Json - Parses the JSON returned by the OpenAI model
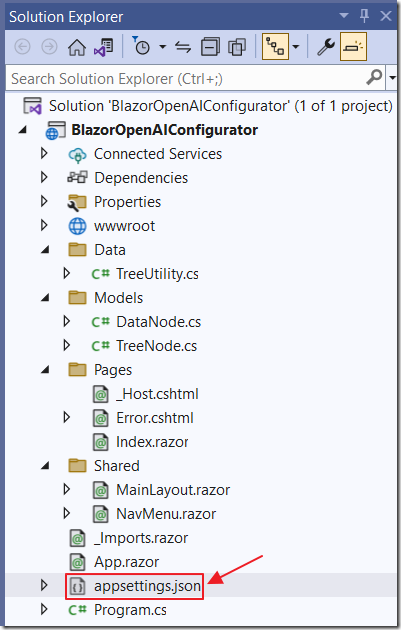
You need to add your OpenAI Key and Organization to the appsettings.json file.
Note: If using Azure OpenAI see documentation on how to use those keys here: https://github.com/RageAgainstThePixel/OpenAI-DotNet
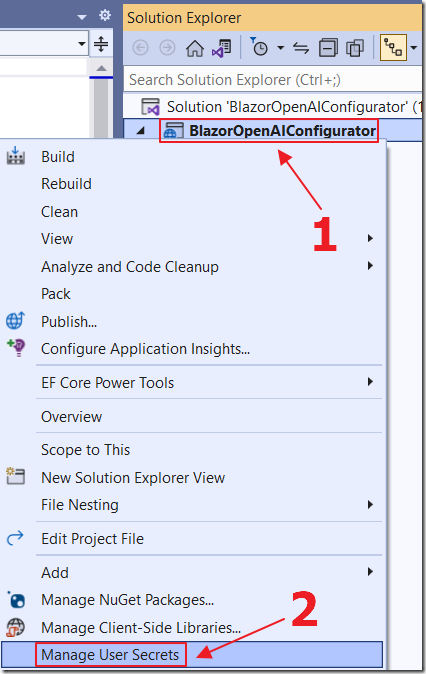
However, the safer way, to prevent your keys from accidently being leaked when checking your code into source control, is to right-click on the Project node and select Manage User Secrets…

Enter your keys in this file instead of the appsettings.json file.
The keys will be retrieved from the secrets file because this code in the Program.cs file is used:
// OpenAIServicebuilder.Configuration.AddJsonFile("appsettings.json", optional: true, reloadOnChange: true).AddEnvironmentVariables().AddUserSecrets(Assembly.GetExecutingAssembly(), true);
The Code
The UI code is simple, just a text box for the prompt, a box to display the JSON, and the Tree control.
In addition, Radzen has a SpeechToTextButton control that allows you to easily convert audio into text.
<RadzenRow class="rz-text-align-left" Gap="1rem"><RadzenColumn Size="12">@if (InProgress){<RadzenProgressBar Value="100"ShowValue="false"Mode="ProgressBarMode.Indeterminate" />}else{<RadzenSpeechToTextButton Change="@(args => OnSpeechCaptured(args))" /><RadzenButton Click=@CallServiceText="Create Tree"ButtonStyle="ButtonStyle.Success" /><RadzenTextArea @bind-Value=@InputText Rows="4"class="w-100" Style="margin-top:15px" />}</RadzenColumn></RadzenRow><RadzenRow class="rz-text-align-center" Gap="1rem"><RadzenColumn Size="6"><RadzenTextArea @bind-Value=@InputJSON Rows="25"class="w-100" Style="margin-top:15px" /></RadzenColumn><RadzenColumn Size="6"><RadzenTree Data=@colAllNodesExpand=@LoadTreeStyle="width: 100%; height: 100%; margin-top:15px"><RadzenTreeLevel Text=@GetTextForNodeTemplate=@FolderTemplateExpanded="@(data => true)" /></RadzenTree></RadzenColumn></RadzenRow>
When the main page loads the OpenAI keys are retrieved:
// This method initializes the componentprotected override void OnInitialized(){// Get the organization from the configuration,// default to an empty string if not foundOrganization =_configuration["OpenAIServiceOptions:Organization"] ?? "";// Get the API key from the configuration,// default to an empty string if not foundApiKey =_configuration["OpenAIServiceOptions:ApiKey"] ?? "";}
We have to wait for the OnAfterRenderAsync method to execute before trying to grab the last JSON from application storage.
If we find any JSON we pass it to the CreateTreeFromJSON method to turn it into a C# collection, persisted as a global variable, called colRootNode.
ColRootNode is then passed to the TreeUtility.GetTree method to convert the C# collection into a nested collection (colAllNodes) that is bound to the Tree control:
// This method is called after the component is renderedprotected override async Task OnAfterRenderAsync(bool firstRender){// Check if it's the first render of the componentif (firstRender){// Get the JSON text from local storageInputJSON =await localStorage.GetItemAsync<string>("InputJSON");if (InputJSON != null){// Create initial dataCreateTreeFromJSON(InputJSON);colAllNodes = await TreeUtility.GetTree(colRootNode);}// Notify the framework that the state has changed// and the UI should be updatedStateHasChanged();}}

When the Create Tree button is clicked, the following method runs:
// This method calls the GPT-4 serviceasync Task CallService(){// Set the in-progress flag to trueInProgress = true;// Notify the framework that the state has changed and the UI should be updatedStateHasChanged();try{// Create a new instance of OpenAIClient using the ApiKey and Organizationvar api = new OpenAIClient(new OpenAIAuthentication(ApiKey, Organization));// Create a new list of chatMessages objectsvar chatMessages = new List<Message>();chatMessages.Add(new Message(Role.System, GetInstruction()));// Set FinalInputTextstring FinalInputText = InputText;// Add existing JSONif (InputJSON != null){FinalInputText =$"Start with the following json: {InputJSON} {InputText}";}chatMessages.Add(new Message(Role.User, FinalInputText));// Call ChatGPT// Create a new ChatRequest object with the chat prompts and pass// it to the API's GetCompletionAsync method// temperature is set to 0.0, which controls the randomness// Lower values produce more deterministic outputs.var chatRequest = new ChatRequest(chatMessages,temperature: 0.0,topP: 1,frequencyPenalty: 0,presencePenalty: 0,model: Model.GPT3_5_Turbo);var result = await api.ChatEndpoint.GetCompletionAsync(chatRequest);// Save the first choice result as a JSON fileInputJSON = result.FirstChoice;// Check if the first character is '['// This ensures the response is only JSONif (!InputJSON.StartsWith("[")){// Set BadResponsestring BadResponse = InputJSON;// Get the Previous JSON text from local storageInputJSON =await localStorage.GetItemAsync<string>("InputJSON");// Create an error notification message// Show the BadResponsevar Notification = new NotificationMessage(){Severity = NotificationSeverity.Error,Summary = "Error",Detail = BadResponse,Duration = 50000};// Show the notificationNotificationService.Notify(Notification);}else{// Deserialize the JSON file into a TreeNode objectvar root = JsonConvert.DeserializeObject<List<TreeNode>>(InputJSON);// Clear the root nodecolRootNode.Clear();// Convert the TreeNode object into a collection of DataNode objects// and populate colRootNodeConvertToDataNodes(root, null);colAllNodes = await TreeUtility.GetTree(colRootNode);// Save the input text to local storageawait localStorage.SetItemAsync("InputJSON", InputJSON);// Clear InputTextInputText = "";}}catch (Exception ex){// Create an error notification messagevar Notification = new NotificationMessage(){Severity = NotificationSeverity.Error,Summary = "Error",Detail = ex.Message,Duration = 40000};// Show the notificationNotificationService.Notify(Notification);}// Set the in-progress flag to falseInProgress = false;// Notify the framework that the state has changed// and the UI should be updatedStateHasChanged();}
This calls the GetInstruction method that provides the instructions to the OpenAI model.
This is where the AI programming is done.
If you have any issues, or need to change or otherwise enhance the functionality, this is where you would do it:
public string GetInstruction(){string instruction = @"You are a helpful assistant that creates json output from a text prompt.When you have valid json you will only respond with json code nothing else.You will ignore any input that cannot fit the defined json format.The data in the json file will be used to construct tree items.The json format is as follows:[ /* always output an array */{""Id"":1, /* unique number for the node */""NodeName"":""Root Node One"", /* name of the node item */""Children"": [], /* a collection of child items */},{""Id"":2, /* unique number for the node */""NodeName"":""Root Node Two"", /* name of the node item */""Children"": [{""Id"":3, /* unique number for the node */""NodeName"":""Child Node One"", /* name of the node item */""Children"": [], /* a collection of child items */},{""Id"":4, /* unique number for the node */""NodeName"":""Child Node Two"", /* name of the node item */""Children"": [], /* a collection of child items */}], /* a collection of child items */}]";return instruction;}
Links
Calling OpenAI GPT-3 From Microsoft Blazor
Build Your Own ChatGPT Client in Blazor
Download
The project is available on the Downloads page on this site.
You must have Visual Studio 2022 (or higher) installed to run the code.

