4/21/2025 Admin
Using Azure Container Apps to Handle Memory Intensive Blazor UI
Modern web applications often encounter bottlenecks when handling resource-intensive operations—especially when those operations involve dynamic, data-heavy UI components like Blazor datasheet. In this post, we’ll explore an architecture that decouples heavy data processing from your main Blazor app by offloading the work to isolated containers running in Azure Container Apps.
We’ll walk through the creation of a scalable system that:
-
Executes resource-intensive jobs in a separate Blazor container called BlazorSpark
-
Integrates the results back into the main BlazorData application using an iframe
-
Leverages Azure Storage to manage communication between the two containers
-
Dynamically scales using Azure Container Apps to handle traffic spikes
Note: An alternate method for addressing this situation is to use Blazor WebAssembly. However, there are certain use cases that require server rendered components (for example you cannot parse parquet files in Blazor WebAssembly).
Scaling Blazor Data Apps with Azure Container Apps and IFrame Integration
We will explore the proof of concept Blazor Server application that uses the following flow:
-
The BlazorData web app initiates the job and writes a unique GUID to Azure Storage.
-
The user is redirected to the BlazorSpark container via an Iframe, along with the GUID.
-
BlazorSpark checks for the GUID in Azure Storage, and if valid, services the request.
-
The user sees the display of the BlazorSpark container in the IFrame contained in the BlazorData web app
-
When the user navigates away, BlazorSpark removes the GUID from storage.
The Aspire Project
To get started, we create a .NET Aspire project that launches both the webfrontend website and the webcontainer which runs in a container, and the blob Storage. Aspire makes it easy to orchestrate and manage distributed components with configuration baked into a single solution.
You can download the completed project from GitHub at the following link: https://github.com/BlazorData-Net/BlazorSpark.
Note: To run this project you also need to install either Docker or Podman.
The solution contains multiple projects and also includes:
-
Added the NuGet package for BlazorDatasheet, used for rendering a high-performance datasheet.
-
Integrated Azurite for local development with Aspire Blob Storage.
Run The Project
To run the project, select the AppHost project as the start-up project and hit F5 or click the https button on the toolbar.
Your web browser will open with the Aspire dashboard page.
Click the URL link for the webfrontend project.
The frontend project will open in another web browser tab.
We first click on the Local tab and click the Load Data button to load one million random records.
If we switch back to the Aspire dashboard page, select the Metrics section, and look at the memory, we see that it is 9.52 billion bytes.
Why this matters: With multiple users doing this simultaneously, you’ll quickly exhaust available memory. This is especially problematic in shared or limited hosting environments.
Next, re-start the application and click on the Home tab and click the Load Data button that will instead load a million rows using a container.
When we look at the memory usage of the container we see that it is over a gigabyte.
However, the frontend is only 30 million bytes.
Why this matters: With multiple tabs or users doing this simultaneously, the frontend won’t run out of memory.
How The Code Works
The webfrontend is located in the BlazorSpark.Web project.
If we open the Home.razor page we see there is an IFrame that has a dynamically set IFrameURL source:
<div style="display: flex; flex-direction: column; height: 100vh;"><iframe style="width: 100%; height: 100%;" src="@IFrameURL"></iframe></div>
When the Load Data button is pressed the following method is executed:
private async Task CreateRequest(){// Create a new GUID for the requestCurrentGUID = Guid.NewGuid().ToString();// Write to Blob Storageawait StorageService.UploadBlobAsync(ContainerName, CurrentGUID, $"Created on {DateTime.UtcNow}");// Load the IframeWebContainerUrl = Configuration["ContainerUrl"];IFrameURL = $"{WebContainerUrl}{CurrentGUID}";LoadIframe = true;}
The webcontainer is located in the BlazorSpark.Web project.
If we open the Home.razor page we see it has this url matching pattern to gather the GUID passed to it from the frontend:
@page "/{requestGuid:guid?}"
The OnInitializedAsync method uses this value to connect to the blob storage, and if finding a blob matching that GUID, it updates the blob and calls the LoadDataSheet() method that loads a random one million records in the Blazor datasheet.
protected override async Task OnInitializedAsync(){try{if (requestGuid.HasValue){// Set the current GUIDCurrentGuid = requestGuid.Value.ToString();// Read existing blobvar existing = await StorageService.ReadBlobAsync(BlobContainer, CurrentGuid);if (existing != null){isLoading = true;StateHasChanged();// Set the current GUID (BlobName) and Container in the GUID service// to be used by the CustomCircuitHandler// to remove the blob when the user navigates awayGUIDService.ContainerName = BlobContainer;GUIDService.BlobName = CurrentGuid;// Upload the object with the current URL as the “response”await StorageService.UploadBlobAsync(BlobContainer, CurrentGuid, NavigationManager.Uri);// Load the data sheetawait LoadDataSheet();}}}catch (Exception ex){Console.WriteLine($"Error initializing: {ex.Message}");isLoading = false;}}
Video
You can see the video at this link:
https://github.com/BlazorData-Net/BlazorSpark?tab=readme-ov-file#blazor-app-using-containers
Deploy to Azure
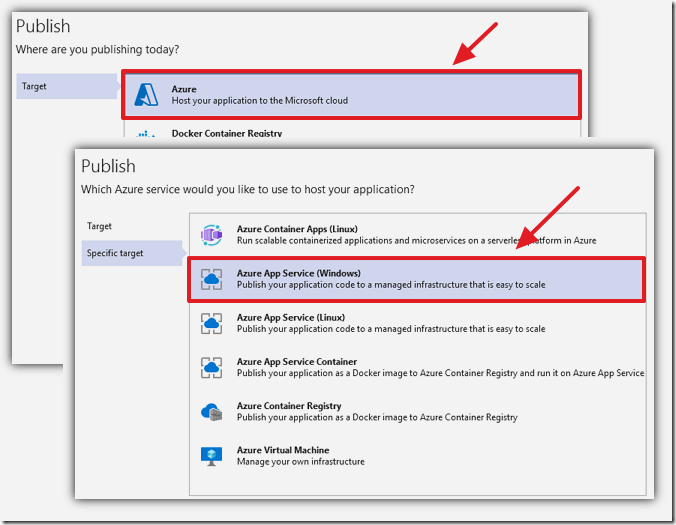
Normally, to deploy to Azure we would right-click on the AppHost project and select publish.
© Microsoft
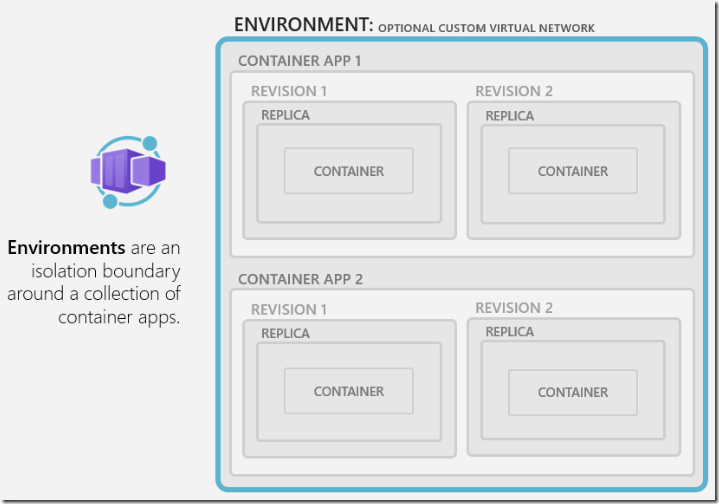
However, we cannot do a normal Publish on the App Host because it would deploy the two websites in the project into a single Azure App Container Apps App environment, that need public access (the webfrontend and the webcontainer that is displayed in an Iframe). A single App Environment can only contain one application that has a public endpoint.
Instead we will do this:
- Create an Azure Blob storage and get the connection string
- Deploy webcontainer (
BlazorUIContainer)in Azure Container apps - Deploy webfrontend (
BlazorSpark.Web) as a normal Azure web app
Create Azure Blob Storage
Follow the directions here to create an Azure storage account:
https://learn.microsoft.com/en-us/azure/storage/common/storage-account-create?tabs=azure-portal
Copy the connection string.
Note that in the Aspire project, we used code like this to represent the connection to the Blob storage:
// Add Azure Blob clientbuilder.AddAzureBlobClient("blobs");
In this example we used “blobs” as the name of the connection.
When we deploy the webfrontend website and the webcontainer app to Azure we need to use “blobs” as the name of the connection, and insert the connection string we just copied.
Deploy BlazorUIContainer to Azure Container Apps
We will now deploy the webcontainer (BlazorUIContainer) to Azure Container Apps.
Right-click on the BlazorUIContainer project and select Add then Docker Support to add a Docker file to the project.
A Docker file will be added to the project.
Right-click → Publish to Azure → choose Azure Container Apps.
Complete the wizard to create the publishing profile.
After the publishing profile is created, select Manage container app settings.
Click add settings and create a settings called: ConnectionStrings__blobs (because the settings we need to set is “blobs”).
Insert the connection string copied earlier and press OK.
Click the Publish button to publish the container to Azure.
Very Important!
-
In the Azure configuration for the container (in Portal.Azure.com) You must enable Session Affinity under Ingress.
Blazor Server apps need to maintain a constant connection with the same server instance. Without it, the diff computation fails, and the UI breaks. -
Also copy the value under Endpoints you will need the value in the frontend (BlazorSpark.Web) deployment.
-
Auto Scaling:
-
Configure minimum instances to
0to save money during idle times. -
Increase memory and CPU cores as needed for performance.
-
Deploy BlazorSpark.Web as an Azure Web App
Right-click the project in Visual Studio and choose Publish to Azure Web App.
Complete the publishing profile.
Complete the following tasks and publish to Azure:
-
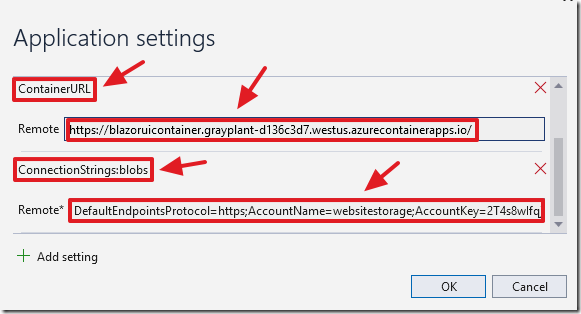
Add a ContainerURL setting to point to the Azure Container App (copied earlier)
-
Add a ConnectionStrings:blobs setting and set to the connection string copied earlier (copied earlier)
Closing Thoughts
By using Azure Container Apps and a modular architecture with Blazor, you can scale memory-intensive workloads without overwhelming your frontend app.
Links
https://github.com/BlazorData-Net/BlazorSpark
DotNet Aspire: Publishing to an Existing Azure Container Registry
Deploy Aspire to Azure Container Apps
Azure Container Apps Documentation
Azure Container App Pricing


