9/26/2019 Admin
Blazor JavaScript Interop

When you need to, you can interact with JavaScript using Blazor. This allows you to call Javascript methods from Blazor, and to call Blazor methods from JavaScript as well as pass parameters.
Starting With State Manager
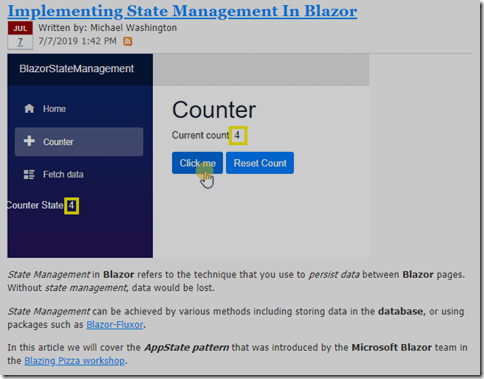
We will start with the project created in this tutorial: Implementing State Management In Blazor.
That project allows you to persist data between Blazor pages. In the example, the value for the counter is maintained.
However, when you restart the application, the counter starts over again.
In this example, we will persist the counter value between application restarts, and even between multiple tabs in the same web browser.
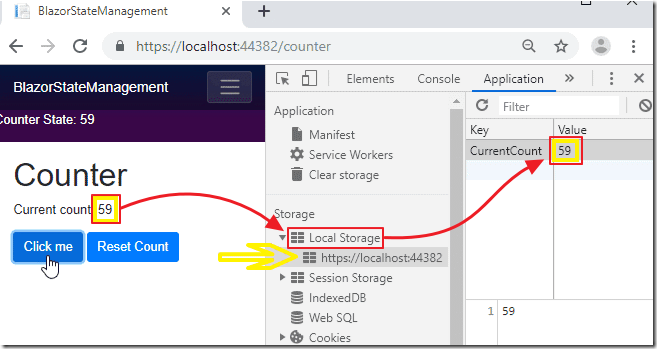
We will do this by storing the counter value in the user’s web browser’s Local Storage.
We communicate with Local Storage through JavaScript.
With Blazor, we communicate with JavaScript using JavaScript Interop.
Using JavaScript Interop
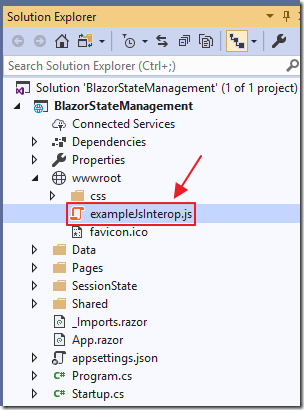
To demonstrate how JavaScript Interop in Blazor works, we will start with two simple examples.
Open the project from Implementing State Management In Blazor in Visual Studio, and add a JavaScript file called exampleJsInterop.js, to the wwwroot directory using the following code:
(function () {
    window.exampleJsFunctions = {
        helloWorld: function () {
            return alert('Hello World!');
        }
    };
})();
This adds a JavaScript method called helloWorld that simply displays an alert box.
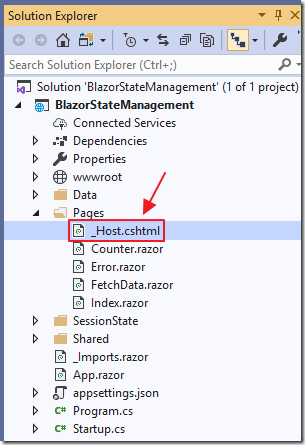
To allow this JavaScript to be called, it needs to be registered in the main HTML page.
Open the _Host.cshtml file, and add the following line below the <script src="_framework/blazor.server.js"></script> line:
<script src="exampleJsInterop.js"></script>
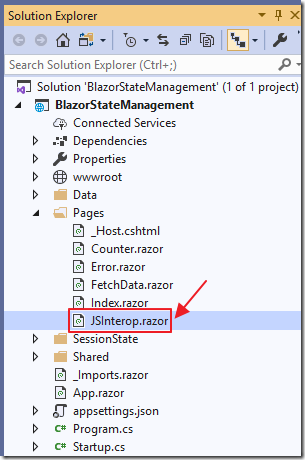
Add a new page called JSInterop.razor using the following code:
@page "/JSInterop"
@*Inject JSRuntime to allow JavaScript Interop *@
@inject IJSRuntime JSRuntime
<h1>JavaScript Interop</h1>
<div>
    <button type="button"
            class="btn btn-primary"
            @onclick="HelloWorld">
        Hello World
    </button>
</div>
@code {
    public async void HelloWorld()
    {
        // helloWorld is implemented in
        // wwwroot /exampleJsInterop.js
        await JSRuntime.InvokeAsync<string>(
            "exampleJsFunctions.helloWorld", null
            );
    }
}
Essentially, we inject support for JavaScript Interop by adding the line:
@inject IJSRuntime JSRuntime
We then call the helloWorld JavaScript method, created earlier, using JSRuntime.InvokeAsync like so:
        await JSRuntime.InvokeAsync<string>(
            "exampleJsFunctions.helloWorld", null
            );
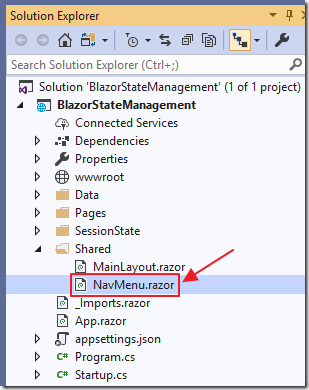
Now, open NavMenu.razor, and add the following code so that a link to the new page shows up in the menu:
        <li class="nav-item px-3">
            <NavLink class="nav-link" href="JSInterop">
                <span class="oi oi-list-rich" aria-hidden="true"></span> JSInterop
            </NavLink>
        </li>
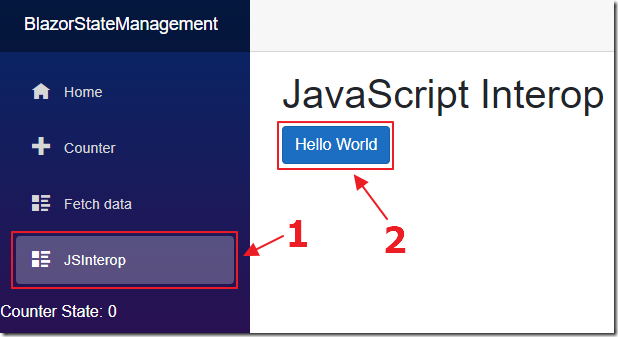
When we run the application, we can navigate to the JSInterop page, and click the Hello World button.
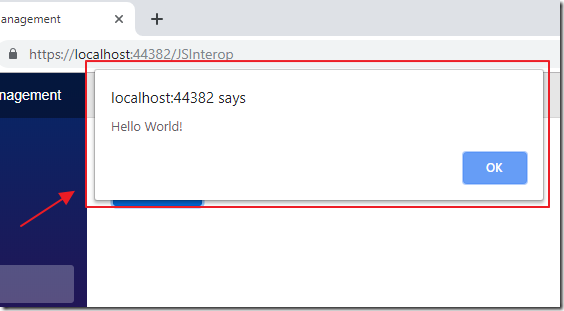
A JavaScript alert box will appear.
From JavaScript Back To Blazor With Parameters
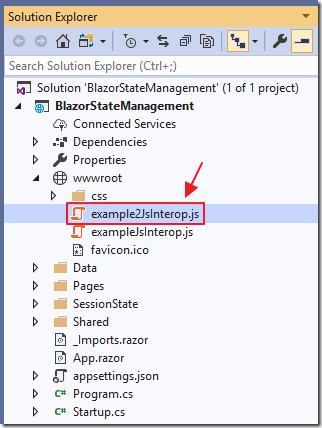
To demonstrate how a JavaScript function can take parameters and communicate back to Blazor, add a new JavaScript file to the wwwroot directory, example2JsInterop.js, using the following code:
(function () {
    window.example2JsFunctions = {
        showPrompt: function (text) {
            return prompt(text, 'Type your name here');
        }
    };
})();
To register the JavaScript file, add the following line to the _Host.cshtml page:
<script src="example2JsInterop.js"></script>
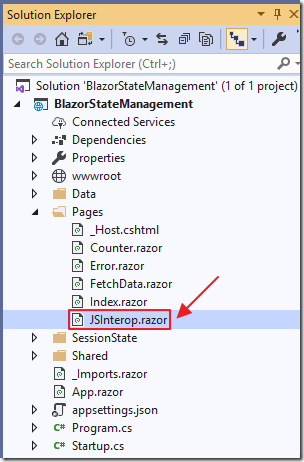
Next, open the JSInterop.razor page, and add the following HTML markup:
<br />
<div>
    <button type="button"
            class="btn btn-primary"
            @onclick="SayMyName">
        Say My Name
    </button>
    <br />
    <p>@strSayMyName</p>
</div>
Finally, add the following code to implement the SayMyName method:
   string strSayMyName = "";
    public async void SayMyName()
    {
        // showPrompt is implemented in wwwroot/example2JsInterop.js
        var NameFromJavaScript =
            await JSRuntime.InvokeAsync<string>(
                "example2JsFunctions.showPrompt",
                "What's your name?"
                );
        strSayMyName = $"Your name is: {NameFromJavaScript}";
        // Must call StateHasChanged() because Blazor
        // will not know to refresh page because
        // it was updated by JavaScript
        StateHasChanged();
    }
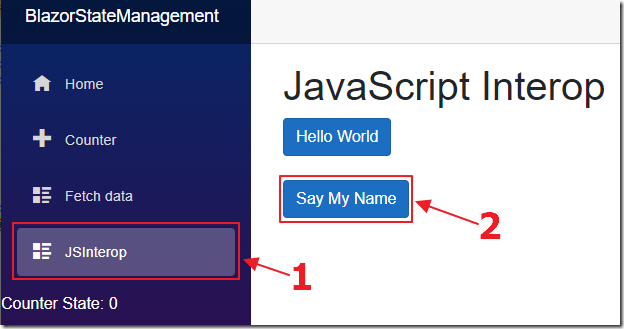
When we run the application, we can navigate to the JSInterop page, and click the Say My Name button.

We enter our name in the JavaScript dialog box and click OK.
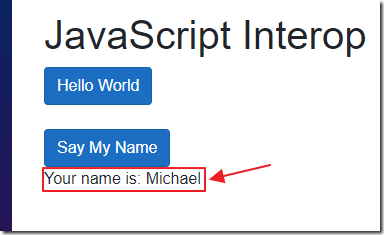
The Blazor page then displays a message with our name.
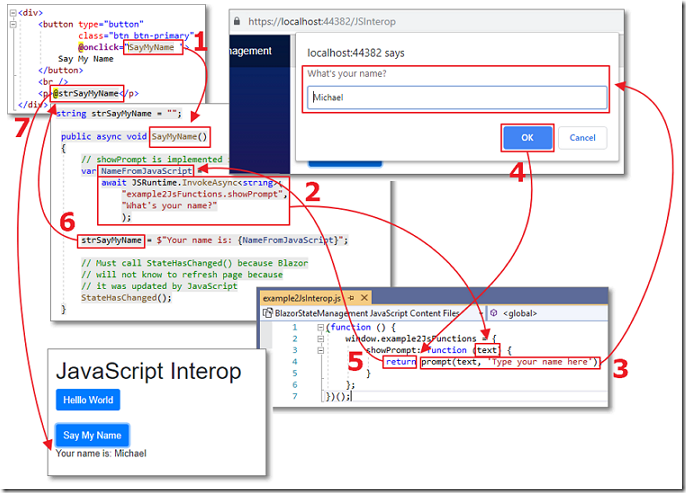
The image above illustrates the program flow.
Using ElementReference And The @ref Attribute
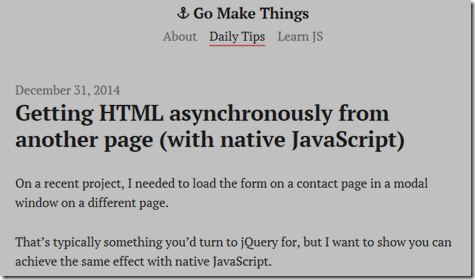
Let’s say we wanted to fill a Popup with content from another page.
We could use JavaScript from the article: Getting HTML asynchronously from another page (with native JavaScript).
We now need to call this JavaScript, pass it the web address of the page we want to retrieve, get the results of the call, and insert the contents returned into our Popup.
However, to get the HTML contents, of the page retrieved with the JavaScript call, onto the page in the Blazor application, we need to use the ElementRef and the @ref attribute.
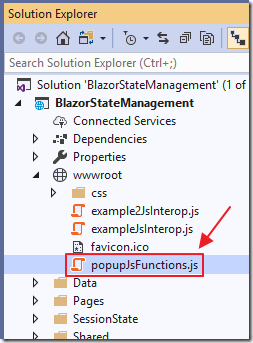
The first step is make a new JavaScript file called popupJsFunctions.js, and add the following code:
(function () {
    window.popupJsFunctions = {
        populateDiv: function (element) {
            popupJsFunctions.getHTML('/Counter',
                function (response) {
                element.innerHTML = response.documentElement.innerHTML;
            });
        },
        // From:
        // https://gomakethings.com/getting-html-asynchronously-from-another-page/
        getHTML: function (url, callback) {
            // Feature detection
            if (!window.XMLHttpRequest) return;
            // Create new request
            var xhr = new XMLHttpRequest();
            // Setup callback
            xhr.onload = function () {
                if (callback && typeof (callback) === 'function') {
                    callback(this.responseXML);
                }
            };
            // Get the HTML
            xhr.open('GET', url);
            xhr.responseType = 'document';
            xhr.send();
        }
    };
})();
This simply creates a JavaScript method called getHTML that will retrieve the contents of an HTML page.
This also adds a JavaScript method, called populateDiv, that when passed a ElementRef, will populate it with the contents returned by the getHTML JavaScript method.
Ensure that we register the JavaScript file in the _Host.cshtml page by adding this line:
<script src="popupJsFunctions.js"></script>
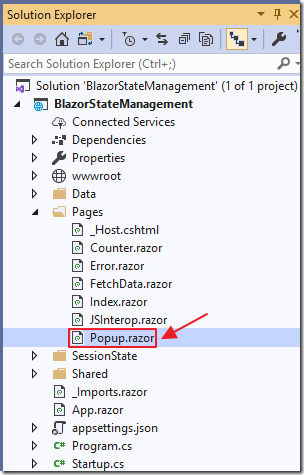
Next, add a new page, Popup.razor, using the following code:
@page "/Popup"
@inject IJSRuntime JSRuntime
<h1>Popup</h1>
<button class="btn btn-primary"
        @onclick="ShowDynamicPopup">
    Show Dynamic Popup
</button>
@if (showDynamicPopup)
{
    <div tabindex="-1" style="display:block" role="dialog">
        <div class="modal-dialog">
            <div class="modal-content">
                <div class="modal-header">
                    <h3 class="modal-title">Blazor Dynamic Popup</h3>
                    <button type="button"
                            class="close"
                            @onclick="HideDynamicPopup">
                        <span aria-hidden="true">X</span>
                    </button>
                </div>
                <div @ref="modalBody"
                     class="modal-body">
                    <!-- Dynamic content will go here -->
                </div>
            </div>
        </div>
    </div>
}
@code {
    ElementReference modalBody; // reference to the DIV
    bool showDynamicPopup = false;
    // To prevent making JavaScript interop calls during prerendering
    protected override async Task OnAfterRenderAsync(bool firstRender)
    {
        // This will set the content of the Div
        // to the content of the server Login page
        await setDivContent(modalBody);
    }
    public async Task setDivContent(ElementReference elementRef)
    {
        // Call the popupJsFunctions.populateDiv
        // JavaScript method, passing it an instance of
        // the DIV element from the page (elementRef)
        // This DIV will be populated with the HTML content
        // Of the page retrieved
        await JSRuntime.InvokeAsync<object>(
            "popupJsFunctions.populateDiv", elementRef
            );
    }
    void ShowDynamicPopup()
    {
        showDynamicPopup = true;
    }
    void HideDynamicPopup()
    {
        showDynamicPopup = false;
    }
}
Note that <!-- Dynamic content will go here - -> is contained in a Div.
The key thing here is that we added “ref=@modalBody” to the Div.
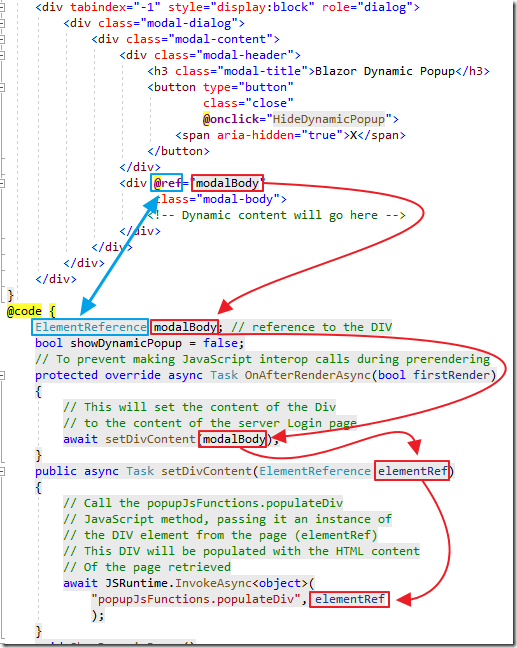
This allows us to access the Div (as a ElementReference) in the setDivContent method, and pass it as a parameter to the populateDiv JavaScript function.
Now, open NavMenu.razor, and add the following code so that a link to the new page shows up in the menu:
        <li class="nav-item px-3">
            <NavLink class="nav-link" href="Popup">
                <span class="oi oi-list-rich" aria-hidden="true"></span> Popup
            </NavLink>
        </li>
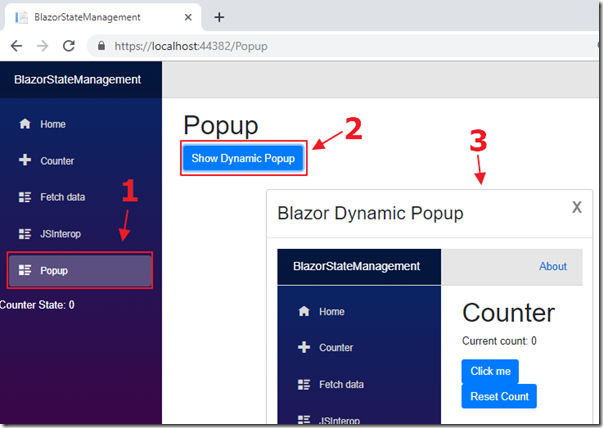
When we run the application, we can now click the Show Dynamic Popup button to display the Popup with the dynamically retrieved content.
(Note: Only the html content is retrieved, not its associated JavaScript, so the page inside the popup wont work)
Blazor State Management Using Local Storage
In the final example, we will demonstrate refactoring the existing State Management to use the web browser Local Storage.
This will allow the value of the counter to be persisted when the user closes and re-opens their web browser.
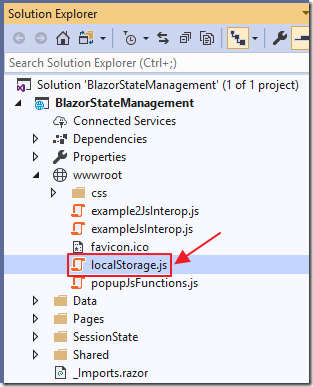
First, add a new file, localStorage.js to the wwwroot folder using the following code from: https://github.com/dotnet-presentations/blazor-workshop:
// From: https://github.com/dotnet-presentations/blazor-workshop
// (c) Microsoft
(function () {
    window.blazorLocalStorage = {
        get: key => key in localStorage ? JSON.parse(localStorage[key]) : null,
        set: (key, value) => { localStorage[key] = JSON.stringify(value); },
        delete: key => { delete localStorage[key]; }
    };
})();
Ensure that we register the JavaScript file in the _Host.cshtml page by adding this line:
<script src="localStorage.js"></script>
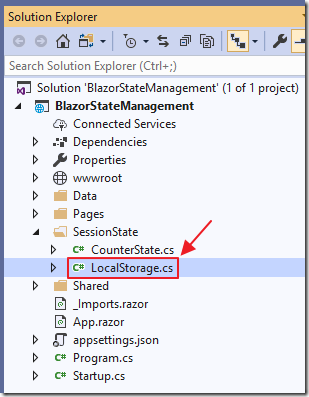
Create a new class file called LocalStorage.cs, using the following code from: https://github.com/dotnet-presentations/blazor-workshop:
using Microsoft.JSInterop;
using System.Threading.Tasks;
// From https://github.com/dotnet-presentations/blazor-workshop
// (c) Microsoft
namespace BlazingPizza.ComponentsLibrary
{
    public static class LocalStorage
    {
        public static ValueTask<T> GetAsync<T>
            (IJSRuntime jsRuntime, string key)
            => jsRuntime.InvokeAsync<T>(
                "blazorLocalStorage.get", key
                );
        public static ValueTask<T> SetAsync<T>
            (IJSRuntime jsRuntime, string key, object value)
            => jsRuntime.InvokeAsync<T>(
                "blazorLocalStorage.set", key, value
                );
        public static ValueTask<T> DeleteAsync<T>
            (IJSRuntime jsRuntime, string key)
            => jsRuntime.InvokeAsync<T>(
                "blazorLocalStorage.delete", key
                );
    }
}
This time we are creating a helper class to call the JavaScript function.
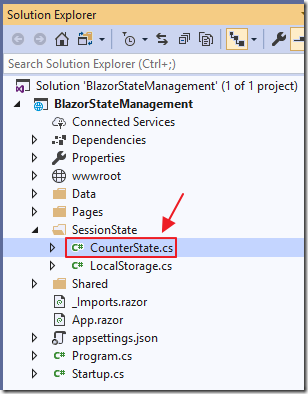
Next, open the existing CounterState.cs class, and replace all the code with the following:
using System;
using System.Collections.Generic;
using System.Linq;
using System.Threading.Tasks;
using Microsoft.JSInterop;
using BlazingPizza.ComponentsLibrary;
namespace BlazorStateManagement
{
    public class CounterState
    {
        // A property to hod reference to JSRuntime
        private readonly IJSRuntime _jsRuntime;
        private int? _currentCount = 0;
        // To use JSRuntime in a class, we must
        // inject it into the constructor of the class
        // using dependency injection
        public CounterState(IJSRuntime jsRuntime)
        {
            _jsRuntime = jsRuntime;
        }
        // StateChanged is an event handler other pages
        // can subscribe to
        public event EventHandler StateChanged;
        public int CurrentCount()
        {
            return (!_currentCount.HasValue) ? 0 : (int)_currentCount.Value;
        }
        public async Task<int> GetCurrentCount()
        {
            try
            {
                // We call LocalStorage to get the current count
                _currentCount =
                    await LocalStorage.GetAsync<int>(_jsRuntime, "CurrentCount");
            }
            catch
            {
                // we did not have a value in LocalStorage
                // Set it
                _currentCount = 0;
                SetCurrentCount(_currentCount.Value);
            }
            return (!_currentCount.HasValue) ? 0 : (int)_currentCount.Value;
        }
        // This method will be called to update the current count
        public async void SetCurrentCount(int paramCount)
        {
            // We use LocalStorage to set the current count
            await
                LocalStorage.SetAsync<object>(_jsRuntime, "CurrentCount", paramCount);
            _currentCount = paramCount;
            StateHasChanged();
        }
        // This method will allow us to reset the current count
        public void ResetCurrentCount()
        {
            // We use LocalStorage to clear the current count
            LocalStorage.SetAsync<object>(_jsRuntime, "CurrentCount", 0);
            _currentCount = 0;
            StateHasChanged();
        }
        private void StateHasChanged()
        {
            // This will update any subscribers
            // that the counter state has changed
            // so they can update themseleves
            // and show the current counter value
            StateChanged?.Invoke(this, EventArgs.Empty);
        }
    }
}
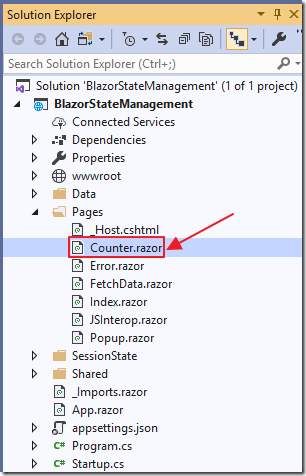
The GetCurrentCount method now returns a Task so we have to refactor the code that calls it.
Open the Counter.razor page and replace all the code with the following:
@page "/counter"
@inject CounterState CounterState
<h1>Counter</h1>
<!-- We now call the GetCurrentCount() method -->
<!-- to get the current count -->
<p>Current count: @CurrentCount</p>
<button class="btn btn-primary"
        @onclick="IncrementCount">
    Click me
</button>
<!-- Add a button to reset the current count -->
<!-- that calls the CounterState class directly -->
<button class="btn btn-primary"
        @onclick="CounterState.ResetCurrentCount">
    Reset Count
</button>
@code {
    int CurrentCount;
    // To prevent making JavaScript interop calls during prerendering
    protected override async Task OnAfterRenderAsync(bool firstRender)
    {
        CurrentCount = await CounterState.GetCurrentCount();
        StateHasChanged();
    }
    async void IncrementCount()
    {
        // Call the GetCurrentCount() method
        // to get the current count
        int CurrentCount = await CounterState.GetCurrentCount();
        // Increase the count
        CurrentCount++;
        // Set Current count on the Session State object
        CounterState.SetCurrentCount(CurrentCount);
    }
}
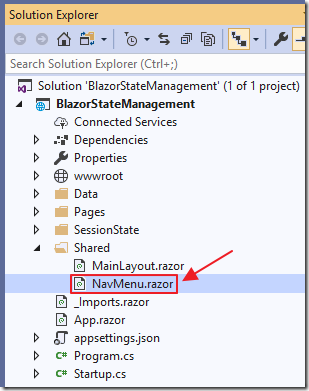
We also need to open NavMenu.razor, and replace the following code:
<div>
    <!-- We now call the GetCurrentCount() method -->
    <!-- to get the current count -->
    <p style="color:white">
        Counter State: @CounterState.GetCurrentCount()
    </p>
</div>
With:
<div>
    <!-- We now call the CurrentCount() method -->
    <!-- to get the current count -->
    <p style="color:white">
        Counter State: @CounterState.CurrentCount()
    </p>
</div>
In the @code section, add the following code to retrieve the current counter value:
    // To prevent making JavaScript interop calls during prerendering
    protected override async Task OnAfterRenderAsync(bool firstRender)
    {
        // We only want this to run one time
        if (firstRender)
        {
            await CounterState.GetCurrentCount();
            // Must call StateHasChanged() because Blazor
            // will not know to refresh page because
            // it was updated by JavaScript
            StateHasChanged();
        }
    }
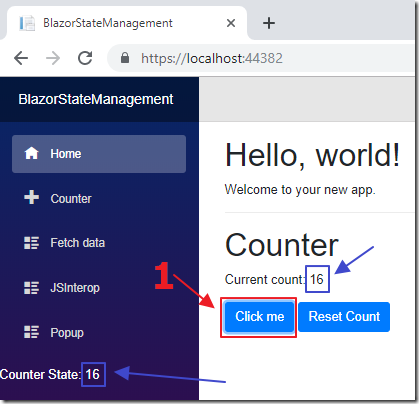
Now, when we run the application, the counter value will persist.
Links
Getting HTML asynchronously from another page (with native JavaScript)
Download
The project is available on the Downloads page on this site.
You must have Visual Studio 2019 Version 16.3 (or higher) installed to run the code.
