
9/26/2019 Admin
Blazor Forms and Validation
Microsoft Blazor allows you to easily create forms with validation to collect data.
Creating A Form With Validations
We will start with the project created in this tutorial: Creating A Step-By-Step End-To-End Database Server-Side Blazor Application.
That project presents a form that allows you to insert and update data, but it currently provides no validation for the data entered.
We will create a form that will validate each field.
In addition, we will demonstrate validation of date, integer, and dropdown controls.
Add Data Annotations
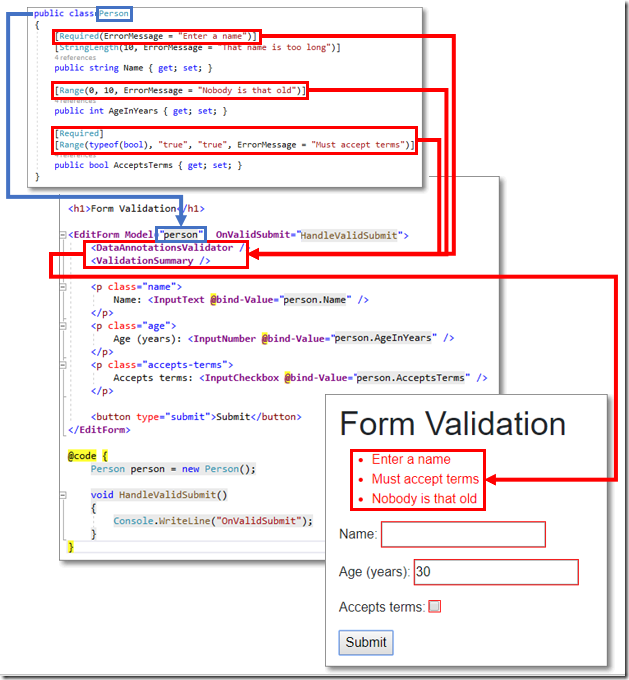
Validation in Blazor is implemented by decorating properties in a class with data annotations.
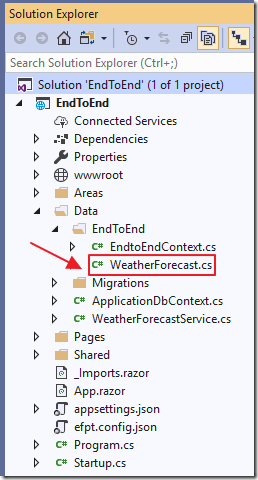
Open the EndToEnd project in Visual Studio, and open the WeatherForecast class, and change all the code from this:
using System;
using System.Collections.Generic;
namespace EndToEndDB.Data.EndToEnd
{
    public partial class WeatherForecast
    {
        public int Id { get; set; }
        public DateTime? Date { get; set; }
        public int? TemperatureC { get; set; }
        public int? TemperatureF { get; set; }
        public string Summary { get; set; }
        public string UserName { get; set; }
    }
}
To this:
using System;
using System.ComponentModel.DataAnnotations;
namespace EndToEndDB.Data.EndToEnd
{
    public partial class WeatherForecast
    {
        public int Id { get; set; }
        [Required]
        public DateTime? Date { get; set; }
        [Required(ErrorMessage =
            "Celsius is required")]
        [Range(typeof(int), "-51", "106",
            ErrorMessage =
            "Enter a valid Celsius range (-51 to 106).")]
        public int? TemperatureC { get; set; }
        [Required(ErrorMessage =
            "Fahrenheit is required")]
        [Range(typeof(int), "-60", "224",
            ErrorMessage =
            "Enter a valid Fahrenheit range (-60 to 224).")]
        public int? TemperatureF { get; set; }
        [Required]
        [StringLength(50, MinimumLength = 2,
            ErrorMessage =
            "Summary must be set and maximum of 50 characters.")]
        public string Summary { get; set; }
        public string UserName { get; set; }
    }
    // This class will hold the possible options that
    // will be displayed on the dropdown for the Summary property
    public partial class WeatherForecastOptions
    {
        public string OptionName { get; set; }
        public string OptionValue { get; set; }
    }
}
The data annotations will control the validation.
The form validation controls, added later, will simply trigger and display the results of these validation rules.
Add The Form Validation Controls
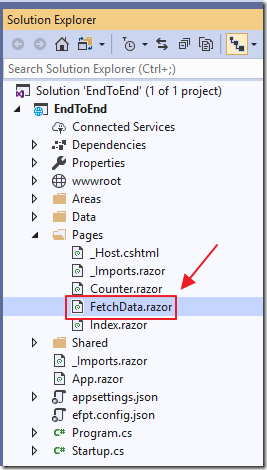
Open the FetchData.razor page.
Change the code for the Save button from this:
        <!-- Button to save the forecast -->
        <button class="btn btn-primary"
                @onclick="SaveForecast">
            Save
        </button>
To This:
        <!-- Button to save the forecast -->
        <button class="btn btn-primary"
                type="submit">
            Save
        </button>
The Save button will now only trigger a form submit (not call the SaveForecast method directly).
We then wrap the existing form controls in a EditForm control that is bound to an instance of the WeatherForcast class that we decorated with the validation rules.
We set the Context property to formContext (any alias name will work) because this EditForm is contained in an AuthorizeView control and we would otherwise get build errors because the default name of the context for both controls is “context” and this would cause an ambiguity.
We would see an error like the following:
CS0136 A local or parameter named 'context' cannot be declared in this scope because that name is used in an enclosing local scope to define a local or parameter
We also set the OnValidSubmit property to call the SaveForecast method after the form data has passed all validations.
        <!-- Edit form for the current forecast -->
        <EditForm Context="formContext"
                    Model="objWeatherForecast"
                    OnValidSubmit="SaveForecast">
            // Existing Form code goes here...
        </EditForm>
We add the validation controls:
            <!-- This will validate the form -->
            <DataAnnotationsValidator />
            <!-- This will show any validation errors -->
            <ValidationSummary />
Finally we update the form controls to the following:
            <p>
                <label for="Date">Date: </label>
                <InputDate id="Date" class="form-control"
                            placeholder="Date"
                            @bind-Value="objWeatherForecast.Date" />
            </p><p>
                <label for="TemperatureC">Celsius: </label>
                <InputNumber id="TemperatureC" class="form-control"
                                placeholder="Celsius forecast"
                                @bind-Value="objWeatherForecast.TemperatureC" />
            </p><p>
                <label for="TemperatureF">Fahrenheit: </label>
                <InputNumber id="TemperatureF" class="form-control"
                                placeholder="Fahrenheit forecast"
                                @bind-Value="objWeatherForecast.TemperatureF" />
            </p><p>
                <label for="Summary">Summary: </label>
                <InputText id="Summary" class="form-control"
                            placeholder="Summary forecast"
                            @bind-Value="objWeatherForecast.Summary" />
            </p>
Essentially we use a InputDate control for the date field, an InputText control for the Summary text field, and InputNumber controls for the integer fields.
The complete EditForm code is indicated below:
        <!-- Edit form for the current forecast -->
        <EditForm Context="formContext"
                    Model="objWeatherForecast"
                    OnValidSubmit="SaveForecast">
            <!-- This will validate the form -->
            <DataAnnotationsValidator />
            <!-- This will show any validation errors -->
            <ValidationSummary />
            <div class="modal-body">
                <p>
                    <label for="Date">Date: </label>
                    <InputDate id="Date" class="form-control"
                                placeholder="Date"
                                @bind-Value="objWeatherForecast.Date" />
                </p><p>
                    <label for="TemperatureC">Celsius: </label>
                    <InputNumber id="TemperatureC" class="form-control"
                                    placeholder="Celsius forecast"
                                    @bind-Value="objWeatherForecast.TemperatureC" />
                </p><p>
                    <label for="TemperatureF">Fahrenheit: </label>
                    <InputNumber id="TemperatureF" class="form-control"
                                    placeholder="Fahrenheit forecast"
                                    @bind-Value="objWeatherForecast.TemperatureF" />
                </p><p>
                    <label for="Summary">Summary: </label>
                    <InputText id="Summary" class="form-control"
                                placeholder="Summary forecast"
                                @bind-Value="objWeatherForecast.Summary" />
                </p>
                <br />
                <!-- Button to save the forecast -->
                <button class="btn btn-primary"
                        type="submit">
                    Save
                </button>
                <!-- Only show delete button if not a new record -->
                @if (objWeatherForecast.Id > 0)
                {
                    <!-- Button to delete the forecast -->
                    <button class="btn btn-primary"
                            @onclick="DeleteForecast">
                        Delete
                    </button>
                }
            </div>
        </EditForm>
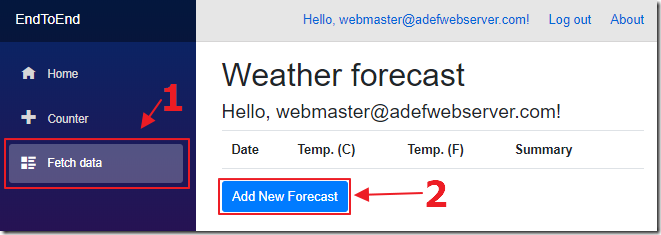
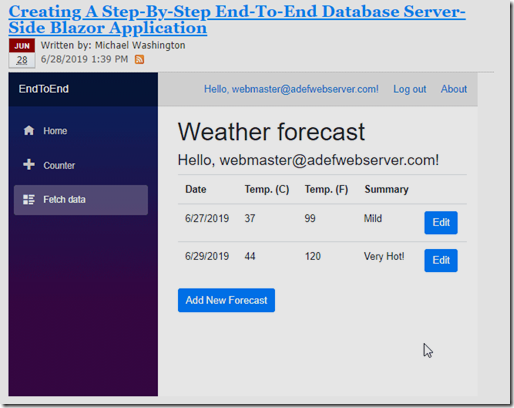
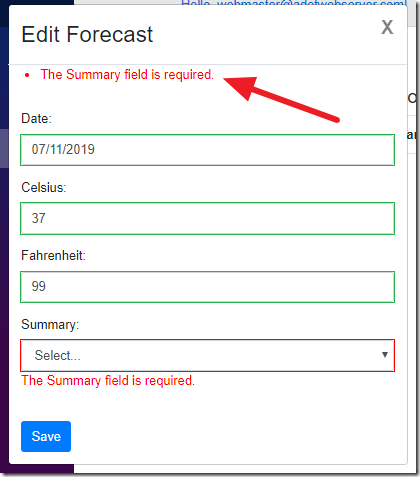
We can run the application, log in, navigate to the Fetch data page, and click the Add New Forecast button…
…this will open the EditForm control in a popup.
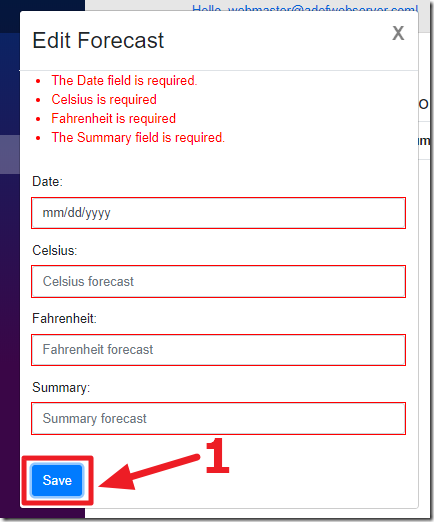
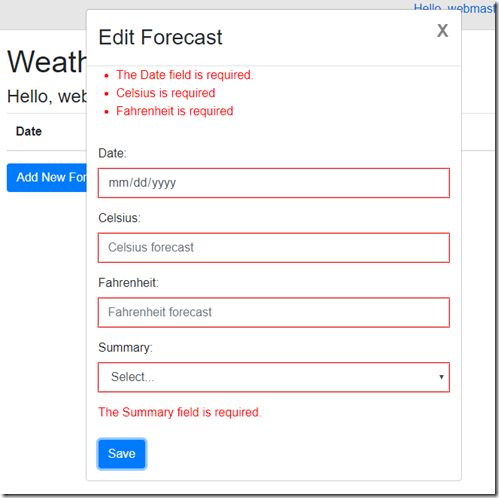
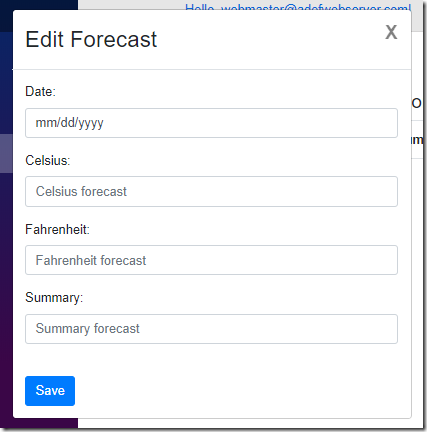
If we don’t enter any data, and try to submit the form, we see that the validation rules, that we added earlier, will be enforced.
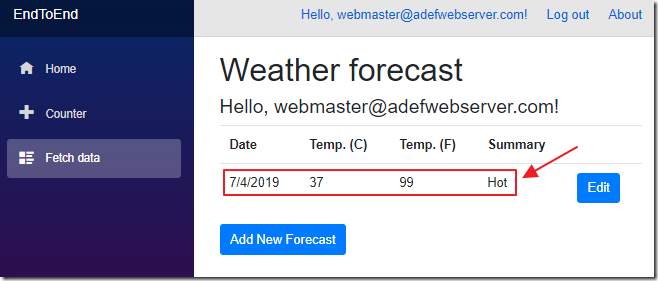
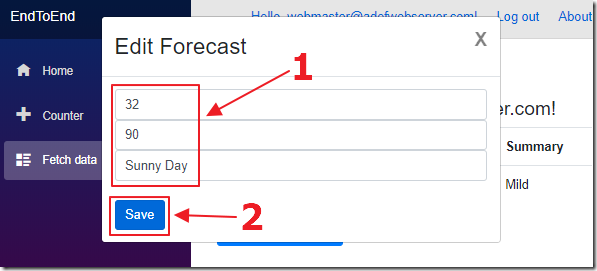
When we enter valid data, the popup will close and the data will be saved.
Validate A Dropdown Control
To demonstrate adding validation to a dropdown control, we will convert the Summary field to a dropdown.
In the @code section of the FetchData.razor page, add the following code:
    List<WeatherForecastOptions> SummaryOptions = new List<WeatherForecastOptions>() {
    new WeatherForecastOptions() { OptionName = "Select...", OptionValue = " " },
        new WeatherForecastOptions() { OptionName = "Hot", OptionValue = "Hot" },
        new WeatherForecastOptions() { OptionName = "Mild", OptionValue = "Mild" },
        new WeatherForecastOptions() { OptionName = "Cold", OptionValue = "Cold" }};
This will create a SummaryOptions collection that we will bind to the dropdown.
Change the existing Summary control (and label control) to the following:
            <label for="Summary">Summary: </label>
            <InputSelect id="Summary" class="form-control"
                            @bind-Value="objWeatherForecast.Summary">
                @foreach (var option in SummaryOptions)
                {
                    <option value="@option.OptionValue">
                        @option.OptionName
                    </option>
                }
            </InputSelect>
We are now using an InputSelect control that will display as a dropdown.
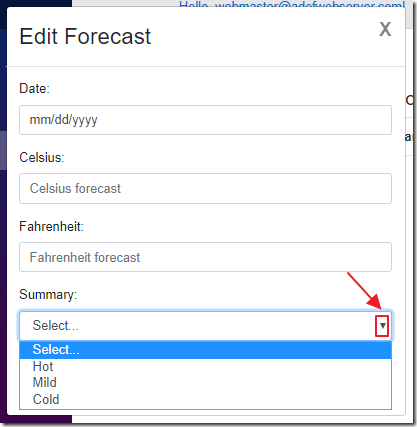
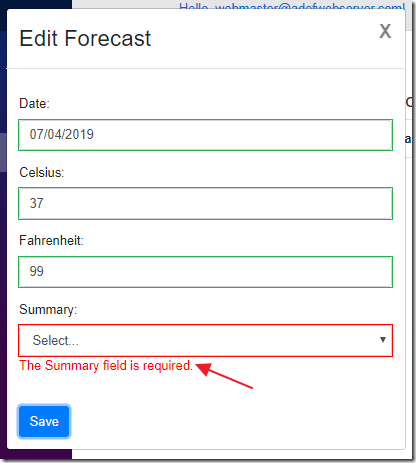
When we run the application we see that the Summary field is now a dropdown.
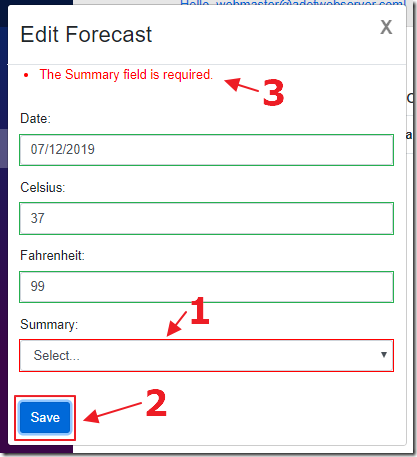
We see that if we do not select an option and try to save, the validation will be enforced.
Customizing Validation
We can use the ValidationMessage control to add code such as this, below the InputSelect control we just added, to display validation messages:
<ValidationMessage For="@(() => objWeatherForecast.Summary)" />
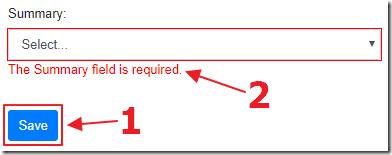
This will cause the validation for a single control to be displayed.
However, the validation will also be displayed by the ValidationSummary control.
To correct this, we can remove the ValidationSummary from the page, and replace it with code such as the following, that iterates through the validation errors and allows us to suppress any we don’t want to show:
        <!-- This will show any validation errors -->
        @*<ValidationSummary />*@
        <ul class="validation-errors">
            @foreach (
                var message in formContext.GetValidationMessages()
                .Where(x => !x.Contains("Summary")))
            {
                <li class="validation-message">@message</li>
            }
        </ul>
Now the Summary validation error appears only once.
Links
ASP.NET Core Blazor forms and validation
Model validation in ASP.NET Core MVC and Razor Pages
System.ComponentModel.DataAnnotations Namespace
Components: Forms and validation
Download
The project is available on the Downloads page on this site.
You must have Visual Studio 2019 Version 16.3 (or higher) installed to run the code.