
9/26/2019 Admin
Creating Blazor Templated Components

A Blazor application is composed of components. These components can be made fully re-usable by creating templated components.
We start with the application created in the article: Blazor Forms and Validation.
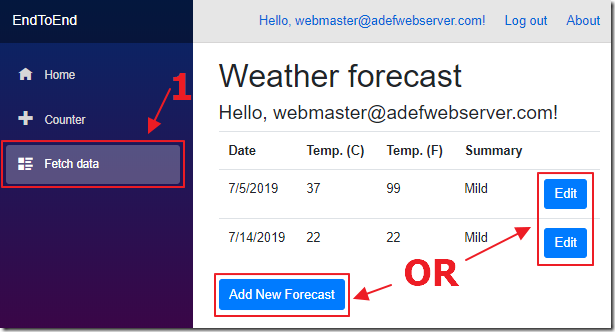
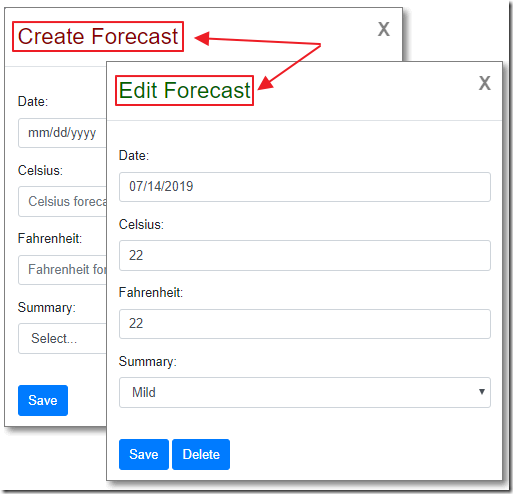
In that application, on the Fetch data page, if we click the Add New Forecast button or the Edit button next to each row…
The popup always displays the title Edit Forecast.
In this article we will create a Templated control that will allow us to replace the title of the popup dialog. We will do this not by simply passing a parameter, but by replacing the user interface elements.
In addition, we will use Blazor templates to create a fully reusable generic template control that can be used with any data type.
Create The Dialog Control
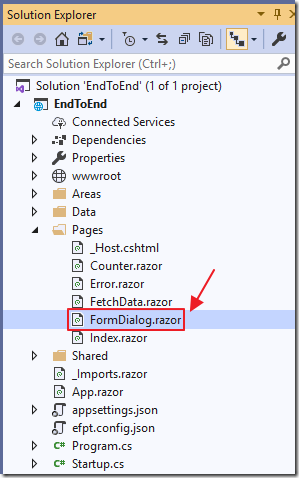
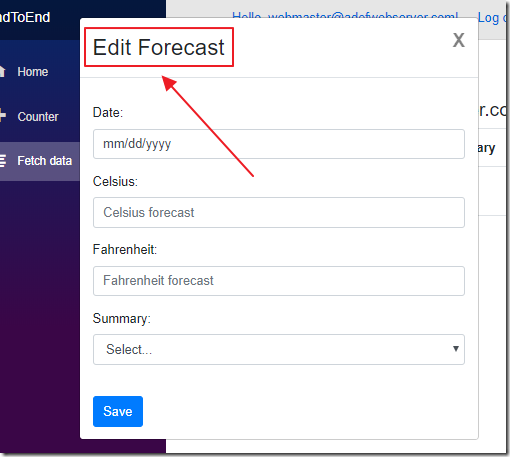
In the Blazor Forms and Validation project, add a new page called FormDialog.razor using the following code:
@using EndToEndDB.Data.EndToEnd
@if (Show)
{
    <!-- This is the popup to create or edit a forecast -->
    <div class="modal" tabindex="-1" style="display:block" role="dialog">
        <div class="modal-dialog">
            <div class="modal-content">
                <div class="modal-header">
                    <h3 class="modal-title">Edit Forecast</h3>
                    <!-- Button to close the popup -->
                    <button type="button" class="close"
                            @onclick="ClosePopup">
                        <span aria-hidden="true">X</span>
                    </button>
                </div>
                <!-- Edit form for the current forecast -->
                <EditForm Context="formContext"
                          Model="objWeatherForecast"
                          OnValidSubmit="SaveForecast">
                    <!-- This will validate the form -->
                    <DataAnnotationsValidator />
                    <ul class="validation-errors">
                        @foreach (
                    var message in formContext.GetValidationMessages()
                    .Where(x => !x.Contains("Summary")))
                        {
                            <li class="validation-message">@message</li>
                        }
                    </ul>
                    <div class="modal-body">
                        <p>
                            <label for="Date">Date: </label>
                            <InputDate id="Date" class="form-control"
                                       placeholder="Date"
                                       @bind-Value="objWeatherForecast.Date" />
                        </p><p>
                            <label for="TemperatureC">Celsius: </label>
                            <InputNumber id="TemperatureC" class="form-control"
                                         placeholder="Celsius forecast"
                                         @bind-Value="objWeatherForecast.TemperatureC" />
                        </p><p>
                            <label for="TemperatureF">Fahrenheit: </label>
                            <InputNumber id="TemperatureF" class="form-control"
                                         placeholder="Fahrenheit forecast"
                                         @bind-Value="objWeatherForecast.TemperatureF" />
                        </p><p>
                            <label for="Summary">Summary: </label>
                            <InputSelect id="Summary" class="form-control"
                                         @bind-Value="objWeatherForecast.Summary">
                                @foreach (var option in SummaryOptions)
                                    {
                                    <option value="@option.OptionValue">
                                        @option.OptionName
                                    </option>
                                    }
                            </InputSelect>
                            <ValidationMessage For="(() => objWeatherForecast.Summary)" />
                        </p>
                        <br />
                        <!-- Button to save the forecast -->
                        <button class="btn btn-primary"
                                type="submit">
                            Save
                        </button>
                        <!-- Only show delete button if not a new record -->
                        @if (objWeatherForecast.Id > 0)
                        {
                            <!-- Button to delete the forecast -->
                            <button class="btn btn-primary"
                                    @onclick="DeleteForecast">
                                Delete
                            </button>
                        }
                    </div>
                </EditForm>
            </div>
        </div>
    </div>
}
@code {
    [Parameter] public bool Show { get; set; }
    [Parameter] public WeatherForecast objWeatherForecast { get; set; }
    [Parameter] public EventCallback DeleteForecast { get; set; }
    [Parameter] public EventCallback ClosePopup { get; set; }
    [Parameter] public EventCallback SaveForecast { get; set; }
    List<WeatherForecastOptions> SummaryOptions = new List<WeatherForecastOptions>() {
    new WeatherForecastOptions() { OptionName = "Select...", OptionValue = " " },
        new WeatherForecastOptions() { OptionName = "Hot", OptionValue = "Hot" },
        new WeatherForecastOptions() { OptionName = "Mild", OptionValue = "Mild" },
        new WeatherForecastOptions() { OptionName = "Cold", OptionValue = "Cold" }};
}
At this point, this is not a templated component. It is essentially a copy of the popup code from the FetchData.razor age.
Open the FetchData.razor page.
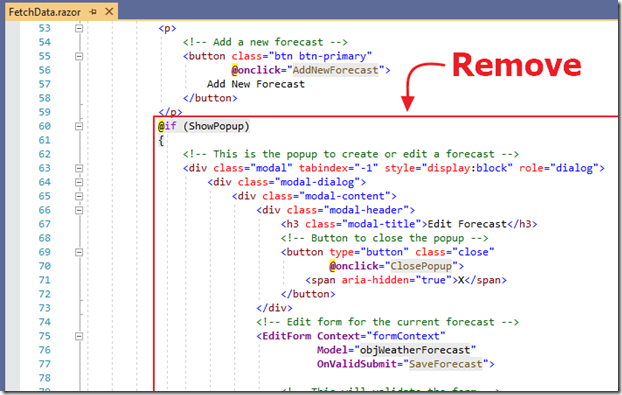
Remove the code for the existing popup.
Replace with two instances of the dialog component we just created, one that will be used for creating new records (ShowNewRecordPopup), and one for editing existing records (ShowEditRecordPopup).
            <FormDialog Show="ShowNewRecordPopup"
                        objWeatherForecast="objWeatherForecast"
                        DeleteForecast="DeleteForecast"
                        ClosePopup="ClosePopup"
                        SaveForecast="SaveForecast">
            </FormDialog>
            <FormDialog Show="ShowEditRecordPopup"
                        objWeatherForecast="objWeatherForecast"
                        DeleteForecast="DeleteForecast"
                        ClosePopup="ClosePopup"
                        SaveForecast="SaveForecast">
            </FormDialog>
Add variables to pass to the new dialogs to control their display:
    bool ShowNewRecordPopup = false;
    bool ShowEditRecordPopup = false;
Change the ClosePopup() method to the following code:
    void ClosePopup()
    {
        // Close the Popups
        ShowNewRecordPopup = false;
        ShowEditRecordPopup = false;
    }
Replace all other instances of ShowPopup with either ShowNewRecordPopup or ShowEditRecordPopup depending on the need to show either the create or edit popup.
For example, change the EditForecast method from:
    void EditForecast(WeatherForecast weatherForecast)
    {
        // Set the selected forecast
        // as the current forecast
        objWeatherForecast = weatherForecast;
        // Open the Popup
        ShowPopup = true;
    }
To:
    void EditForecast(WeatherForecast weatherForecast)
    {
        // Set the selected forecast
        // as the current forecast
        objWeatherForecast = weatherForecast;
        // *** EDIT
        // Open the Popup
        ShowEditRecordPopup = true;
    }
And the AddNewForecast method to:
    void AddNewForecast()
    {
        // Make new forecast
        objWeatherForecast = new WeatherForecast();
        // Set Id to 0 so we know it is a new record
        objWeatherForecast.Id = 0;
        // *** EDIT
        // Open the Popup
        ShowNewRecordPopup = true;
    }

When we run the project, the Add New Forecast, and the Edit button still work, but the title of the dialog is still the same.
(Note: The Delete button on the popup is programmatically set to show only when the record id is not a new record (objWeatherForecast.Id > 0)).
Create The Templated Component
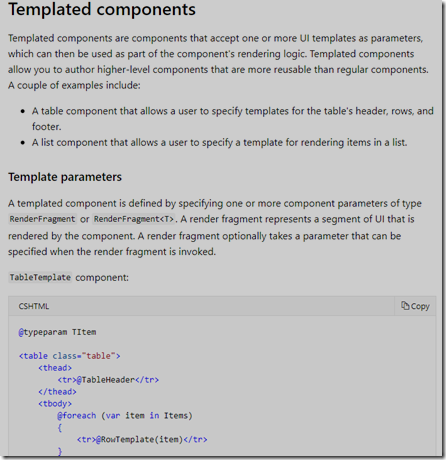
A templated component is a Blazor component that has one or more parameters of type RenderFragment (or the generic RenderFragment<T> demonstrated later).
A RenderFragment parameter accepts User Interface (UI) that is then rendered by the component. This allows you to fully customize the look and feel of the resulting component while still reusing much of the component structure and logic.

Open the FormDialog.razor file.
Add a RenderFragment parameter:
[Parameter] public RenderFragment HeaderContent { get; set; }
Next, To consume the RenderFragment parameter, change the following line:
<h3 class="modal-title">Edit Forecast</h3>
To:
@HeaderContent
To set the content of the RenderFragment parameter, open the FetchData.razor page, and change the following code:
    <FormDialog Show="ShowNewRecordPopup"
                objWeatherForecast="objWeatherForecast"
                DeleteForecast="DeleteForecast"
                ClosePopup="ClosePopup"
                SaveForecast="SaveForecast">
    </FormDialog>
    <FormDialog Show="ShowEditRecordPopup"
                objWeatherForecast="objWeatherForecast"
                DeleteForecast="DeleteForecast"
                ClosePopup="ClosePopup"
                SaveForecast="SaveForecast">
    </FormDialog>
To:
<FormDialog Show="ShowNewRecordPopup"
objWeatherForecast="objWeatherForecast"
DeleteForecast="DeleteForecast"
ClosePopup="ClosePopup"
SaveForecast="SaveForecast">
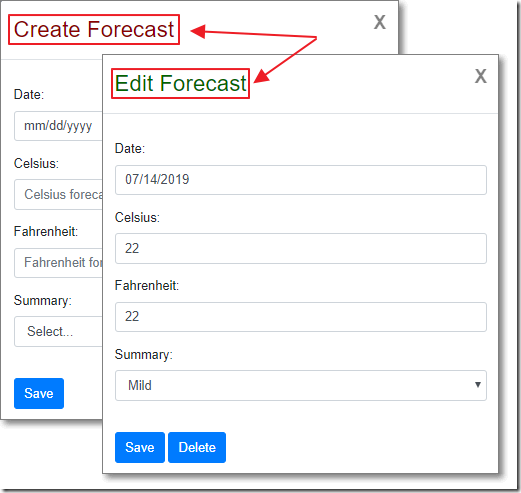
<HeaderContent>
<h3 class="modal-title"
style="color:darkred">
Create Forecast
</h3>
</HeaderContent>
</FormDialog>
<FormDialog Show="ShowEditRecordPopup"
objWeatherForecast="objWeatherForecast"
DeleteForecast="DeleteForecast"
ClosePopup="ClosePopup"
SaveForecast="SaveForecast">
<HeaderContent>
<h3 class="modal-title"
style="color:darkgreen">
Edit Forecast
</h3>
</HeaderContent>
</FormDialog>
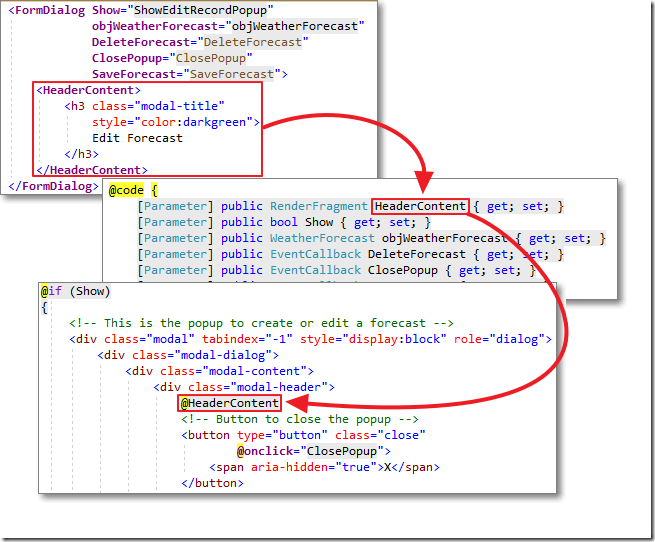
Essentially, we are passing the content for the HeaderContent RenderFragment parameter inside the HeaderContent tags.
Now, when we run the project, each dialog will have customized header content.
Creating A Generic Templated Component
In the preceding templated component example, the data type has to always be a type of WeatherForecast. However, we can create templated components that can work with any data type. The data type can be specified at the time the component is consumed.
The Microsoft Blazor Documentation site provides an example, using @typeparam and RenderFragment<T>, to create a generic template.
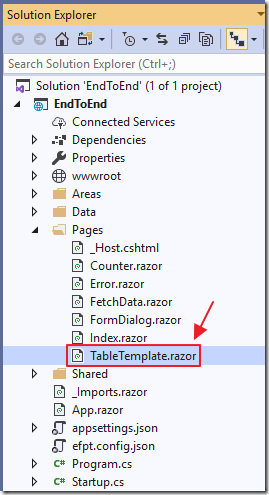
Add a new control called TableTemplate.razor using the following code:
@*To define a generic component*@
@*we use the @typeparam directive to specify *@
@*type parameters*@
@typeparam TItem
@*Create a table*@
<table class="table">
    <thead>
        @*TableHeader will be inserted here*@
        <tr>@TableHeader</tr>
    </thead>
    <tbody>
        @*Items will be iterated at this point*@
        @*Creating a row for each item*@
        @foreach (var item in Items)
        {
            @*The UI markup for the RowTemplate*@
            @*RenderFragment parameter will be*@
            @*applied here*@
            <tr>@RowTemplate(item)</tr>
        }
    </tbody>
    <tfoot>
        @*TableFooter will be inserted here*@
        <tr>@TableFooter</tr>
    </tfoot>
</table>
@code {
    [Parameter]
    public
        RenderFragment TableHeader
    { get; set; }
    [Parameter]
    public
        RenderFragment<TItem> RowTemplate
    { get; set; }
    [Parameter]
    public
        RenderFragment TableFooter
    { get; set; }
    // A collection of any type can be
    // passed for Items
    [Parameter]
    public
        IReadOnlyList<TItem> Items
    { get; set; }
}
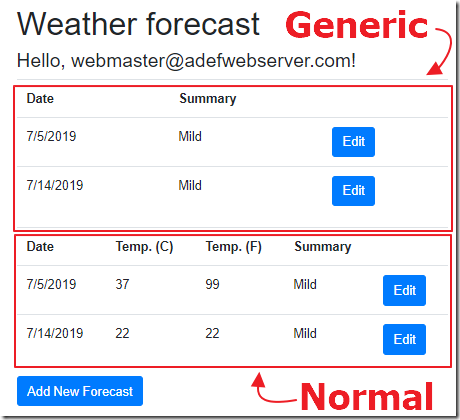
To consume the template, add the following code to the FetchData.razor page:
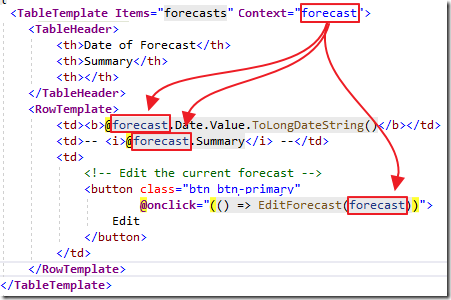
        <TableTemplate Items="forecasts" Context="forecast">
            <TableHeader>
                <th>Date of Forecast</th>
                <th>Summary</th>
                <th></th>
            </TableHeader>
            <RowTemplate>
                <td><b>@forecast.Date.Value.ToLongDateString()</b></td>
                <td>-- <i>@forecast.Summary</i> --</td>
                <td>
                    <!-- Edit the current forecast -->
                    <button class="btn btn-primary"
                            @onclick="(() => EditForecast(forecast))">
                        Edit
                    </button>
                </td>
            </RowTemplate>
        </TableTemplate>
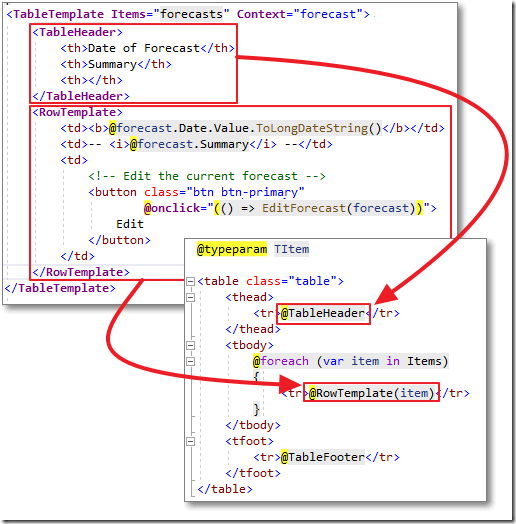
Essentially, we pass in a collection for Items and define custom UI for the @TableHeader and @RowTemplate RenderFragements (we don’t pass a value for the @TableFooter RenderFragement so it will remain blank).
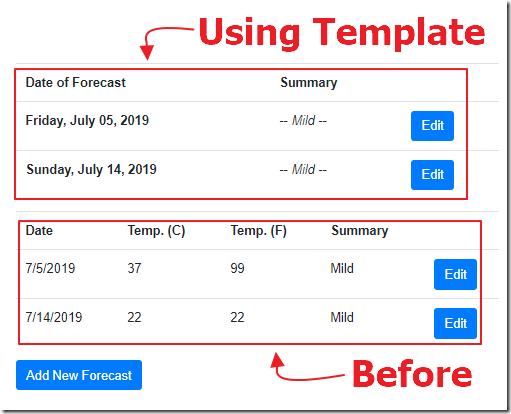
When we run the project, the templated control allows us to customize the instance of the control while retaining the structure and logic of the HTML table.
Note: When you use the generic RenderFragment<T> parameter in your templated component, the type that you pass as <T> will have a variable name of context inside the templated component. However, you can override this by setting the Context= parameter.
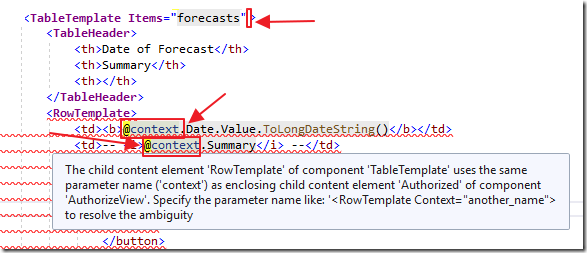
When you have other controls on the page that are already using the default context parameter, you will find that the page will not even build and you will get an error like this:
CS0136 A local or parameter named 'context' cannot be declared in this scope because that name is used in an enclosing local scope to define a local or parameter
or like this:
The child content element 'RowTemplate' of component 'TableTemplate' uses the same parameter name ('context') as enclosing child content element 'Authorized' of component 'AuthorizeView'. Specify the parameter name like: '<RowTemplate Context="another_name"> to resolve the ambiguity
Links
Download
The project is available on the Downloads page on this site.
You must have Visual Studio 2019 Version 16.3 (or higher) installed to run the code.