10/12/2019 Admin
Blazor Microsoft Graph Calendar Example With Active Directory Authentication
You can easily access the Microsoft Graph with Blazor, as well as use Microsoft Azure Active Directory authentication.
The Application

When the application starts up, we have to click the Log in button to log in.
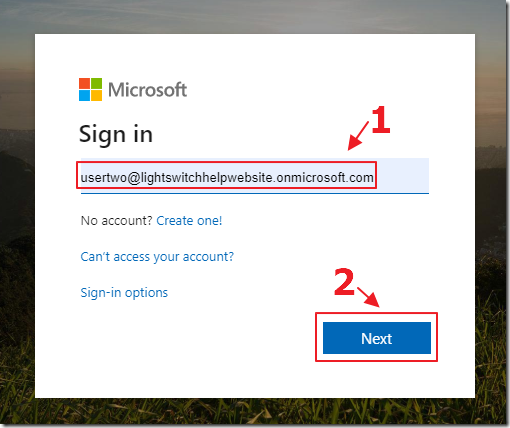
We use an account in our Microsoft Office tenant to log in.
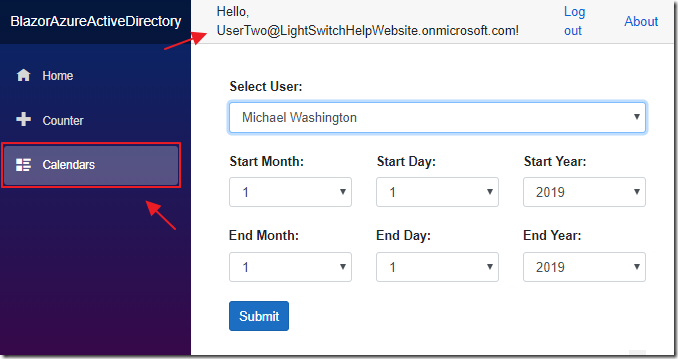
After we log in, our user name will display in the application header.
We can then navigate to the Calendars page.
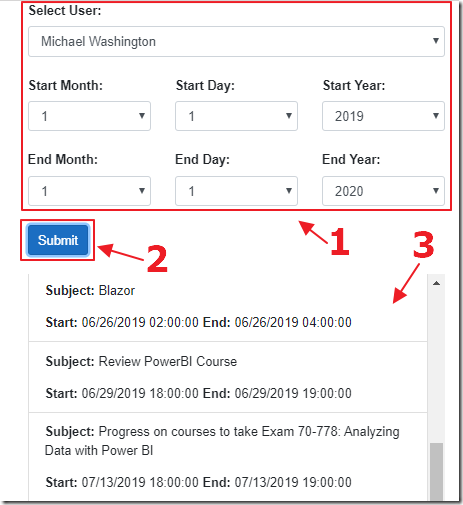
Finally, we can select a user, start and end dates, and click the Submit button to show the calendar events for the selected user during that period.
Note: Even though we are logging in as a user, we are reading the calendars of the users using Application-level authorization not the logged in users permissions. This allows all users to see all calendars.
Get Started – Setup

To work with Calendars, you will need an Office 365 tenant. If you do not have one, you can go to: Welcome to the Office 365 Developer Program for directions to sign up for one.
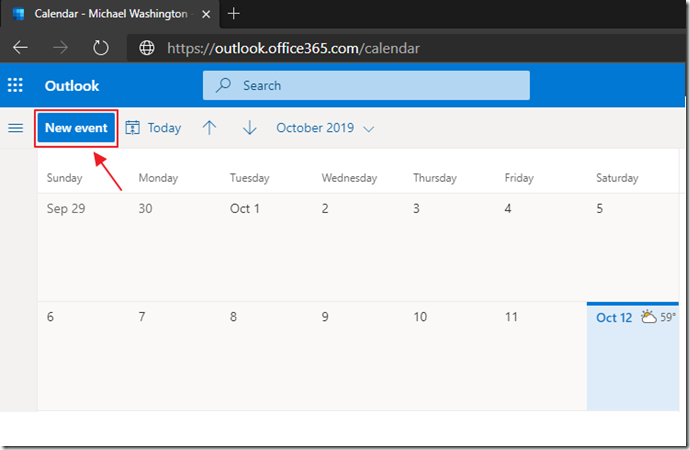
After you create the account, you will want to go to https://outlook.office365.com/calendar and log in and select the calendar and enter some calendar entries.
Create The Application

Open Visual Studio.

Create a new Project.
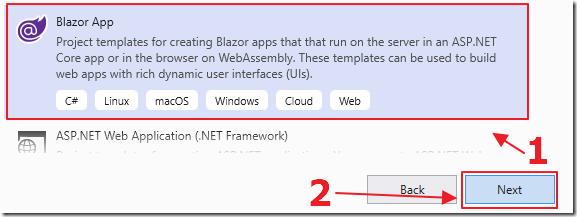
Select Blazor App.
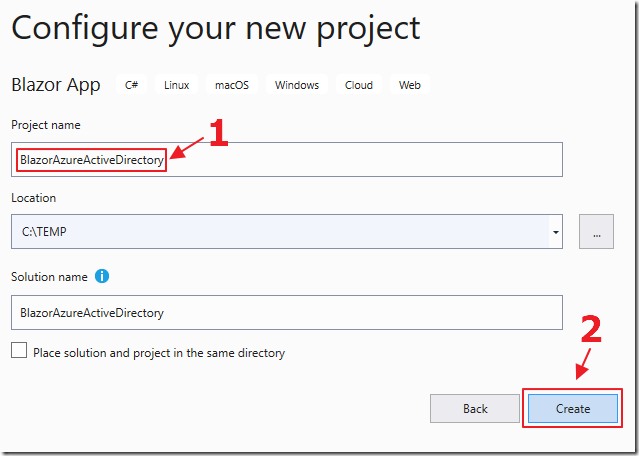
Name the project BlazorAzureActiveDirectory.
Click the Create button.
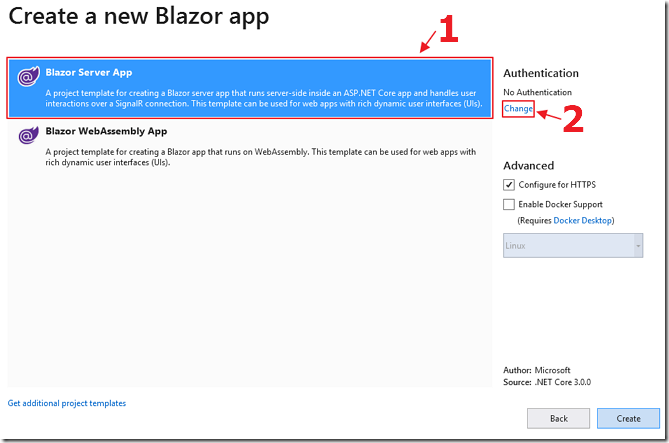
Select Blazor Server App then Change under Authentication.
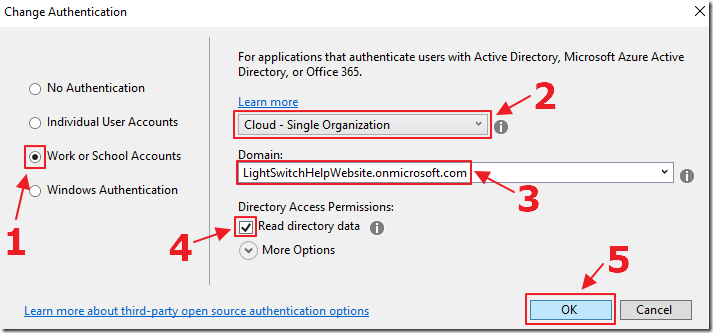
Select the options shown above.
For #3 use the Office tenant you created in the earlier step.
Click the OK button.
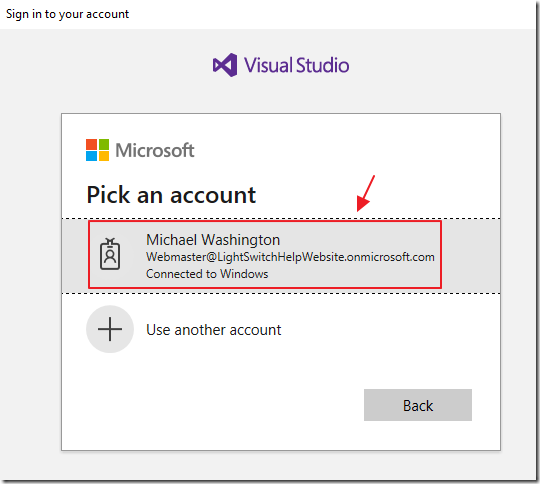
You may be asked to sign in with the Global Administrator account you created.
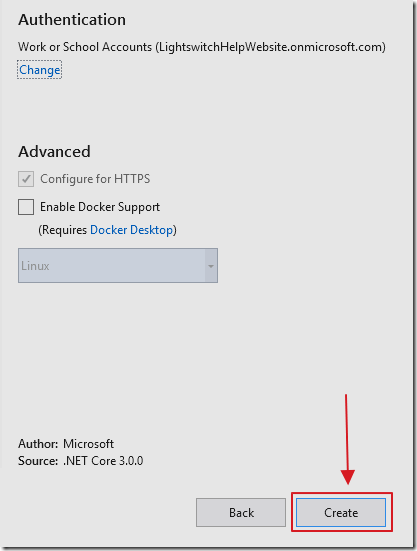
Click Create.
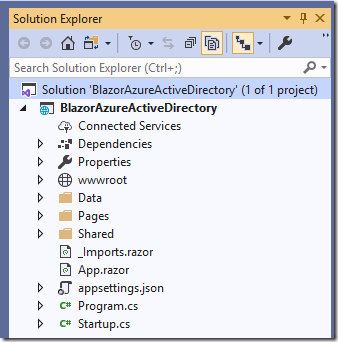
The application will be created and open in Visual Studio.
Get The Client Secret and Set the Permissions
![]()
Using the account you created, log into https://portal.azure.com/ and select the Azure Active Directory node.
![]()
Next, select App registrations.

You will find the application created by the Visual Studio wizard, click on it.
![]()
Select API permissions.
Use the Add a permission button to create the permissions below:

After you have entered the permissions, scroll down to the Grant consent section (that is on the same page)…

Click the Grant admin consent button.

Click Yes.
![]()
Select Certificates & secrets.

Select New client secret.
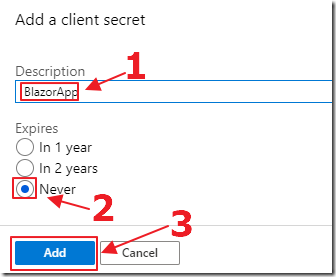
Give it a name, an expiration period, and click the Add button.

The key will display.
Copy it, you will need it for a later step.
Update The Application Configuration
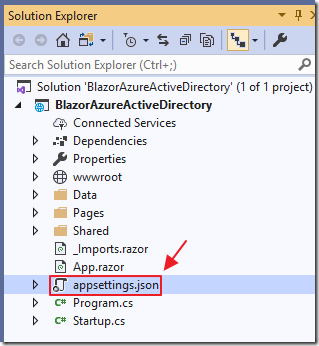
Return to Visual Studio and open the appsettings.json file:
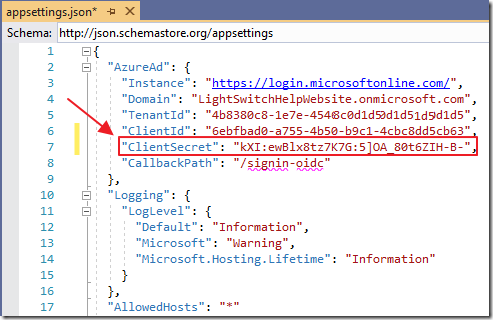
Add an entry for the ClientSecret you copied earlier.
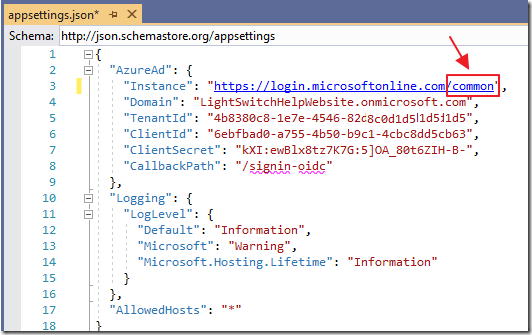
Also, add the word common to the end of the Instance value.
Save, and close the file.

Hit F5 to run the application…
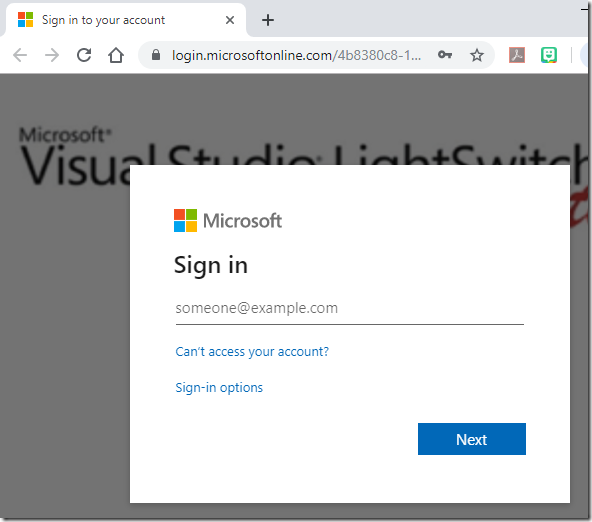
It will open a web browser and immediately ask us to sign in.
We don’t want this.
Close the web browser and return to Visual Studio.
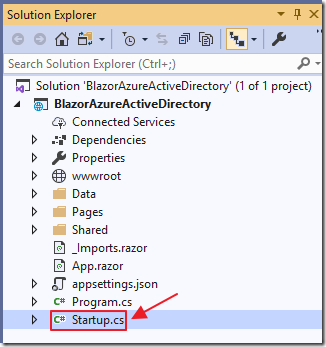
Open the startup.cs file and remove the following lines:
services.AddControllersWithViews(options =>{var policy = new AuthorizationPolicyBuilder().RequireAuthenticatedUser().Build();options.Filters.Add(new AuthorizeFilter(policy));});
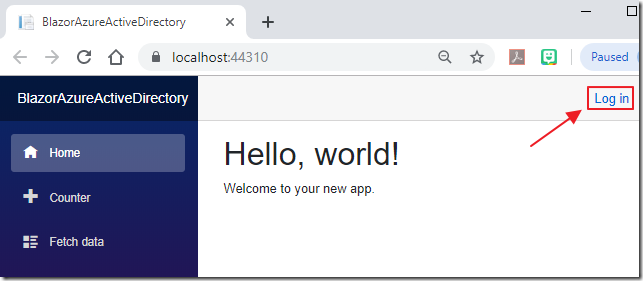
Now when we run the application we see a log in button that we can click to log in.

When we log in, we can see our user name in the application header.
We will also see a button to Log out.
Add Support For Microsoft Graph
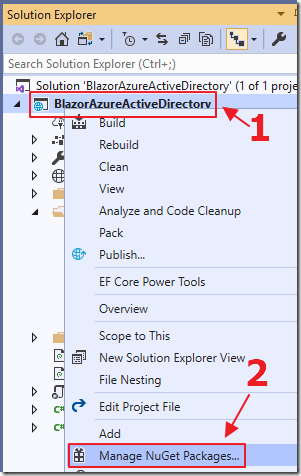
Right-click on the project node and select Manage NuGet Packages…

Install:
- Microsoft.Graph
- Microsoft.Graph.Auth (make sure to check the Include prerelease box)
- Microsoft.Identity.Client
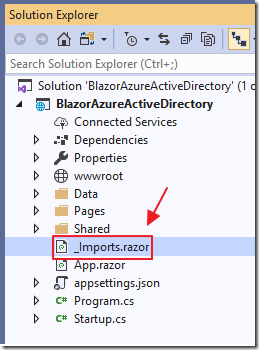
Open the _Imports.razor file and add the following lines:
@using Microsoft.Graph@using Microsoft.Extensions.Configuration@using Microsoft.Graph.Auth
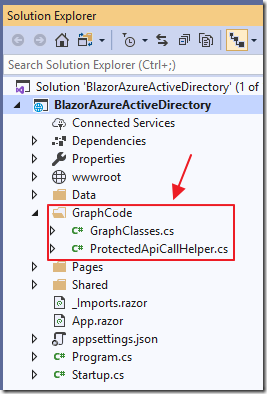
Add a folder called GraphCode and the following files:
GraphClasses.cs
using System;using System.Collections.Generic;using System.Linq;using System.Threading.Tasks;public class GraphUser{public string[] businessPhones { get; set; }public string displayName { get; set; }public string givenName { get; set; }public string jobTitle { get; set; }public string mail { get; set; }public string mobilePhone { get; set; }public object officeLocation { get; set; }public string preferredLanguage { get; set; }public string surname { get; set; }public string userPrincipalName { get; set; }public string id { get; set; }}
ProtectedApiCallHelper.cs
/*The MIT License (MIT)Copyright (c) 2015 Microsoft CorporationPermission is hereby granted, free of charge, to any person obtaining a copyof this software and associated documentation files (the "Software"), to dealin the Software without restriction, including without limitation the rightsto use, copy, modify, merge, publish, distribute, sublicense, and/or sellcopies of the Software, and to permit persons to whom the Software isfurnished to do so, subject to the following conditions:The above copyright notice and this permission notice shall be included in allcopies or substantial portions of the Software.THE SOFTWARE IS PROVIDED "AS IS", WITHOUT WARRANTY OF ANY KIND, EXPRESS ORIMPLIED, INCLUDING BUT NOT LIMITED TO THE WARRANTIES OF MERCHANTABILITY,FITNESS FOR A PARTICULAR PURPOSE AND NONINFRINGEMENT. IN NO EVENT SHALL THEAUTHORS OR COPYRIGHT HOLDERS BE LIABLE FOR ANY CLAIM, DAMAGES OR OTHERLIABILITY, WHETHER IN AN ACTION OF CONTRACT, TORT OR OTHERWISE, ARISING FROM,OUT OF OR IN CONNECTION WITH THE SOFTWARE OR THE USE OR OTHER DEALINGS IN THESOFTWARE.*/using Newtonsoft.Json;using Newtonsoft.Json.Linq;using System;using System.Linq;using System.Net.Http;using System.Net.Http.Headers;using System.Threading.Tasks;/// <summary>/// Helper class to call a protected API and process its result/// </summary>public class ProtectedApiCallHelper{/// <summary>/// Constructor/// </summary>/// <param name="httpClient">HttpClient used to/// call the protected API</param>public ProtectedApiCallHelper(HttpClient httpClient){HttpClient = httpClient;}protected HttpClient HttpClient { get; private set; }/// <summary>/// Calls the protected Web API and processes the result/// </summary>/// <param name="webApiUrl">Url of the Web API to call/// (supposed to return Json)</param>/// <param name="accessToken">Access token used as a bearer/// security token to call the Web API</param>/// <param name="processResult">Callback used to process the result/// of the call to the Web API</param>public async Task CallWebApiAndProcessResultASync(string webApiUrl,string accessToken,Action<JObject> processResult){if (!string.IsNullOrEmpty(accessToken)){var defaultRequetHeaders = HttpClient.DefaultRequestHeaders;if (defaultRequetHeaders.Accept == null ||!defaultRequetHeaders.Accept.Any(m => m.MediaType == "application/json")){HttpClient.DefaultRequestHeaders.Accept.Add(new MediaTypeWithQualityHeaderValue("application/json"));}defaultRequetHeaders.Authorization =new AuthenticationHeaderValue("bearer", accessToken);HttpResponseMessage response =await HttpClient.GetAsync(webApiUrl);if (response.IsSuccessStatusCode){string json = await response.Content.ReadAsStringAsync();JObject result = JsonConvert.DeserializeObject(json) as JObject;processResult(result);}else{string content =await response.Content.ReadAsStringAsync();// Note that if you got reponse.Code == 403// and reponse.content.code == "Authorization_RequestDenied"// this is because the tenant admin as not granted// consent for the application to call the Web APIConsole.WriteLine($"Content: {content}");}}}}
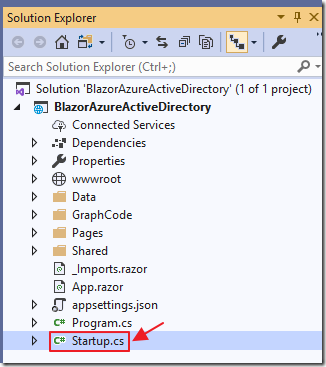
Open the startup.cs file and add the following line to the public void ConfigureServices(IServiceCollection services) section:
services.AddHttpClient<ProtectedApiCallHelper>();
Add Calendar Search Page
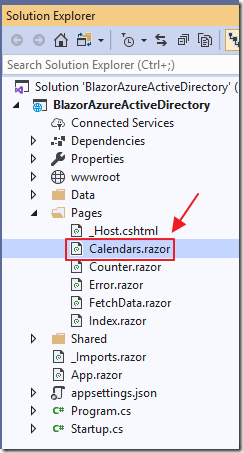
Add a new page called Calendars.razor (also add a link to it in the navigation menu) using the following code:
@page "/calendars"@using Microsoft.Identity.Client;@using Newtonsoft.Json;@using Newtonsoft.Json.Linq;@inject IConfiguration _configuration@inject ProtectedApiCallHelper ProtectedApiCallHelper
Next add the following page markup code:
<!-- AuthorizeView allows us to only show sections of the page --><!-- based on the security on the current user --><AuthorizeView><!-- Show this section if the user is logged in --><Authorized><br /><div class="container-fluid"><div class="row"><div class="col-sm-12"><label><b>Select User:</b></label><select class="form-control"@bind="@UserId">@foreach (var user incolGraphUsers.OrderBy(x => x.displayName)){<option value="@user.id">@user.displayName</option>}</select></div></div></div></Authorized><!-- Show this section if the user is not logged in --><NotAuthorized><p>You must be logged in to use this page</p></NotAuthorized></AuthorizeView>
Finally add the following procedure code:
@code {string strError = "";string UserId = "";int intStartMonth = 1;int intStartDay = 1;int intStartYear = 2019;int intEndMonth = 1;int intEndDay = 1;int intEndYear = 2019;List<GraphUser> colGraphUsers = new List<GraphUser>();List<Calendar> colCalendars = new List<Calendar>();DateTime StartDateValue, EndDateValue;List<int> colMonths = Enumerable.Range(1, 12).ToList();List<int> colDays = Enumerable.Range(1, 31).ToList();List<string> colYears = new List<string>() { "2018", "2019", "2020", "2021" };protected override async Task OnInitializedAsync(){try{IConfidentialClientApplication confidentialClientApplication =ConfidentialClientApplicationBuilder.Create(_configuration["AzureAd:ClientId"]).WithTenantId(_configuration["AzureAd:TenantId"]).WithClientSecret(_configuration["AzureAd:ClientSecret"]).Build();// With client credentials flows the scopes is ALWAYS of the shape// "resource/.default", as the// application permissions need to be set statically// (in the portal or by PowerShell),// and then granted by a tenant administratorstring[] scopes = new string[] { "https://graph.microsoft.com/.default" };AuthenticationResult result = null;result = await confidentialClientApplication.AcquireTokenForClient(scopes).ExecuteAsync();var httpClient = new HttpClient();var apiCaller = new ProtectedApiCallHelper(httpClient);await apiCaller.CallWebApiAndProcessResultASync("https://graph.microsoft.com/v1.0/users",result.AccessToken,DisplayUsers);}catch (Exception ex){strError = ex.GetBaseException().Message;}}private void DisplayUsers(JObject result){colGraphUsers = new List<GraphUser>();foreach (JProperty child in result.Properties().Where(p => !p.Name.StartsWith("@"))){colGraphUsers.AddRange(child.Value.ToObject<List<GraphUser>>());}// If there are users set the first as the defaultif (colGraphUsers.Count > 0){UserId = colGraphUsers.OrderBy(x => x.displayName).FirstOrDefault().id;}}}
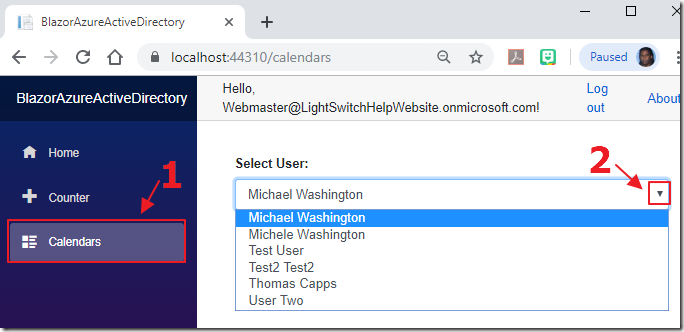
When we run the application, log in, and navigate to the Calendars page, we will see a dropdown that will show us the users in our Microsoft Office tenant.
Next, add the following markup to the page:
<div class="row"><div class="col-sm-4"><br /><label><b>Start Month:</b></label><select class="form-control"@bind="@intStartMonth">@foreach (var month in colMonths){<option value="@month">@month</option>}</select></div><div class="col-sm-4"><br /><label><b>Start Day:</b></label><select class="form-control"@bind="@intStartDay">@foreach (var day in colDays){<option value="@day">@day</option>}</select></div><div class="col-sm-4"><br /><label><b>Start Year:</b></label><select class="form-control"@bind="@intStartYear">@foreach (var year in colYears){<option value="@year">@year</option>}</select></div></div><div class="row"><div class="col-sm-4"><br /><label><b>End Month:</b></label><select class="form-control"@bind="@intEndMonth">@foreach (var month in colMonths){<option value="@month">@month</option>}</select></div><div class="col-sm-4"><br /><label><b>End Day:</b></label><select class="form-control"@bind="@intEndDay">@foreach (var day in colDays){<option value="@day">@day</option>}</select></div><div class="col-sm-4"><br /><label><b>End Year:</b></label><select class="form-control"@bind="@intEndYear">@foreach (var year in colYears){<option value="@year">@year</option>}</select></div></div><div class="row"><div class="col-sm-3" style="text-align:left"><br /></div><div class="col-sm-9" style="text-align:left"><br /><span style="color:red"><b>@strError</b></span></div></div></div>
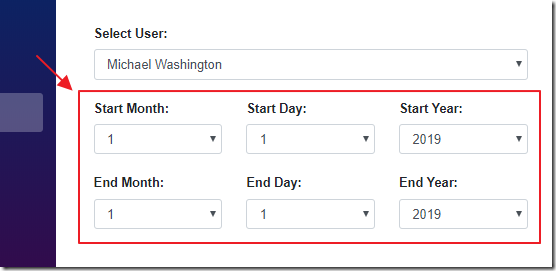
When we run the application, we now see we have the ability to select the start and end dates.
Add the markup for a Submit button:
<button class="btn btn-primary"@onclick="Submit">Submit</button>
Add the methods to handle the Submit button and to generate the display the calendar:
async Task Submit(){strError = "";// Try to create valid start and Stop datesstring dateString;dateString = $"{intStartMonth}/{intStartDay}/{intStartYear}";if (!DateTime.TryParse(dateString, out StartDateValue)){strError = "Start Date is not valid";return;}dateString = $"{intEndMonth}/{intEndDay}/{intEndYear}";if (!DateTime.TryParse(dateString, out EndDateValue)){strError = "End Date is not valid";return;}try{IConfidentialClientApplication confidentialClientApplication =ConfidentialClientApplicationBuilder.Create(_configuration["AzureAd:ClientId"]).WithTenantId(_configuration["AzureAd:TenantId"]).WithClientSecret(_configuration["AzureAd:ClientSecret"]).Build();string[] scopes = new string[] { "https://graph.microsoft.com/.default" };AuthenticationResult result = null;result = await confidentialClientApplication.AcquireTokenForClient(scopes).ExecuteAsync();var httpClient = new HttpClient();var apiCaller = new ProtectedApiCallHelper(httpClient);await apiCaller.CallWebApiAndProcessResultASync($"https://graph.microsoft.com/v1.0/users/{UserId}/calendar/" +$"calendarView?startDateTime={intStartYear}-{intStartMonth}-{intStartDay}" +$"&endDateTime={intEndYear}-{intEndMonth}-{intEndDay}", result.AccessToken,DisplayCalendars);}catch (Exception ex){strError = ex.GetBaseException().Message;}}private void DisplayCalendars(JObject result){colCalendars = new List<Calendar>();foreach (JProperty child in result.Properties().Where(p => !p.Name.StartsWith("@"))){colCalendars.AddRange(child.Value.ToObject<List<Calendar>>());}}
Add the markup to display the calendar:
<div class="row"><div class="col-sm-12" style="text-align:left"><br /><ul class="list-group"style="height: 500px; overflow-y: scroll;">@foreach (var calendar in colCalendars){<li class="list-group-item"><p><b>Subject:</b>@calendar.AdditionalData["subject"]</p><div><b>Start:</b>@FormatJSONDate(calendar.AdditionalData["start"].ToString())<b>End:</b>@FormatJSONDate(calendar.AdditionalData["end"].ToString())</div></li>}</ul></div></div>
Finally add the method to format the dates and times:
public string FormatJSONDate(string json){JObject jObject = JObject.Parse(json);var dateTime = (string) jObject["dateTime"];var timeZone = (string) jObject["timeZone"];return dateTime;}
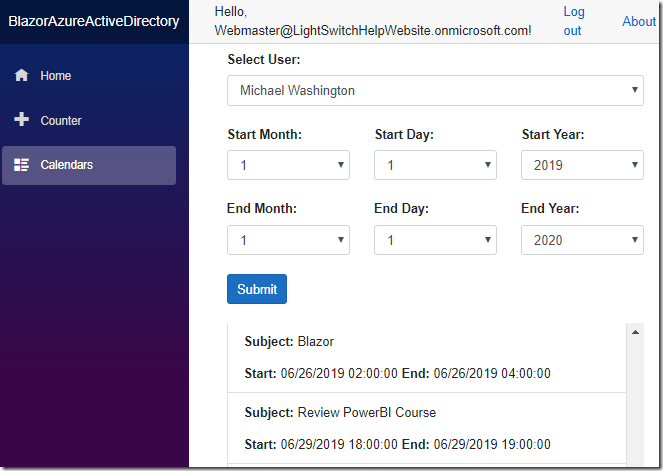
When we run the application, it works.
Links
Microsoft Account external login setup with ASP.NET Core
Microsoft Graph - Get access without a user
Build .NET Core apps with Microsoft Graph
Welcome to the Office 365 Developer Program
Download
The project is available on the Downloads page on this site.
You must have Visual Studio 2019 (or higher) installed to run the code.
