
11/21/2019 Admin
Creating A Rich Text Editor In Blazor Using Quill
You can easily implement a Rich Text Editor in your Blazor applications using the free open source component called Quill.
Setup
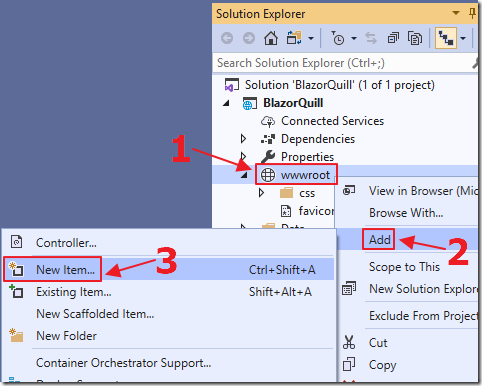
Create a new Server Side Blazor project and right-click on the wwwroot folder and select Add then New Item…
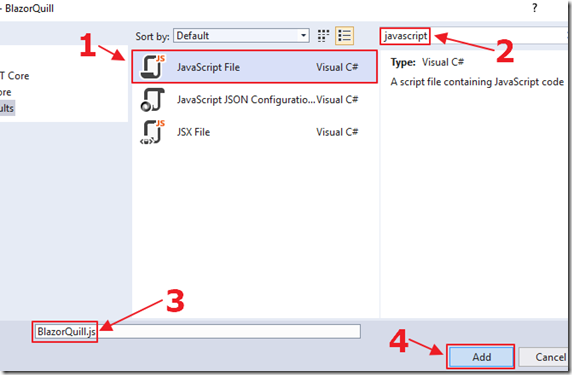
Create a JavaScript file called BlazorQuill.js.
For the file, use the following content:
(function () {
    window.QuillFunctions = {
        createQuill: function (quillElement) {
            var options = {
                debug: 'info',
                modules: {
                    toolbar: '#toolbar'
                },
                placeholder: 'Compose an epic...',
                readOnly: false,
                theme: 'snow'
            };
            // set quill at the object we can call
            // methods on later
            new Quill(quillElement, options);
        }
    };
})();
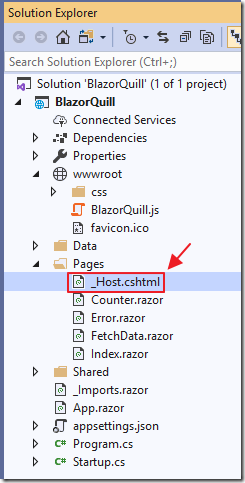
Open the _Host.cshtml file and add the following .css references to the Head section (above the bootstrap .css lines):
    <!-- Quill stylesheet -->
    <link href="//cdn.quilljs.com/1.3.6/quill.snow.css" rel="stylesheet">
    <link href="//cdn.quilljs.com/1.3.6/quill.bubble.css" rel="stylesheet">
Next, add the following lines to the Body section (below the blazor.server.js reference):
    <!-- Quill library -->
    <script src="https://cdn.quilljs.com/1.3.6/quill.js"></script>
    <script src="BlazorQuill.js"></script>

Open the Index.razor file and change all the content to the following:
@page "/"
@*Inject JSRuntime to allow JavaScript Interop *@
@inject IJSRuntime JSRuntime
@if (EditorEnabled)
{
    <div id="toolbar">
        <span class="ql-formats">
            <select class="ql-font">
                <option selected=""></option>
                <option value="serif"></option>
                <option value="monospace"></option>
            </select>
            <select class="ql-size">
                <option value="small"></option>
                <option selected=""></option>
                <option value="large"></option>
                <option value="huge"></option>
            </select>
        </span>
        <span class="ql-formats">
            <button class="ql-bold"></button>
            <button class="ql-italic"></button>
            <button class="ql-underline"></button>
            <button class="ql-strike"></button>
        </span>
        <span class="ql-formats">
            <select class="ql-color"></select>
            <select class="ql-background"></select>
        </span>
        <span class="ql-formats">
            <button class="ql-list" value="ordered"></button>
            <button class="ql-list" value="bullet"></button>
            <button class="ql-indent" value="-1"></button>
            <button class="ql-indent" value="+1"></button>
            <select class="ql-align">
                <option selected=""></option>
                <option value="center"></option>
                <option value="right"></option>
                <option value="justify"></option>
            </select>
        </span>
        <span class="ql-formats">
            <button class="ql-link"></button>
        </span>
    </div>
}
<div @ref="@divEditorElement" />
@code {
    private string strSavedContent = "";
    private ElementReference divEditorElement;
    private string EditorContent;
    private string EditorHTMLContent;
    private bool EditorEnabled = true;
    protected override async Task OnAfterRenderAsync(bool firstRender)
    {
        if (firstRender)
        {
            await JSRuntime.InvokeAsync<string>(
                "QuillFunctions.createQuill", divEditorElement);
        }
    }
}
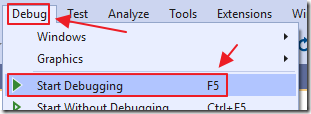
Hit F5 to run the application.
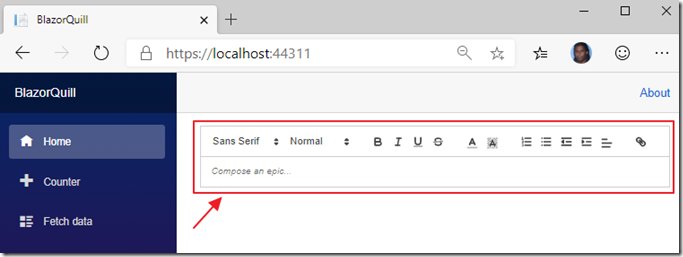
The Quill Rich Text Editor will appear.
Programmatically Get Content
The Quill control provides the content as Text, HTML, or its native Delta format.
Add the following buttons to the markup section in the Index.razor page:
<br />
<button class="btn btn-primary" @onclick="GetText">Get Text</button>
<button class="btn btn-primary" @onclick="GetHTML">Get HTML</button>
<button class="btn btn-primary" @onclick="GetEditorContent">Get Content</button>
<br />
Also add some Divs to display the content:
<br />
<div>
    @EditorContent
</div>
<div>
    @((MarkupString)@EditorHTMLContent)
</div>
In the @code section implement the methods:
    async Task GetText()
    {
        EditorHTMLContent = "";
        EditorContent = await JSRuntime.InvokeAsync<string>(
            "QuillFunctions.getQuillText", divEditorElement);
    }
    async Task GetHTML()
    {
        EditorContent = "";
        EditorHTMLContent = await JSRuntime.InvokeAsync<string>(
            "QuillFunctions.getQuillHTML", divEditorElement);
    }
    async Task GetEditorContent()
    {
        EditorHTMLContent = "";
        EditorContent = await JSRuntime.InvokeAsync<string>(
            "QuillFunctions.getQuillContent", divEditorElement);
    }
Finally, in the BlazorQuill.js file, add the following code under the createQuill method:
        ,
        getQuillContent: function (quillControl) {
            return JSON.stringify(quillControl.__quill.getContents());
        },
        getQuillText: function (quillControl) {
            return quillControl.__quill.getText();
        },
        getQuillHTML: function (quillControl) {
            return quillControl.__quill.root.innerHTML;
        }

When we run the application, we can enter rich text in the editor, and programmatically display it.
Saving And Loading Content
If we want to save and load content into the Quill editor, for example, to persist to a database, we can implement it in the following way.
Add the following buttons:
<br />
<button class="btn btn-danger" @onclick="SaveContent">Save Content</button>
<button class="btn btn-success" @onclick="LoadContent">Load Saved Content</button>
<br />
Add the methods to implement the buttons:
    async Task SaveContent()
    {
        strSavedContent = await JSRuntime.InvokeAsync<string>(
            "QuillFunctions.getQuillContent", divEditorElement);
    }
    async Task LoadContent()
    {
        var QuillDelta = await JSRuntime.InvokeAsync<object>(
            "QuillFunctions.loadQuillContent", divEditorElement, strSavedContent);
    }
Finally, in the BlazorQuill.js file, add the following code under the getQuillHTML method:
        ,
        loadQuillContent: function (quillControl, quillContent) {
            content = JSON.parse(quillContent);
            return quillControl.__quill.setContents(content, 'api');
        },
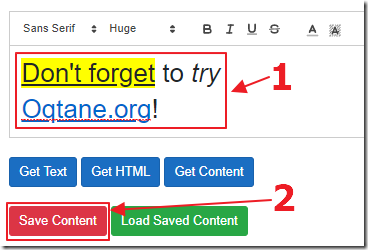
When we run the application, we can enter text, and click the Save Content button.
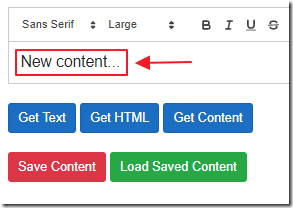
Clear the content and enter new content…

Click Load Saved Content, and have the original content come back.
Disable The Editor
While it is possible to load and save Text or HTML content from the control and display that content on any page, to display content in the Quill editor native Delta format, you have to load that content into the Quill editor control.
When you want the content to be read only, you will want to disable the editor. You can do that programmatically by adding a button:
<br />
<button class="btn btn-info" @onclick="DisableQuillEditor">Disable Editor</button>
<br />
A method to implement the button:
    async Task DisableQuillEditor()
    {
        EditorEnabled = false;
        await JSRuntime.InvokeAsync<object>(
            "QuillFunctions.disableQuillEditor", divEditorElement);
    }
…and a method in the BlazorQuill.js file:
        ,
        disableQuillEditor: function (quillControl) {
            quillControl.__quill.enable(false);
        }
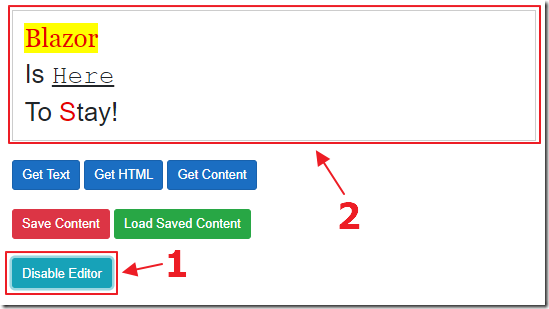
Clicking the Disable Editor button will put the editor in read only mode.
Links
Download
The project is available on the Downloads page on this site.
You must have Visual Studio 2019 (or higher) installed to run the code.